The guitar is now just about completed. Just a few additional
fabrication steps are needed: construction and installation of the neck
reinforcing truss rod and cover plate, installation of the tuning
machines, fabrication of the nut and saddle, and attachment of the
pickguard.
Truss Rod
The truss rod is a reinforcing rod that is placed in the neck of a
guitar to help to counteract the tendency of the strings to cause the
neck to "bow" or arch toward the fingerboard. The strings place a great
deal of tension on the neck - for light gauge acoustic guitar strings
in standard tuning, the strings exert approximately 150 lbs of force on
the neck. Since the strings pass over the fretboard and are
consequently offset from the centerline of the neck, they cause the
neck to bow slightly, just as the string of an archer's bow causes the
bowframe to curve. For an archer's bow, this bending is of course the
desired effect, but for a guitar a significantly bowed neck makes the
instrument difficult to play as the strings will be high above the
(arched) fretboard and consequently difficult to push down onto the
frets.
However, paradoxically, a slight bow in the neck is actually desirable
to allow the action to be set low without the strings "buzzing" on the
frets. When the strings vibrate, they naturally move more in the middle
of the strings than at the ends, since the ends are fixed at the nut
and saddle. In fact, the motion of the string forms an oval-shaped
"envelope" from end to end, with the ends being motionless (resting on
the saddle and nut) and the center moving up and down the most. As the
string flexes up and down, it will be curved up when it's at its
highest point (furthest from the fretboard) and curved down when it is
at its lowest point (closest to the fretboard)). It is at this low
point that the string can hit the frets and cause a buzz. A slight bow
in the fretboard can keep this from happening by having the fretboard
arch match the curved envelope of the vibrating string. This slight
arching of the fretboard is called relief, and can be seen by sighting
down along the fretboard from the peghead. On a properly set up
instrument, the frets will be seen not to lie exactly in a plane, i.e.,
the fretboard will not be perfectly flat.
Thus the string tension actually does something that we want - putting
relief into the fretboard - but will generally induce too much bowing.
The trussrod is intended to counteract the tendency of the strings to
bow the neck, and create just the amount of relief that we want (more
on the correct amount in the section on setting up the instrument). Two
different types of truss rod have been used: fixed and adjustable. A
fixed truss rod is just a stiffening rod embedded into the neck to help
keep it from arching when the strings are brought up to tension. While
this will help keep the strings from putting too much bow into the
neck, it provides no adjustability if the amount of bow isn't exactly
as desired. An adjustable truss rod applies a bending force in the neck
that opposes that of the strings by tightening a screw or nut.
Adjustable truss rods can further be subdivided into "one way" and "two
way" adjustable rods. A one way adjustable rod can only apply
force to counteract the bending applied by the strings, while a two-way
rod can apply a force in either direction, to bow the neck either up or
down. The latter is useful in cases where the strings don't exert
enough force to put sufficient bow into the neck to give us the relief
(arching) that we need to prevent the strings from buzzing; in this
case a two-way rod can actually help the strings to put a little
additional bow into the neck. But this is usually necessary only if the
neck has warped to take on a "back bow", or if the neck is too heavily
built to begin with. I use just a one-way adjustable rod, since I build
relatively thin necks that the strings have no difficulty putting
plenty of bow into with their natural tension.
The one-way rod that I use is ingenious and pretty much foolproof - I
believe the original concept is attributed to luthier Michael Gurian.
In this design the rod is not even glued to the neck, so is easily
removable if there are ever problems (which I've never had), and
applies just a pure bending moment to the neck without any compressive
forces as in earlier "bent rod" designs. Finally, it's easy to make.
The theory of operation is quite simple, too. If you have two bars
attached at the ends, one above the other, and you shorten the bottom
bar but not the top, then the two-bar assembly is going to bend itself
downward to form a circular arch. If this assembly is inside a guitar
neck, it will try to push the neck into this arch as well.
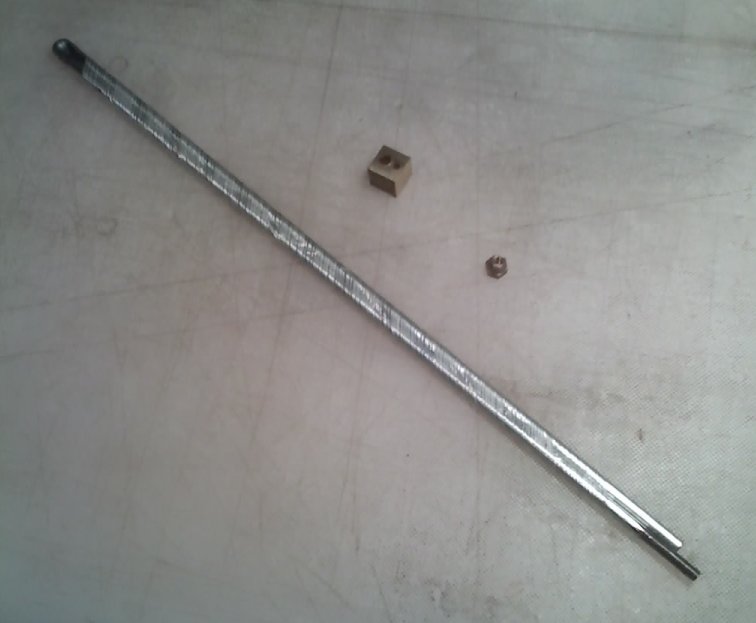
The rod consists of a piece of 3/16" steel rod, threaded at one end,
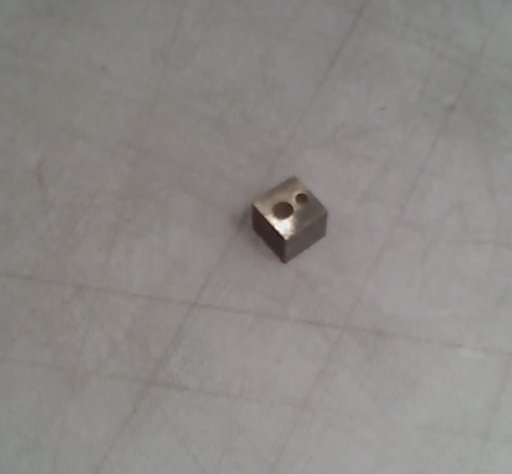
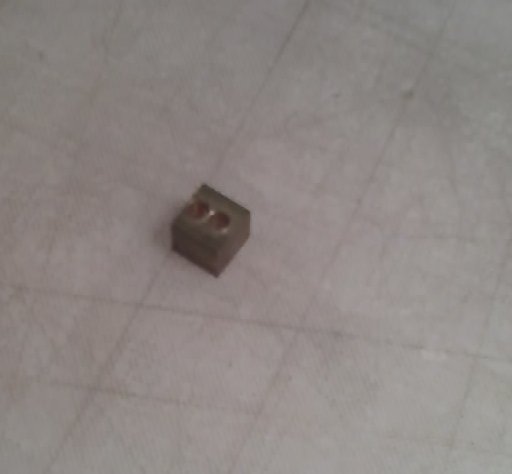
doubled back on itself, and installed into a special brass end block
with a brass nut. The photo below shows the brass end block. This
consists of a 1/2" brass cube that has two 3/16" holes drilled right
next to one another. The only thing special is that one of the holes is
"stopped" - it doesn't go all the way through to the other side of the
block, but stops about 1/8" from the end. The photos below show the two
sides of the block; note that the "stopped" hole has just the 1/8"
pilot hole going through.
A 3/16" steel rod is then threaded about 1" on one end, and then bent
back on itself. The length of the rod is chosen so the bent rod will
fit into the slot routed into the neck; the rod should go about to the
end of that slot. I usually find the slot is about 13" long, so I use a
rod about 26" long. When doubled-over, the unthreaded end of the rod
should be about 3/8" or 1/2" shorter than the threaded end.
The rod is then wrapped diagonally with fiberglass-reinforced packing
tape to hold the two rods together when tension is applied to the nut.
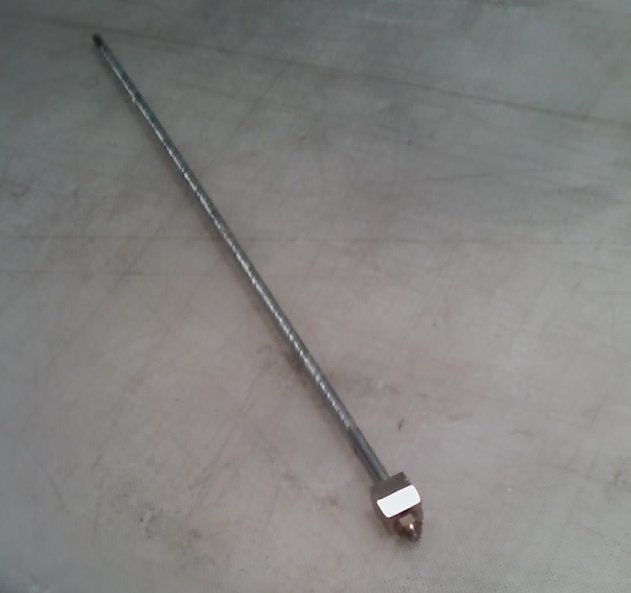
The doubled-over rod is then inserted into the brass end block, with
the threaded end going through the "through" hole and the unthreaded
end going into the "stopped" hole. The threaded portion is longer, and
should stick out about 1/4". A small flat is then filed onto the brass
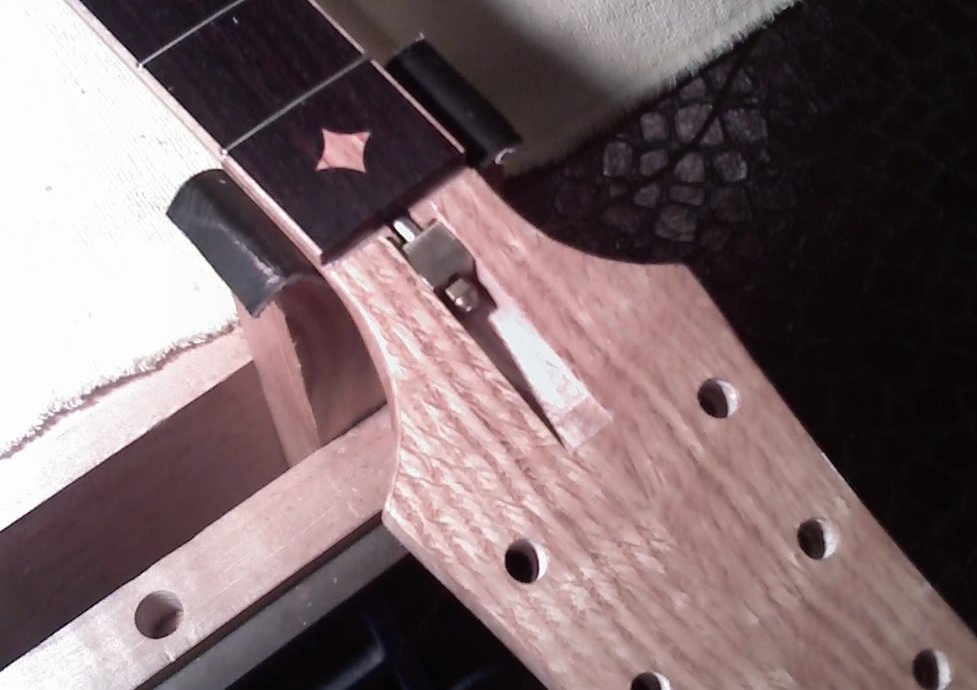
end block so it won't stick up above the angled peghead surface when it
is installed (see following photo).
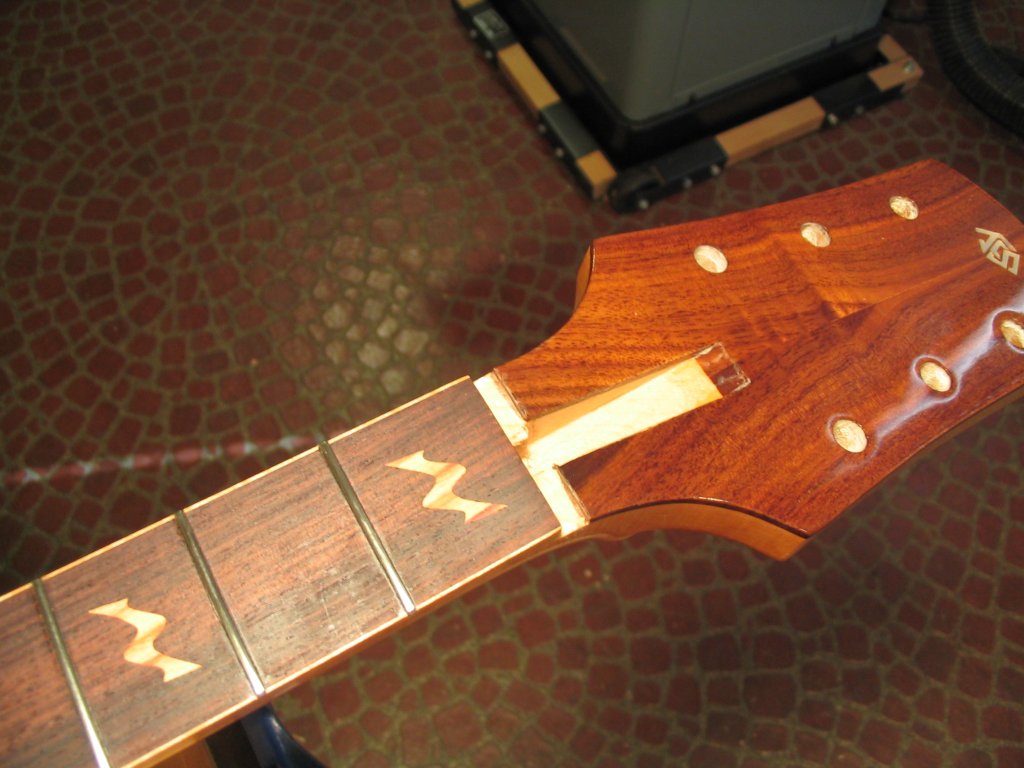
The completed rod can then be inserted into the truss rod slot in the
neck. The friction of the tape should keep it from falling out before
the nut is tightened; once the nut is tightened to counteract the
string force the rod will wedge itself tightly against the neck slot as
it tries to bend itself backwards. Note the small angled flat on the
end block that keeps the block from protruding above the surface of the
peghead.
Tuning Machines
The installation of the tuning machines is straightforward; the only
trick is that the shaft diameter is usually 10mm, and so will require a
little reaming of the holes drilled in the peghead (which will also
remove any finish that has gotten into the hole during the finishing
process.
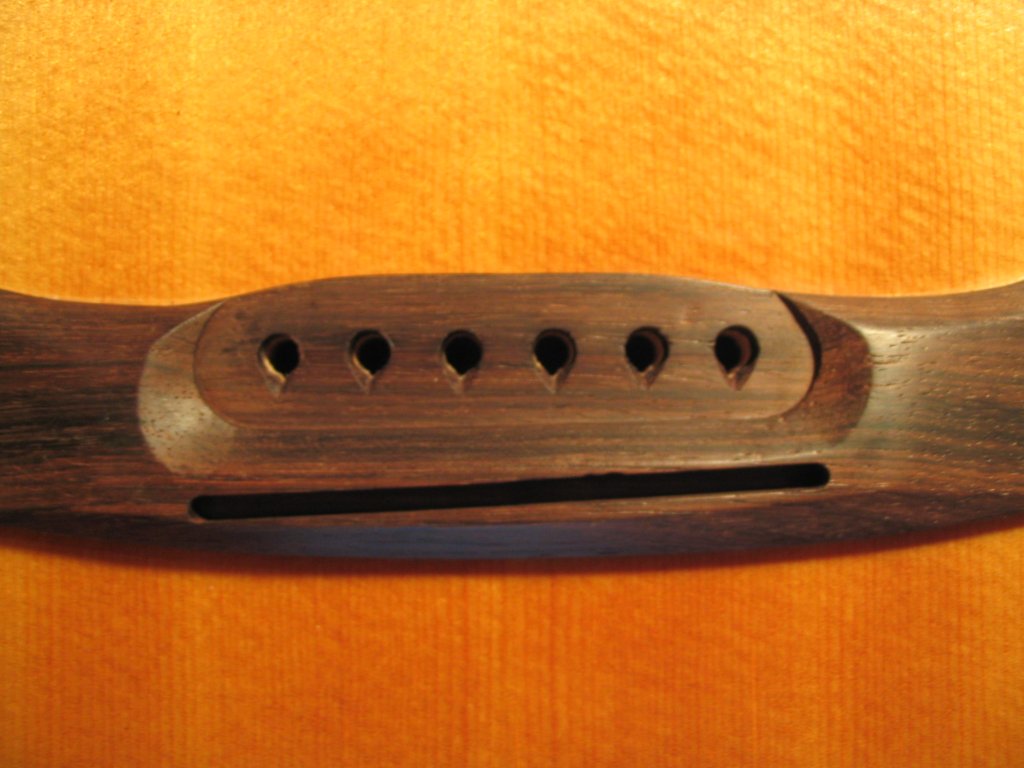
Bridge Pin Fitting
The pins used to secure the string ball-ends to the bridge need to be
fitted to the string holes in the bridge. Since each pin will vary
slightly in diameter, particularly ebony or other wood pins, it is
necessary to ream each hole to fit its specific pin and then keep each
pin associated with its hole until the strings are installed. The holes
are reamed with a tapered reamer whose taper matches that of the pins.
Each hole is reamed until its associated pin seats tightly with a firm
push.
The front edge of each hole can then be relieved with a knife to break
the hard edge where the string will pass over. The front side of the
hole will also need to be notched to allow the string to pass between
the pin and the hole - while the pin has a notch cut along its length
for this purpose, it's usually not sufficiently deep to allow the pin
to be pushed all the way down when the string is installed. The notch
will naturally be bigger in the holes for the larger (lower-pitched)
strings.
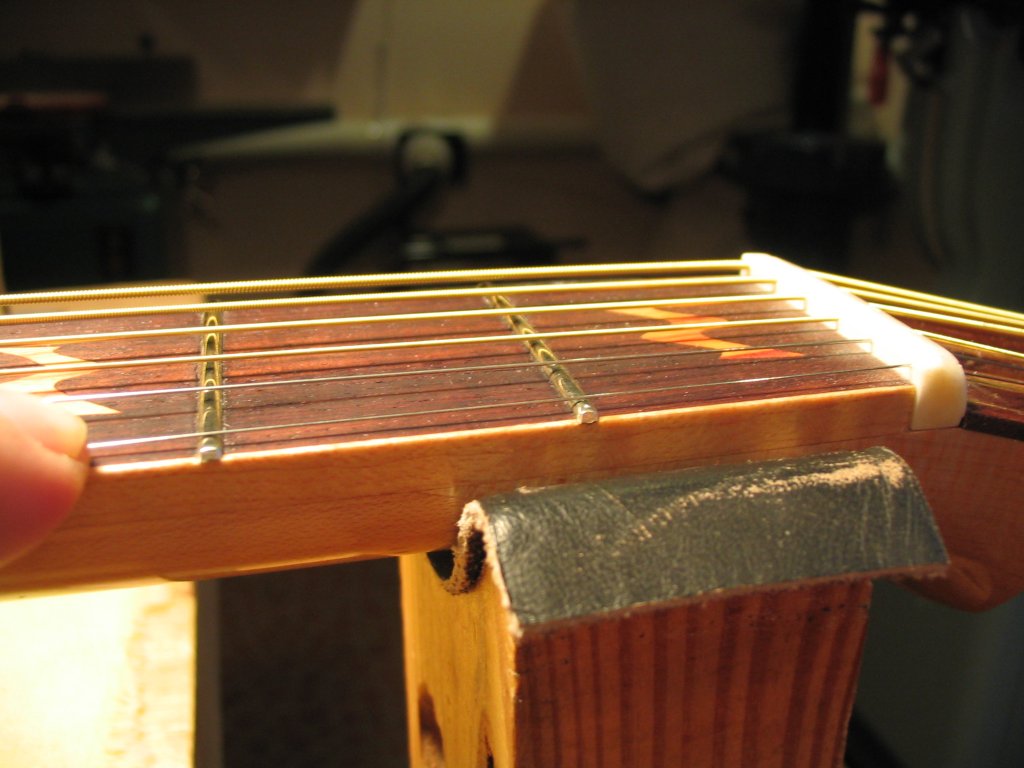
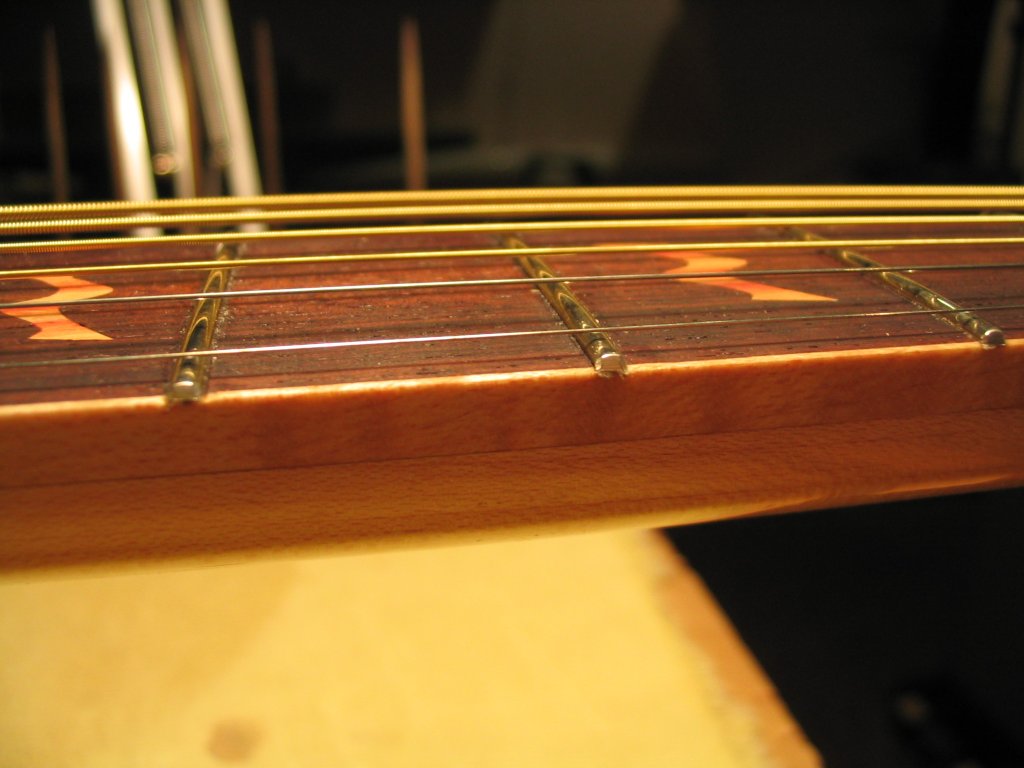
Nut
The nut and saddle are the pieces that support the strings at the end
of the fretboard and the bridge, respectively. The nut in particular is
notched to hold the strings at the appropriate spacing from one
another. The saddle is usually not notched as the pegs holding the
strings to the bridge provide the spacing. However, the height at which
the strings are supported is important at both the nut and saddle; for
the nut it's the depth of the string slots that determines this height.
The nut and saddle are generally made of very hard material to resist
the tendency of the steel strings to dig in. The traditional material
is bone, but ebony, brass and even some plastics like Corian are also used. Bone nuts can be fabricated from inexpensive raw
materials available at the grocer's - they usually have chunks of leg
bone that they sell for soup or dogs. A section from the middle of the
leg works best, as it tends to flare less at the ends. In addition, the
bone tends to get "spongy" towards the ends where the joints are. The
bone should be cleaned of as much extraneous material as possible,
including the marrow, and then boiled for a couple of hours, changing
the water occasionally, to remove any oils. After drying for a couple
of days, the bone can be sawn into rectangular blanks using a metal
cutting blade on the bandsaw. This is a little tricky as the bone is
essentially a hollow cylinder and the desired chunks are rectangular
"planks". Imagine trying to get useful rectangular boards from a hollow
tree - not especially easy. To make matters worse, bone dust is quite
toxic and shouldn't be inhaled. Fortunately, rectangular bone blanks
are available from lutherie suppliers that eliminate a lot of the fuss
of starting with an irregular hunk of bone.
To make the nut, a rectangular blank approximately 2" long by 1/4" wide
by 1/2" high is used. (The one shown is from a raw piece of bone and
shows a "divot" at one end where the inside surface of the bone is.)
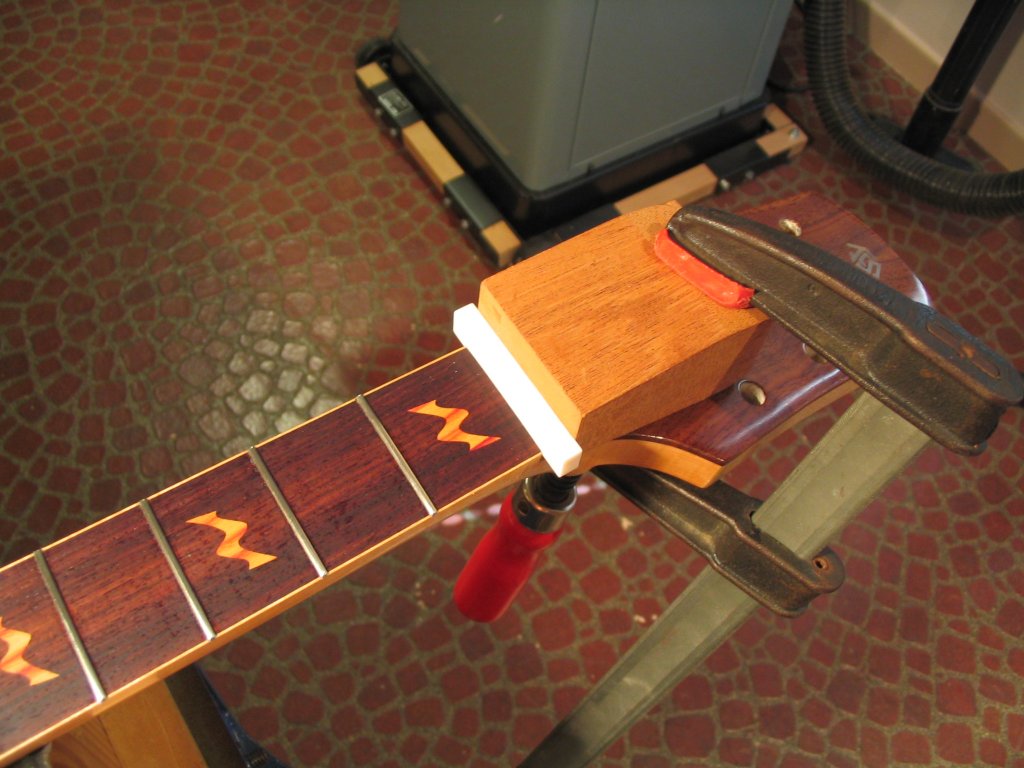
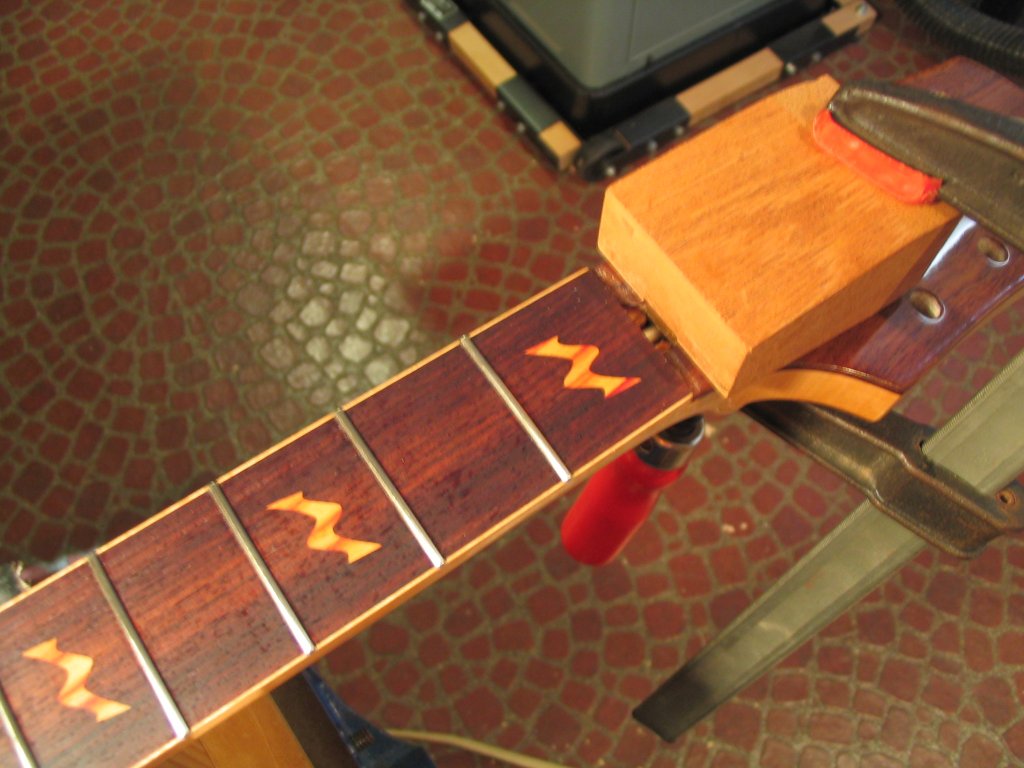
The peghead veneer needs to be trimmed so the nut will fit between it
and the end of the fretboard while sitting flat on the neck surface.
This trimming is done using an angled block to guide the saw and keep
it perfectly vertical while cutting. The block is positioned by placing
the nut blank between the block and the end of the fretboard.
The blank
is then removed and the peghead veneer carefully cut away, using the block as a saw guide and being
careful not to cut into the neck material.
The peghead veneer slot after cutting.
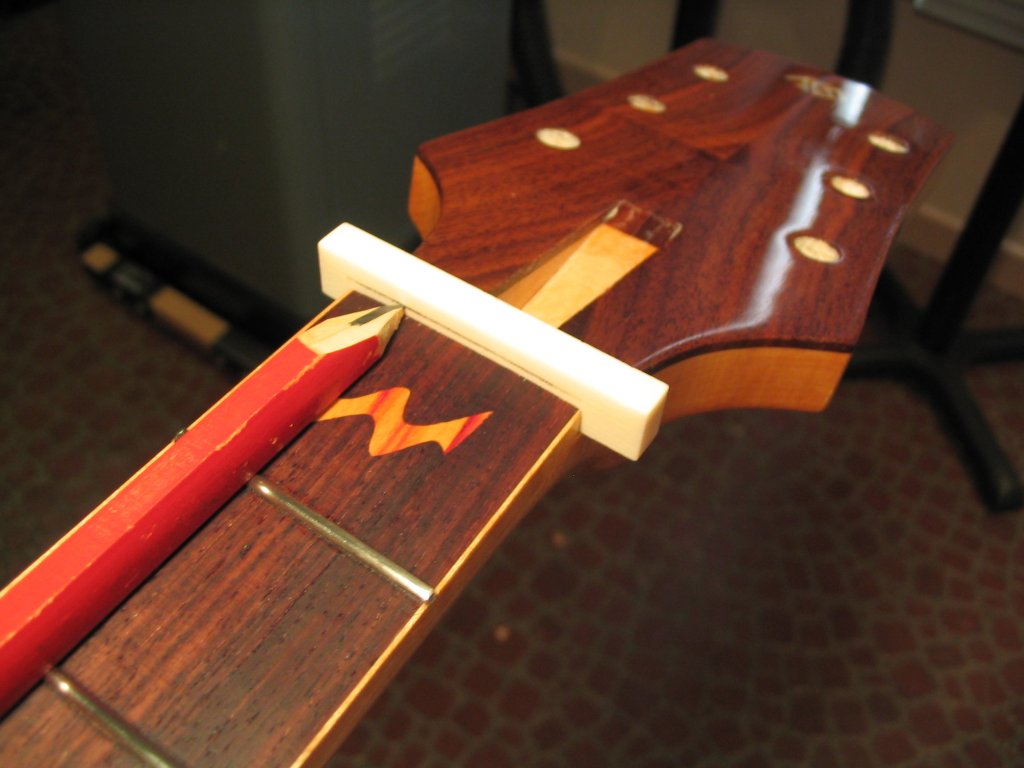
The nut blank is then placed into the slot between the end of the
fretboard and the peghead veneer for marking. The ends are marked so
they'll be flush with the sides of the fretboard. The top surface
should be roughly parallel with the curved top of the fretboard, but
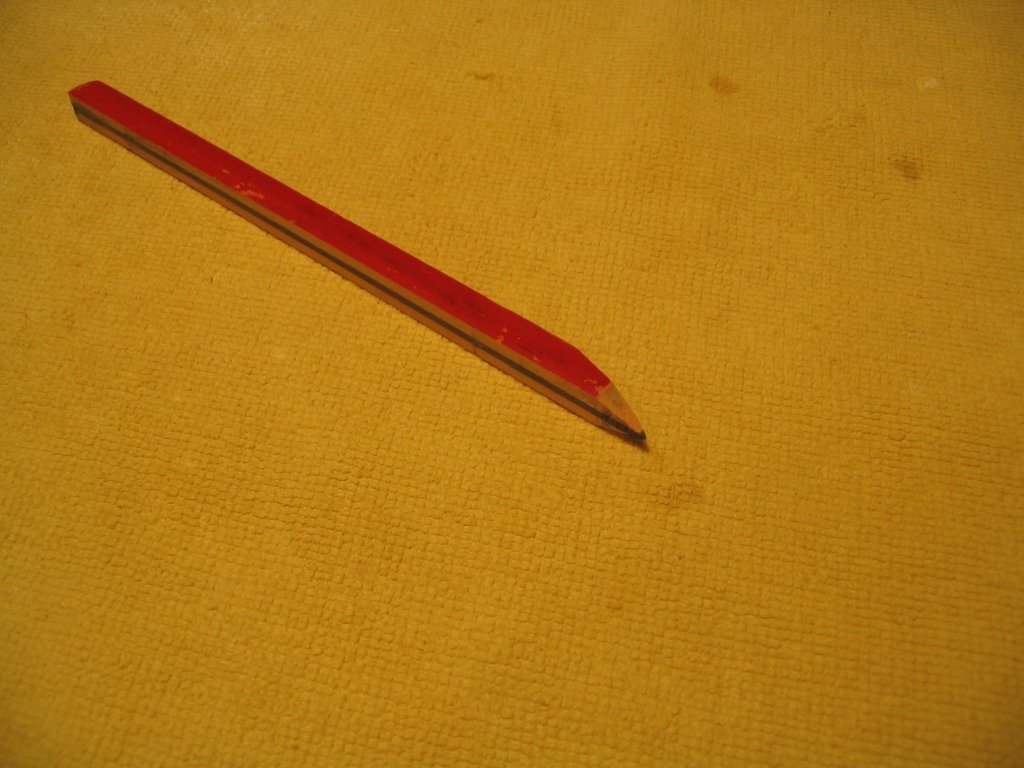
above it to allow for the string grooves. This profile can be
conveniently marked with a "half pencil" that's cut down the middle so that as the flat surface
of the pencil rides on the frets the point will trace a line at exactly
that height on the nut. A modified carpenter's pencil is shown below.
The line being marked is at the fret height, which is the reference
mark for the bottom of the string slots. I put a thin piece of veneer
or plastic on top of the frets to draw a second line parallel to and
slightly above this to mark the curve for the top of the nut.
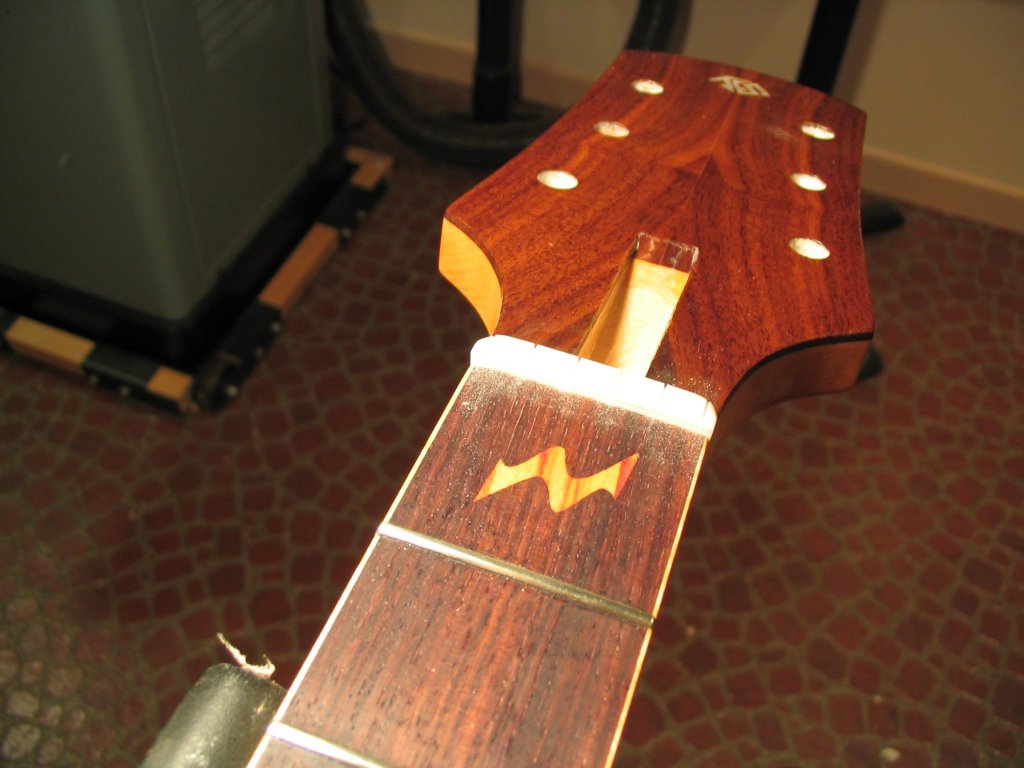
The nut is then cut and shaped using a hacksaw, files and sandpaper to
the desired profile. When the shape is correct, the nut is glued into
the slot in the neck using a couple of drops of cyanoacrylate glue. The
shaped and installed nut is shown below.
At this point the string slots must be cut. The strings should be
evenly spaced, with about a half-spacing at either side of the outer
strings. These can be calculated and marked with a ruler; for
convenience, I print out a set of lines with the desired spacing from a
CAD program and glue a strip of paper with these spacing lines onto the
nut top surface.
The string slots can then be cut with a series of fine
saws and files. The depth of the slots should be just above the
reference line traced with the flattened pencil riding on the fret
surfaces. It's actually important not to cut them too deep, or the
strings will buzz against the frets. The final depth adjustment can
easily be done once the strings are installed, as described below, so
at this point the slots are left a bit high, i.e., are not cut quite
down to the pencil mark. The width of the slots should be equal to the
width of the
string that passes through it, which means the string slots get wider
as you go from the treble to the bass strings. The slots should also be
angled back at approximately the angle of the peghead.
Saddle
The saddle is fabricated from a bone blank 1/8" thick by approximately
1/2" wide and 3" long. The length of the blank is cut to fit into the
slot routed into the bridge, including rounding the ends. The saddle is
then placed in the slot, and the top profile is marked on the blank
using a stick with a scriber at the end that acts like the flattened
pencil used to mark the nut: the stick slides along the frets and the
scribe marks the saddle blank top profile. The blank's top edge is then
cut a little above this profile (to leave room for final adjustment, as
described next) and rounded to ease the strings passing over.
To facilitate the saddle adjustment procedure described below, an
initial saddle is made of inexpensive material (plexiglass or the like)
and left a little overheight. This temporary saddle will be replaced by
the final bone saddle when the appropriate height is determined.
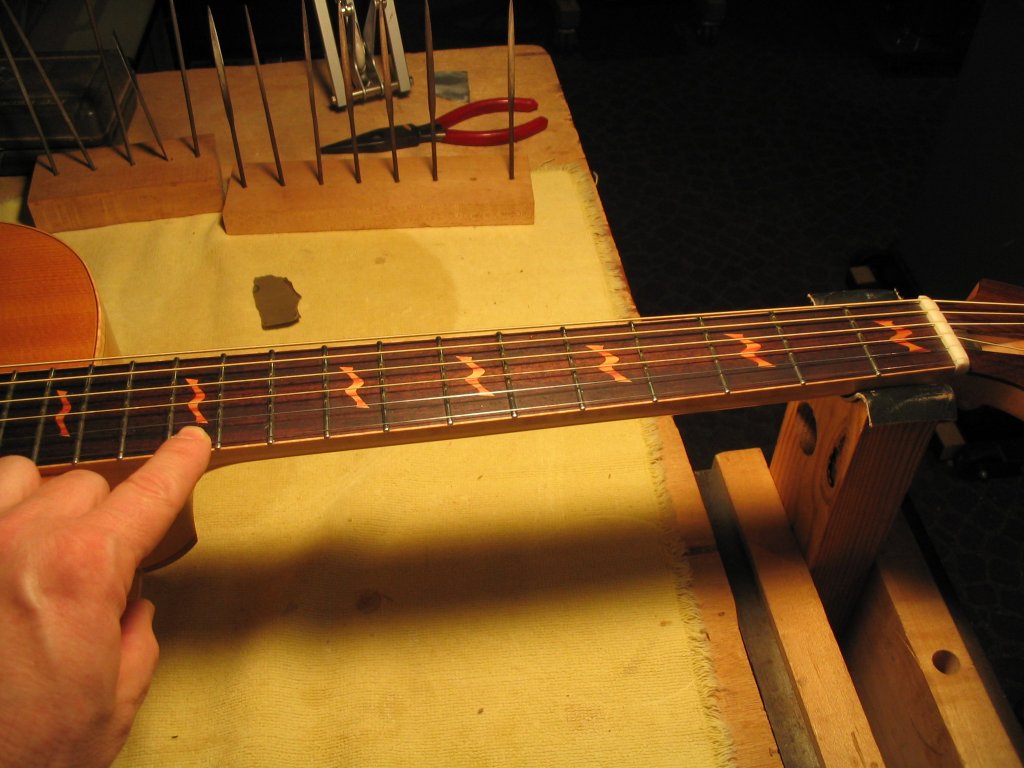
String-up and Adjustment
The guitar is finally ready to be strung up. The strings can be
installed with the bridge pins, attached to the tuning machines, and
brought up to pitch. This is the point at which the instrument will
finally play its first notes and chords. However, there will probably
be a need for some adjustments. In particular, the action - the height
of the strings above the frets - should be too high since we
deliberately cut the saddle too high. The neck relief - the amount the
neck deviates from a perfectly flat plane - will also likely be too
great, since we haven't tightened the truss rod yet. Finally, the nut
slots may not be the right depth, causing notes fretted near the nut
(for "open" chords, for example) to be difficult to push against the
frets. These parameters can be adjusted to provide an optimally playing
instrument.
Nut Adjustment
The nut slot depths should really be such that the strings are
supported at a height that exactly equals that of the nearest frets -
i.e., the nut should be like just another fret, at least as far as the
string height is concerned. In fact, some builders use a "zero fret",
with the nut behind it; the nut provides the string spacing while the
zero fret provides the correct string height. However, it's also common
to make the string heights at the nut slightly higher than that of the
nearest frets to allow a little more space to help prevent buzzing
against the frets when open strings are played, as these tend to be
strummed harder than fretted notes.
Checking the nut-slot depths is actually quite easy: just fret each
string at the 3rd fret, and look "behind", between the 2nd fret and the
nut. The string will be pressed against the 2nd fret and pass over the
nut, with the 1st fret in between; the nut-slot depth is correct if the
string just barely touches the 1st fret, or if there is a very small
gap (say, .005" or less) between the string and the 1st fret.
If the
distance is too great, the nut slot depth should be increased. If
there's not enough space - i.e., the string presses down on the first
fret - the nut slot needs to be filled to raise the slot depth.
However, I've not found a completely satisfactory way to do this, so I
will usually just make a new nut. Since this involves a fair amount of
work, I'm generally careful nut to cut the slot depths too deep,
leaving them slightly high until this adjustment stage.
Truss Rod Adjustment
The truss rod is next adjusted to get the neck relief to the right
state. As discussed above, it's desirable for the neck not to be
perfectly flat, but instead to have a small amount of "bow" or relief.
However, the tension of the strings generally puts a little too much
relief into the neck - the strings will tend to bow the neck more than
is desireable. The truss rod counteracts the pull of the strings to
bring the relief back to the desired value.
The relief can be evaluated by using the straight string to measure the
bow in the neck. The high E string is fretted at both the 1st fret and
12th fret; the relief can then be seen by the fact that the string
doesn'y touch each of the frets in between.
Because of the bow in the
neck induced by the string pressure, the frets between the 1st and
12th will be seen to "curve away" from the straight string, with the
largest space between the string and frets occuring about half way
between, at the 5th or 6th fret. This maximum space gives a way to
measure the amount of relief; I generally adjust the truss rod so the
space between this "middle" fret and the string is about .010", or
about the thickness of the high E string itself.
The relief can be
varied (by adjusting the truss rod) to accomodate different playing
styles. A lower relief will suit softer playing and fingerpicking,
while a higher relief can better accomodate harder playing and
strumming.
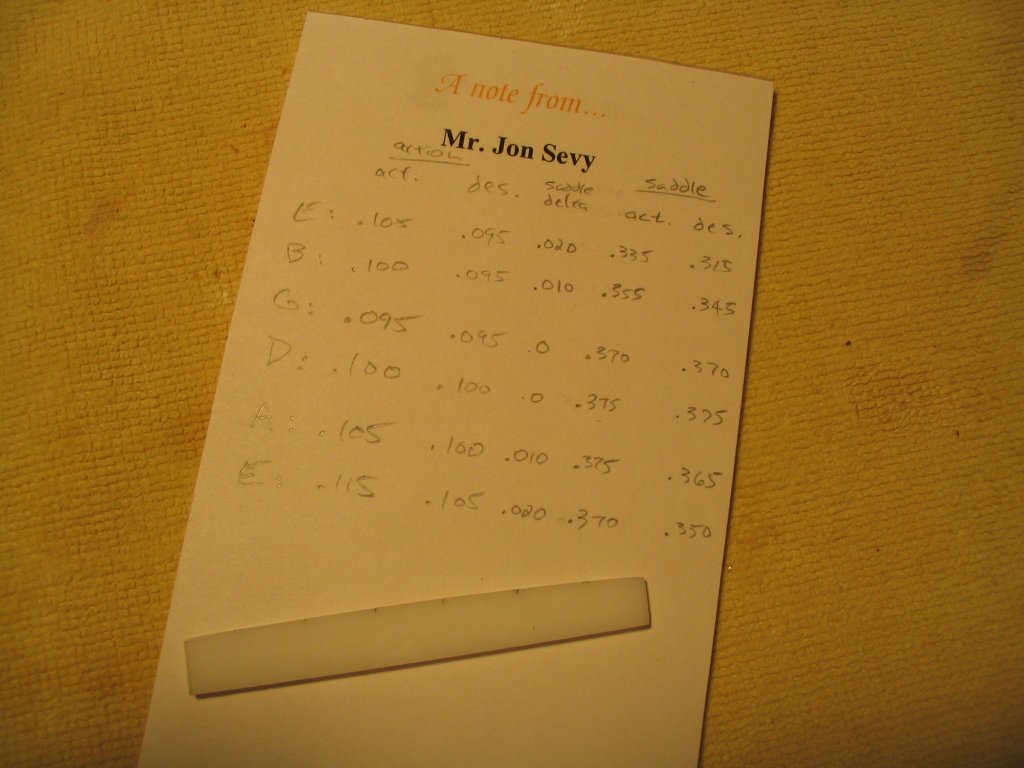
Saddle Adjustment and Action
The saddle height is the final element to be adjusted. Note that the
saddle provides just the height adjustment for the strings; the
positioning of the string holes in the bridge provides the spacing.
Thus the saddle does not have slots like the nut does. When the nut
slot depths and relief have been set as desired, the action is
controlled entirely by the saddle height. The action is the height of
the strings above the frets, and is typically measured at the 12th
fret, halfway between the nut and saddle. The action can be measured
using a calibrated wedge; the wedge sits on the 12th fret, and slid
under the string as the string is gently plucked until the string
contacts the wedge, at which point the action (the height of the string
above the fret) can be read from the surface of the wedge. In the photo
below, the high E string action reads .105".
The action should be adjusted
to accomodate the owner's playing style. As with relief, a lower action
is best suited for softer playing and solo work, while a higher action
can accomodate a harder playing style while avoiding string buzz. The
action is usually set lower on the higher-pitched (smaller diameter)
strings than on the lower-pitched strings to account for the lower
strings' tendency to vibrate with greater amplitude. A general range of
action settings at the 12th fret is
High E: .085" - .095"
Low E: .100" - .115"
with the strings in between having actions between those of the outer strings.
To lower the action, the saddle height is lowered. However, because the
action is measured halfway between the nut and saddle, the reduction in
action will be half the reduction in saddle height, or equivalently,
the saddle height must be reduced by twice the amount it is desired to
reduce the action. For example, suppose the action on the high E string
is desired to be .085:, and that it initially measures .100". The
action for this string is thus desired to be lowered by .015"; this
then requires that the height of the saddle at the position of this
string be lowered by twice this, or .030". The equivalent calculation
is done for each string.
The strings are loosened and the saddle is removed from its slot in the
bridge. The height of the saddle at each string position is measured,
and the desired height is calculated from the action measurements. A
bone saddle blank is then marked with the desired height at each string
position.
The saddle is cut to the marked profiles, and then rounded on top. When the
saddle is reinstalled, the strings should all have the correct
action.
Interactions
The action and relief settings are not completely independent;
adjusting either can affect the other. Tightening the truss rod to
reduce the relief will also generally lower the action, because the
force of the truss rod pulls the neck back and thus tends to make the
strings lie closer to the fretboard. Conversely, if the action is
lowered by lowering the saddle height, the strings will lie closer to
the surface of the fretboard and thus have less leverage to put a bow
into the neck, reducing the relief. Thus if either the action or relief
is adjusted, the other should be checked to make sure it has not
changed significantly.
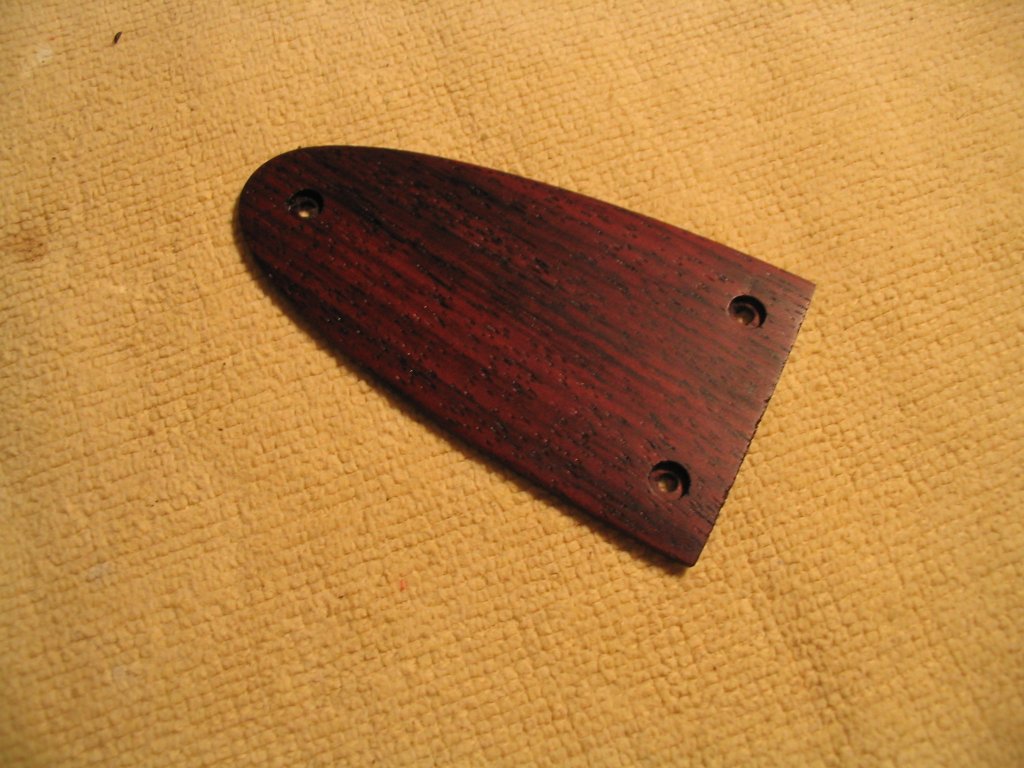
Truss Rod Cover
When the neck relief is in adjustment, the cover for the truss rod
adjustment nut can be fabricated and installed. The cover is secured
with 3 small brass screws.
Pickguard
The final step in finishing the guitar is to fashion and affix a
pickguard. The pickguard can be made of pretty much any thin hard
material that will protect the soft spruce top from errant pick
strokes. I use plastic of .025" thickness, attached with spray adhesive.
The pickguard is cut to shape with an Xacto knife, the edges rounded
and the surface polished. A template is cut in a piece of paper and
taped to the guitar top to allow the adhesive to be sprayed onto the
face of the guitar in exactly the shape of the pickguard. The pickguard
is also sprayed, the paper template is removed, and when the adhesive
has dried on both the guitar face and pickguard, the pickguard is placed
onto the guitar and pressed to firmly attach it to the top.