
Rosette Designer is a Java application that runs on a PC (Windows/Linux) or Mac that helps in the design of mosaic soundhole rosettes for use in acoustic guitar construction. The program allows the luthier to easily experiment with designs, providing a tilestrip drawing area that provides automatic repetition of the design in various symmetries and simultaneously displaying the result in the round. Mosaic designs can be saved and printed, along with parameters needed for constructing the rosette (color counts, tile and row/column dimensions, etc.)
Frequently Asked Questions
What do I need to run the app?
You’ll need a PC (or Mac) with a Java runtime installed; this should already be present on your system, but if not can be downloaded for free from Oracle’s website.
User Guide
Startup
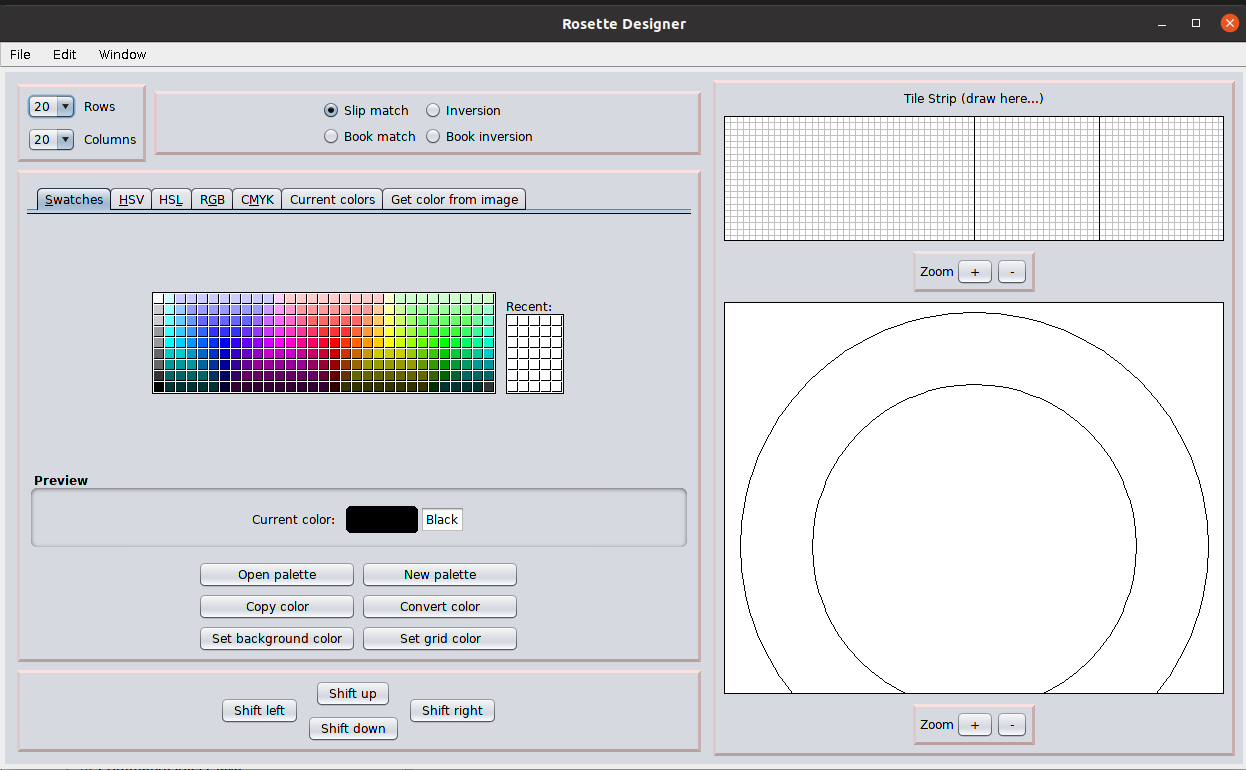
To start the app, just double-click on the RosetteDesigner.jar icon. A blank design is shown with the default rosette parameters (20 rows and 20 columns). There are 3 main panes: the controls on the left, the tile strip at top right, and the rosette at right center. The main drawing pane is the tile strip; the rosette pane just displays the design in the tile strip “in the round”.
The “fundamental tile” is outlined in black in the tile strip; this is the tile that is repeated to fill out the strip. This fundamental tile is directly shifted or flipped to generate the repeating rosette pattern, depending on the symmetry settings described below.
Drawing
Select a color using the color chooser in the left panel; the drawing color will be shown in the “Current color” box. Then click and drag the mouse across the tile strip; the tile elements below the cursor’s path will be colored in the corresponding color, and the design will be filled out in a repeating pattern along the tile strip and simultaneously displayed in the round in the rosette pane.

Erasing
To erase, just start on one of the tile elements which already has the current color; it will be erased back to the background color, as will any of the other elements as you drag the cursor across them.
Controls
The controls on the left provide functions for working with the design.
Shifts
The shift buttons allow the design to be shifted up, down, left or right. The left and right shifts are useful for aligning the design in the “fundamental tile” outlined in black on the tile strip. The up and down shifts are useful particularly when you decide to add rows to provide borders on the top and bottom.
Symmetry
The symmetry buttons determine how the fundamental tile will be replicated to fill out the rosette. The slip match stetting just translates the fundamental tile to the left and right. The book match setting reflects the fundamental tile across a vertical line as in the opening of a book. The inversion setting flips the fundamental tile across a horizontal line while repeating, and the book inversion combines the book match and inversion settings, flipping across both horizontal and vertical.
Rows and Columns
The row and column settings let you choose the number of rows and columns in the fundamental tile. The size (height and width) of the fundamental tile, or each row and column, can be set in the Rosette Parameters dialog box accessible through the main menu. The radio buttons indicate whether the tile width/height or the row and column widths should be kept constant as the number of rows and columns are adjusted.
Color Selection
The drawing color can be selected using the color selector; the current color is displayed in the “Current color” box below. The main selector allows you to choose new colors; the other tabs consist of other ways of selecting colors. The “Current colors palette” is always present, and keeps a list of the color buttons for the colors that have been used so far in the design. To select a color, just click on one of the colored buttons. The “Save palette” button allows you to save a palette of colors for use in future designs; the “Open palette” button allows you to open a palette that has previously been saved. A useful feature is that colors can be named by typing into the text box next to each color square. This can be done either within a palette of colors, or right in the “Current color” box in the main color selector panel.
The “Get color from image” tab allows you to select a saved image in a standard format (jpg, png, etc.) and then select a color from one of the pixels in the image. This is particularly useful for creating colors from images of the woods to be used in a rosette. A sample palette that has done this for some commonly used woods is provided in the sample palette file “Wood palette.xml”.
Though the “Current colors” palette should keep a list of all the colors used in the current rosette design, you can also copy a color in the design. To do this, click the “Copy color” button, and then click on the tile element in the tile strip that has the desired color. This will set the current color to that color.
Color Conversion
The “Convert color” button allows for the replacement of all pixels of a selected color with the current color. To convert, set the desired new color as the current color by selection from the color chooser panel, click the “Convert color” button, and then use the mouse to select a pixel in the design with the color you wish to convert. All of the pixels in the design which have that selected color will be converted to the current color.
Background Color
The background color for the design can be changed using the “Set background” button. All of the pixels in the background color will be set to the current color. Note that the effect of this is slightly different than using the “Convert color” button and choosing one of the background pixels. The background color is used when erasing pixels; if you simply convert the background pixels to a new color with the “Convert color” button, the default background color (white) will still be used when pixels in the design are erased.
Menus
The main menu contains entries for creating, saving and modifying rosettes.
File Menu
New
Creates a new (empty) design, prompting you to save the current design if needed.
Open
Prompts to select a file to open that contains a rosette design, prompting you first to save the current design if needed. If a file is selected that doesn’t contain a valid design description, an error message will be displayed.
Save, Save as
Save the design to a file. You can choose any location and name that you like. Note that the file generated contains an XML description of the rosette design, which is a hierarchical text description. You can view the generated XML in any text viewer, and even edit it directly if you like (but you’ll need to know what you’re doing, or you could end up with an invalid description that Rosette Designer won’t be able to read).
Save as PDF
Save the design in the standard Portable Document Format for printing or viewing in any PDF file viewer (Acroread, e.g.). This brings up a dialog box asking which elements of the design you’d like displayed in the document; you can include the rosette, the tile strip, and additionally an expanded map of the fundamental tile showing clearly which element color is in each row and column. The latter is especially useful to a luthier in constructing a rosette from the design.
Save as image
Save the design as either a JPG or PNG image, with specified resolution. This saves an image of just the circular rosette design. The PNG version uses transparent pixels for the center of the design for easy pasting as an overlay on another image (e.g., a guitar design).
Print the rosette, bringing up the system print dialog to select a printer, as well as the dialog allowing selection of specific design elements to include.
Edit Menu
Undo, Redo
These allow operations (drawing, row/column changes, color conversion, etc.) to be undone or redone. Note that there’s a maximum number of steps that can be undone (currently 20).
Window Menu
Parameters Dialog
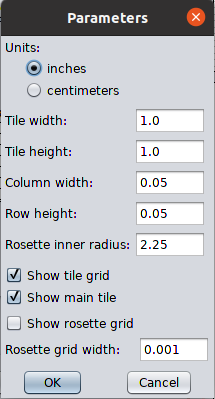
Brings up a dialog box that allows you to specify the units used (inches/cm), the inner radius of the rosette, and the width and height of the fundamental tile. Note that either the tile width and height or the row and column width can be specified; the others will be adjusted in sync.
Color Counts
Brings up a dialog that shows the current count of squares for each color used in the fundamental tile element. Note that this information is also included in the saved PDF or printout.
About
This shows app information as you’d pretty much expect.
Revision History
| Version |
Date | Changes |
| 1.4 | 2019-10-04 |
|
| 2.0 | 2021-03-13 |
|
| 2.1 | 2021-10-31 |
|
| 2.2 | 2021-12-21 |
|