Introduction
With a little bit of care, a fine acoustic guitar will give a lifetime of musical satisfaction. The following booklet details some of the things that should be done to ensure that your guitar stays happy and healthy. Take a little time now to read through the section on Playing and Storage, to learn some basic principles in the treatment of a guitar. When you have a little time, we strongly recommend your reading through the appendix on Humidity and the Guitar. This discusses issues that every player of acoustic stringed instruments should be aware of, and will help to explain why instruments behave as they do with regard to changing climates and seasons. The other sections, on Periodic Maintenance and Repairs, can be read as the need arises (but be sure to consult the section on String Types and Gauges before changing the strings).
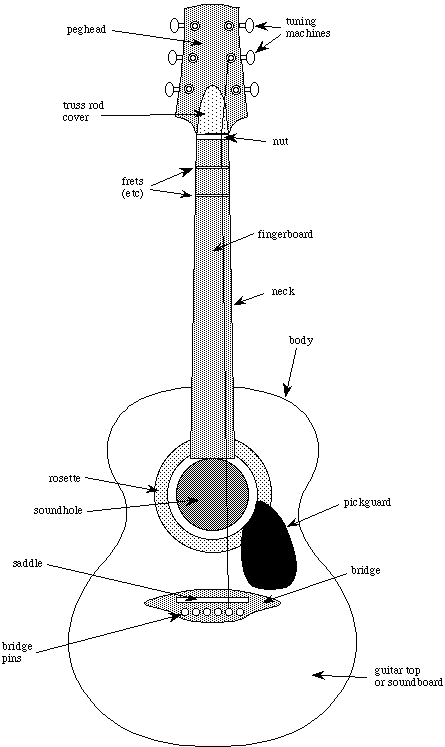
Guitar Terminology
Playing and Storage
Here are some approaches to ensuring that your guitar leads a long and happy life. The discussion of Humidity and the Acoustic Guitar in the Appendix should give you some additional ideas of what to be careful about in the playing and storage of a guitar, and why.
Storage and Travel
An acoustic guitar should be stored in an environment in which the temperature and humidity don’t vary too much, the humidity being the more important of the two variables (but see the Appendix for the relationship of temperature to humidity). You should try to maintain the relative humidity at about 50%. Higher humidity levels can raise the action of the guitar, making the instrument difficult to play unless the action is adjusted; the problems will usually correct themselves when the humidity drops back to the 50% range. You should be especially careful, however, not to let the humidity of the environment in which the guitar is stored drop below 40%. In addition to leading to unacceptably low action, causing buzzing of the strings on the frets when they are strummed, low humidity can lead to cracking and other catastrophic damage. See the Appendix for a discussion of why these changes take place; here we’ll focus on steps you can take to maintain the humidity at appropriate levels.
If you choose to leave the guitar out of its case, on a stand, say, then you need to use some sort of humidity control, especially in the winter. If your dwelling has a central heating system with a built-in humidifier, great – you’re lucky! Otherwise, a small room humidifier can be effective, if the room in which the guitar is stored is small and is kept closed. Get a humidity gauge to check that the humidity is correct – don’t rely on the setting of the humidifier to be accurate. In the summer, a dehumidifier can work similarly in an enclosed space. If you use air conditioning, this tends to lower the humidity as a natural by-product of cooling the air, so you may not need any further dehumidification.
If you can’t or don’t want to employ one of the above options, the next best thing is to store the guitar in a good-quality hard-shell case. This is a good idea anyway, to protect the guitar from dents and scratches, and a good case will be fairly airtight, forming a nice enclosed space for the guitar. There’s still the problem of how to keep the humidity in the case above 40% in the winter. This can be accomplished with several gizmos which are on the market which consist of sponges in porous containers that fit inside the body of the guitar. To use them, you dampen the sponge, place it in its container, insert this in the guitar soundhole, and put the guitar in its case. The sponge then gives off water which is absorbed by the air in the case and the wood in the guitar, raising the relative humidity in the environment inside the case. The only drawback is that you can’t control the exact humidity level, nor do you even know exactly what it is (unless you can fit a humidity gauge into the case in some way).
As far as temperature is concerned, a guitar should be stored at normal room temperatures, avoiding extremes. Be aware that some situations can expose a guitar to dangerous temperatures. For example, never put a guitar (in or out of its case) in the trunk of a car! Especially in the summer, the temperature in a closed car trunk can rise to a level at which the glues used to construct the guitar will soften, at which point highly stressed joints will loosen and separate. This can completely destroy a guitar! Similarly, don’t stand or lean your guitar next to a lit campfire or fireplace or woodstove. And if you travel by plane, don’t check your guitar as baggage: insist on being allowed to take it with you into the cabin. The temperatures in the luggage bins can be quite cold, and baggage handlers are not known for their gentle touch; even a hard-shell case might not protect a guitar from the kind of assault it might receive. Frankly, a reasonable rule of thumb to use when deciding where to put a guitar is this: don’t leave it anyplace where you wouldn’t leave your dog!
Playing
You can’t always control the environment in which you’ll be playing your guitar. For example, if you’re storing your guitar in its case because your home doesn’t have humidity control, you still have to take the guitar out of its case to play it. The indoor humidity in the Northeastern US can be as low as 25% in the winter; what should you do? First, don’t worry too much. It takes a fair amount of time, probably several days or more, for the moisture content of the wood in a guitar to reach equilibrium with the moisture content of the air, especially if they’re substantially different. During the several hours or so that you’re playing the guitar, it will lose some moisture to the surrounding air, but not enough to make noticeable changes. When you put it back in a humidified room or the case with the moisturizing gizmo, it will reabsorb any water it might have lost. Thus the relatively short exposures to low humidity environments that come from playing the guitar are nothing to worry about.
On the other hand, it’s sometimes necessary to warm a guitar up to room temperature, or let it cool down to the outside temperature if it’s being played outdoors. Let this happen by natural warming or cooling, by letting the guitar stand in a corner for a few minutes or by bringing it to playing temperature by playing it. Rapid temperature changes should be avoided; don’t try to warm a guitar up by a fire or any other artificial heat source (other than your own body).
Routine Maintenance
Following is a description of some of the routine maintenance tasks that a guitar owner can carry out himself. While these are simple procedures, if you feel at all uncomfortable about doing something (anything) to your guitar, take it to a good music store and have someone who’s more experienced help you out. Asking for help when you feel you need it isn’t dumb, it’s smart; not getting help is what can get you into trouble.
Strings: Types and Gauges
The strings are an essential part of an acoustic guitar. Lets face it, they’re the things which are actually producing the sound, so the type and quality and condition of the strings has a major influence on the sound produced by the guitar.
One extremely important consideration is the gauge or thickness of the strings. Acoustic guitar strings come in three basic gauges: light, medium, and heavy. This refers to the overall thickness of the six strings in a set; in a medium gauge set, each string will be slightly thicker than the corresponding string in a light gauge set. For example, the G string (the thinnest wound string) will typically have a thickness of .012 inch in a light gauge set, .013 inch in a medium gauge set, and .014 inch in a heavy gauge set; the other strings are scaled similarly. Though the differences don’t seem like much, they have a major effect on the guitar. The thicker a string is, the higher the tension needed to get it up to pitch. Thus the G string in a medium gauge set will need to be pulled more tightly by the tuning machines to get it up to the pitch of G than will the G string in a light gauge set. The additional tension makes the strings create a stronger, louder sound than lighter gauge strings. It also makes them harder to push against the frets to form notes and chords. However, there’s a much more important reason not to use heavier gauge strings than your guitar is designed to use.
The higher tension needed to bring heavier gauge strings up to pitch makes them exert more of a pull on the tuning machines at one end and on the bridge of the guitar at the other. This additional pull can actually deform a guitar over time if it’s not built to withstand it; among other effects, the top can be warped, and the neck can be permanently bowed. Medium or heavy gauge strings can be used only if a guitar is specifically designed and built for them, using substantially heavier bracing. If you try to use them on a guitar built for light gauge strings, you will very likely permanently damage the guitar.
The moral is: find out what gauge strings your guitar was designed to use, and stick with them. All of my guitars are designed for use with light gauge strings; this is true for most of the guitars produced by other manufacturers and guitarmakers, too. Frankly, light gauge strings are substantially easier to play than medium or heavy gauge, and because the bracing in the guitar can be made lighter, they usually produce nearly as much volume as their heavier cousins. (By the way, you may find a slight variation in the thicknesses of the strings in light gauge sets produced by two different manufacturers; this is nothing to worry about.)
Among strings of a particular gauge, there are still lots of choices, between different string materials (bronze, phosphor bronze, nickel bronze for the windings, and different steel compositions for the core) and string manufacturers. Which you decide to use is largely a matter of taste. Strings of different composition, and even just from different manufacturers, can make a guitar sound significantly different; for example, phosphor bronze strings will generally sound “brighter” than plain bronze strings. Experiment to find a type and brand of string that produces a sound you like. I’ve found that nickel-bronze strings produce a well-balanced tone that suits me personally, and that’s what I currently install on my guitars.
Cleaning and Replacement of Strings
Strings on an acoustic guitar need to be replaced fairly regularly. The exact interval at which they should be replaced depends on how much you play, how hard you play, and how well you take care of the strings. To this last point, it’s worth mentioning that a set of strings will last much longer if you clean them after each time you play. By cleaning, I don’t mean just passing a rag lightly over the tops of the strings, but cleaning each of the strings individually around its whole circumference. This is easy: take a soft cloth, place it over your index finger, “hook” the string under your fingernail, and run down the length of the string; then do the other side of the same string. This takes less than 30 seconds to do for all of the strings, and really helps to get all of the crud (mostly your skin, actually) off of the bottom of the string where it likes to hide. You’ll be amazed at how much stuff is on there after you’ve played for an hour or so, and at how much better the strings sound after you get it off. This also helps to keep the strings from corroding by getting all of the moisture off before you store the guitar; this corrosion is one of the main reasons for the loss in tonality of the treble (unwound) strings.
How will you know when to change the strings? Well, if you ever feel that the guitar “just doesn’t sound quite right”, or you’re having trouble getting it in tune, old strings are probably the culprit (though you might try cleaning them first). Also, the strings will lose their shiny appearance and smooth feel as they age (corrode), so if they look grey and start to feel rough, it’s time.
To replace the strings, you can either remove and replace them one at a time, or remove them all at once. The advantage of the former method is that after you replace each string, you can bring it up to pitch using the other strings as a reference. The advantage of removing all of the strings at once is that it makes it easy to clean the fretboard. Some guitarists swear that you should always replace them one at a time, to avoid completely releasing the tension of all the strings. This sentiment arose largely because of early and less-than-effective truss-rod neck reinforcement systems that put peculiar stresses into the neck. The reinforcement system used on my guitars is simple and safe, so you needn’t worry about removing all of the strings (see below for information on neck adjustment using the truss rod). To replace a string, release the tension and unwrap the string end from around the soundpost of the tuning machine. There are inexpensive plastic “cranks” (e.g., Scotty’s String Winder) that speed the job of winding and unwinding the tuning machines. At the bridge, the string is held in place with a tapered pin. The pin is just pushed in place, with the friction of the taper holding it in. To remove it, pull straight up. You may not be able to pull it out with just your fingers (it’s small). There are devices (like on Scotty’s String Winder) which hook underneath the head of the pin to get a grip for you. However, just pull straight up; do not pry against the face of the guitar!! The face of an acoustic guitar is usually made of very light and soft wood, generally spruce, cedar or redwood, which dents very easily. If you try to pry against it, you will dent it. With the pin out, pull out the end of the string; it has a little ball or ring on the end to hold it in place against the bottom of the pin. Place the ball of the new string in the hole, and replace the pin, with the groove facing forward, pushing straight down (not too much force). The string will run through the groove which runs along the length of the pin; pull it until the ball seats against the bottom of the soundboard (there’s actually a bridge plate underneath that the ball will rest against). Then lay the string along the fretboard, pass it through the slot in the nut, wrap it several times around the soundpost, pass it through the hole in the soundpost, and wind to tension.
A new string will stretch as it is first played, causing its tone to drop and the guitar to go out of tune. This is normal, but annoying. You can speed up the process by tensioning the string to its proper pitch, and then “bending” the string (as in the blues technique) at the 12th fret while strumming it. This will pre-stretch the string, reducing significantly the remaining “slack”.
By the way, a tuning fork or an electronic tuner is a good idea, to make sure your guitar is always at the correct pitch. Don’t tune the guitar up significantly in pitch above standard tuning; this increases the stress that the strings exert on the guitar. It’s OK to tune the guitar down slightly in pitch if desired, to E-flat, say, but a guitar will usually sound best when tuned to standard pitch.
Periodic Setup
Over time, as a guitar ages or is exposed to slightly different conditions, it will be necessary to make some adjustments to optimize the instrument’s playability and tone. Some of these adjustments are described below, mostly for purposes of informing the player about what to expect. It is not intended that you perform these operations yourself, unless you feel very confident about your abilities. Some of these operations require you to use sharp tools near easily-gouged parts of the instrument. Save yourself the aggravation of possibly damaging your instrument by taking it to someone with more experience! The adjustments are straightforward and should not be expensive.
Action
The action of a guitar refers to the height of the strings above the frets on the fingerboard. The strings must be far enough above the frets so as not to buzz against them when strummed, but not so far above that it is hard to push them down against the frets to form notes and chords. There is a fair amount of latitude in this; the exact setting is a matter of taste. Some players like a very light (low) action so that the strings are very easy to fret, while others like a higher action so that the strings are less likely to buzz when played hard. In any case, the action can be adjusted to suit a players preference. The action will also change over time, and with changing humidity. As noted above, when the humidity increases, the top of the guitar will bulge outward, lifting the bridge and saddle (over which the strings pass), thus raising the strings above the fretboard, resulting in a higher action. When the humidity decreases, the action becomes lower. In addition, even at constant humidity, the guitar will deform slightly as it ages, due to the constant pull of the strings. Over several years, the guitar’s top will take on a permanent slight outward bulge from the strings pulling up on the bridge. The neck may also take on a slight upward bend (toward the frets), for the same reason. This is a normal part of the aging process in a guitar, and nothing to be concerned about (some folks even feel that this is a large part of the reason that the tone of a guitar is often found to improve with age). It will however change the action, necessitating adjustment.
Action that is too low will make a guitar unplayable as the strings buzz against the frets, and obviously requires adjustment. Though a guitar can often still be played if the action is too high, especially if you use mostly the frets near the peghead, it is particularly important to have this adjusted, as a prolonged high action exerts extra stress that can damage the neck and face of the guitar. When the action is set correctly, the strings will be pulling on the bridge and neck in a direction almost parallel to the face and fingerboard. But when the strings are high above the fretboard, the angle with which they pull on the bridge and neck is more vertical; thus they will tend to cause the top to bulge upward more, and the neck to bend more. You can understand the phenomenon with regard to the neck by picturing a thin wooden flagpole, with a piece of string tied to the top. If you stand at the bottom of the flagpole and pull the string straight down along the pole, you can pull pretty hard without the pole bending very much if at all. But if you move out a little bit from the base of the pole, so that you’re pulling at an angle rather than straight down the pole, it will be much easier to get the pole to bend. Thus when the action of a guitar is too high, it’s easier for the strings to deform the neck into an upward bow, which can become permanently set into the neck if it’s allowed to stay like that for too long. Thus a guitar with action that’s too high should be adjusted as soon as possible.
Neck Relief and the Truss Rod
The neck of a guitar is under constant stress from the strings. This stress tends to pull the neck into a curve, bending it up towards the face of the fingerboard. To counter this tendency, the neck is fitted with an adjustable rod, called a truss rod. This rod produces a stress in the opposite direction, tending to bend the neck down, counteracting the upward stress exerted by the strings, to keep the surface of the fretboard relatively flat when the strings are up to pitch. Indeed, if you remove all of the strings when restringing and sight along the fretboard, you’ll see that the neck is actually bent slightly backward by the truss rod when the pull of the strings is not present.
Actually, the truss rod is not adjusted to make the surface of the fingerboard exactly flat when the strings are in place, as you would expect. It’s adjusted so that a very small amount of the bend induced by the strings is left, i.e., so that the fretboard bends slightly up. One way to see this is to fret the high E-string at the second fret with one hand, and at the 14th fret with the other. If the fretboard were perfectly straight, the string would then touch each of the frets between the second and the 14th fret, because the stretched string gives us a straight reference. You should actually see that there is some space between the string and the intervening frets, becoming greatest about halfway in between, indicating that the neck has a slight upward bend to it. This bow is called “neck relief”, and is essential for the playability of the guitar. The amount of relief is measured by the space between the string and the middle-most fret above. The usual amount of relief is about .010″, or about the thickness of the high E-string itself. It’s not hard to see why relief is necessary when you consider the shape of a vibrating string: it’s fixed at the ends, and alternately bulges upward and downward (at a very fast rate) in a shape not unlike that produced by a jump-rope as it’s swung. Thus the fretboard should ideally be slightly bowed, so that when the string is at the bottom of its “swing” it doesn’t hit the frets.
In the old days, guitar manufacturers (big and well-known ones) either put solid, non-adjustable rods in their guitars and tried to put the correct neck relief in at manufacture, or they used rudimentary adjustable truss-rod designs which put peculiar compression stresses into the necks. With the nonadjustable rods, if the neck took on too much of a bend as the result of aging, the guitar had to be sent to a repairman for an expensive and not always successful heat-bending of the neck. With the old adjustable units, adjusting the neck was easy in principle, amounting to tightening or loosening a nut at the end of the rod, but wasn’t always (often) successful, sometimes imparting a highly undesirable S-curve into the fretboard as the rod compressed the neck. Both of these approaches were so hit-or-miss that guitarists mostly just prayed that the necks on their instruments wouldn’t need adjusting, and lived with the higher action that resulted as a guitar aged as a price for owning a vintage instrument. Luckily, there are new, simple, effective, foolproof adjustable truss rod designs used by virtually every builder (including me). These designs don’t create unusual stresses in the neck, are easily removed should they ever need replacing, and some even allow two-way adjustment of the neck relief. These make adjusting the neck relief a simple matter – though if you have any qualms it’s probably best to have an experienced builder or repairperson do it for you. The procedure is described below for your information.
Interaction Between Neck Relief Adjustment and Action Adjustment
As mentioned above in the discussion on action, a guitar whose action is too high will cause the neck to bow excessively. Conversely, if the neck is overly bowed, the action will be too high (since the straight strings will be too far above the arc of a highly curved fingerboard). Adjusting either the neck relief or the action will affect the other. However, the neck relief affects the action more than the action affects the neck relief (except over the long run, when a high action can put a permanent “set” into the neck). Thus the neck relief should be set first, as described below under “Adjusting the Truss Rod”. This may very well in itself address an action that’s too high; if not, the saddle height can be adjusted as a second step, as described below. The change in action may itself subsequently necessitate a slight readjustment of the truss rod.
Adjusting the Truss Rod
To get at the truss rod, remove the cover plate on the peghead at the end of the fretboard. In my early instruments this is held on with three small brass screws; in later instruments it’s held on with embedded magnets, and will just slide off. You may have to temporarily loosen and remove the 2nd and 5th strings from the nut to get at two of the screws on older guitars. Then make sure all of the strings are up to proper pitch. You’ll see either a small brass nut or a round Allen head; this is the adjustable nut on the end of the truss rod. To decrease the amount of relief, tighten the nut; to increase the amount of relief, loosen it. Do this in small steps, turning the nut only about 1/6 of a turn each time and checking the relief at each step using the high E-string as described above. When it’s right, just replace the cover plate. That’s it! If the action of the guitar is still too high, adjust the saddle height.
Adjusting the Saddle Height
First adjust the neck relief with the truss rod, as described above. Then measure the height of the strings above the 12th fret. The space between the high E-string and the fret should be somewhere between 3/32″ and 1/8″ (.085″ to .120″); the space between the low E-string and the fret should be between 7/64″ and 9/64″ (.110″ to .130″). The lower range is best for players with a light touch, who like to play at the higher frets; the higher range is best for players who tend to strum chords, mostly in the lower frets. If the spacing isn’t as desired, the height of the bone saddle on the bridge must be changed. In general, the amount that the height of the saddle should be changed is twice the amount that the string heights differ from the correct values. For example, if the high E-string measures 1/8″ above the fret and you desire the lower setting of 3/32″, the difference is 1/32″, which means you should lower the saddle height by twice this, or 1/16″. To change the saddle height, the strings must be loosened and removed so that the saddle can be removed from the bridge. (It’s not glued to the bridge, but is held in the slot by the pressure of the strings, and will pull right out when the strings are removed. A piece of tape can be used to pull it out if you can’t get a grip on it.) To lower its height, the saddle must be cut down; leave this job to a professional. If the saddle needs to be raised, it can be shimmed with thin pieces of veneer cut to fit exactly in the slot, or a new higher saddle can be made; in any case, this is better left to a professional, too. With the new saddle in place and the strings back up to pitch, the neck relief should be re-checked and readjusted if necessary.
Repairs
Below are described some of the repairs which may need to be made to your guitar over time. These all should be performed by a qualified guitar repairperson. While these folks don’t work cheap, this is one area in which you get what you pay for. The irreparable damage which can result from an unprofessional job is nowhere nearly worth the few dollars you might save by not taking your instrument to someone experienced and knowledgeable. Check with other guitarists to see who they recommend as being a capable craftsman – i.e., find out who they trust with their guitars.
Action and Setup
The adjustment of action and neck relief is described in the section on Periodic Setup. This work should be done by a repairperson who specializes in the setup of acoustic guitars.
Fretwork
Over the course of many years of playing, the frets on your guitar will wear from the steel strings being repeatedly pressed against them. The frets are made of nickel silver, which though hard is still much softer than the steel strings. When new, the frets are all the same height above the surface of the fingerboard. Over time the frets will wear down, developing divots where the strings are pressed against them. If one of the frets is worn appreciably lower than the one immediately following it, the string will buzz on the following fret when pushed down against the worn one. Unless you play unusually much, this will not likely happen for 10 years or so.
There are two possible remedies to the situation of worn frets, according to how bad the wear is. If the wear is not too severe, the situation can be remedied by re-leveling all of the frets, filing them until they are at the height of the lowest (most worn) fret. This process is called “dressing” the frets, and any qualified guitar repairperson should be able to perform this procedure. If some of the frets are worn so low that dressing would require the removal of too much material, it will be necessary to remove and replace the frets, an operation called “refretting”. The frets are actually designed to be replaced after they’ve worn. The visible surface of the fret conceals a barbed “tang” that fits into a narrow slot cut across the fretboard. Previously, the slots were sized to the width of the tang without the barbs, and the frets were hammered in and held in place by the barbs on the tang, which dug into the sides of the slot. This approach had a few drawbacks, however. First, the frets would sometimes loosen and rise slightly off the surface of the fretboard, especially at the ends, if the slots were not of precisely the correct width. And the barbs which held the frets in place presented problems when it was time to refret the guitar, by pulling up little chips of wood from the edges of the slot when the fret was removed. A modern and widely accepted alternative, which I use, is to cut the slots to the width of the tang plus the barbs, and to use epoxy to hold the frets in. The epoxy fills the space around the barbed tang, holding the fret securely in place. This practically eliminates the problem of lifting fret ends, and actually makes the removal of the frets easier when refretting – heat from the application of a soldering iron to the fret will cause the epoxy to soften, allowing the fret to be lifted from the slot without any fretboard chipping. Refretting is of course not an operation that you should try yourself. This discussion is included here so that, when it is time for refretting, you can let the repairperson know that the frets on your guitar are secured with epoxy (and so that you can make sure that the repairperson is familiar with the technique of “epoxy fretting”).
Installing Pickups and Microphones
There is a wide assortment of different pickups and microphones that can be installed in an acoustic guitar to allow it to be played through an amplifier – check with any good music store as to the units that are available. The dealer should be able to provide installation services, too, but if you feel uncertain of the repair facilities at the store, you can purchase a unit and have it installed by the repairperson of your choice. The installation usually requires drilling a hole for the jack to connect the guitar to an amplifier, as well as several other small holes, depending on the type of pickup / microphone unit.
Serious Damage: Cracks, Gaps and Holes
Despite their awful appearance, these more traumatic types of damage (that can result from lowered humidity, unexpected blows, or just bad luck) can usually be satisfactorily repaired, rendering the instrument perfectly playable again. The skill of the repairperson really comes into play here, especially with regard to how “invisible” the repair will be. The extent to which the damage can be concealed depends to a large part on the type of damage, but the results of the work of a true craftsperson can be pretty amazing – and the work of someone inexperienced can be pretty dismal (and can actually leave the guitar in worse shape than when it was brought in). The moral of the story is that when faced with serious damage like this, find the best craftsperson you can – ask around, get several estimates, and find a repairperson whose work you can trust. And remember, good work won’t come cheap, but bad work won’t go away.
Appendix: Humidity and the Acoustic Guitar
Probably the single most important factor in the health and playability of an acoustic guitar is the relative humidity of the air where the guitar is stored and played. This is a direct result of the way in which wood interacts with humidity, so we’ll take a moment to explain the basics.
Wood and Humidity
Wood, as the substance developed from the biological process of growth in a tree, is a material with a very complex structure consisting of a complicated array of different types of cells. We can use a simplified model to explain its mechanical properties, and to understand why wood behaves as it does with respect to humidity. For our purposes, a piece of wood can be thought of as a bundle of long fibers or tiny straws glued together side-to-side. The fibers are oriented along the axis of the tree as it grows; we say the direction in which the fibers run is the direction “along the grain”. On some pieces of wood the grain direction is very easy to see; for example on a guitar face, the parallel lines on the face run along the grain. While each of the fibers is quite strong, they’re somewhat less strongly bound together. That’s why it’s much easier to split a log or piece of firewood along the grain than to cut it across the grain – and also why, when you see cracks in the face of a musical instrument, they are almost always parallel to the grain lines. This also makes a plate of wood much stiffer along the grain than across it; if you had in hand the top plate of a guitar (detached and unbraced), you’d find that it was much easier to bend it across its width than along its length.
In a growing tree, the fibers are saturated with water. When the tree is cut into lumber, the wood begins to dry out, since the roots are no longer supplying the fibers with groundwater. The lumber will continue to lose moisture until it reaches an equilibrium with the surrounding air, at which point the lumber is said to be “air dry”. This process takes quite some time, especially for thicker pieces of lumber, so many producers speed the process by drying the wood in special heated kilns; such wood is called “kiln-dried” lumber. The amount of residual water in the wood at this point depends on the amount of moisture in the surrounding air, as measured by its “relative humidity”. In fact, the wood will continue to absorb and lose moisture as the humidity of the air around it changes, acting much like a big sponge. And like a sponge, the wood will swell as it absorbs water and shrink as it releases it – but in a nonuniform fashion which depends on the grain direction. This is the source of most of the trickiness in working with wood, especially in musical instruments.
Wood expands as it takes on moisture because its fibers expand. However, the fibers expand mostly in width, and very little in length. Thus, as the humidity increases, a piece of wood will expand across its grain (in two directions), but will not expand along its grain (in the third direction). A board with the grain oriented along its length (the usual arrangement) will increase slightly in width and thickness as the humidity increases, but not in length. Similarly, the board will shrink slightly in width and thickness, but not in length, as the humidity is lowered. (A little fancy terminology for those who are so inclined: a change which takes place equally in all directions is called an isotropic change; a change which doesn’t take place equally in all directions (whether irregularly or regularly) is called an anisotropic change. Thus the change in dimensions of a piece of wood with changing humidity is anisotropic change, and wood is called an anisotropic material.) The nonuniform expansion and contraction of wood with changing humidity is the reason for a great number of the techniques that have been developed for building with wood, and a great number of the problems that occur with wooden items, particularly musical instruments.
Relative Humidity
Since it plays such a pivotal role in the health of a guitar, it is worth taking a look at relative humidity and the relationship between the relative humidity of air and its temperature. Air has the ability to absorb or hold water (actually, it dissolves it). This is the principal behind hanging your clothes out to dry: the air that flows by absorbs water from the clothes. The amount of water that air can hold increases dramatically with temperature. This is the principal behind using hot air in a clothes dryer: the warmer the air, the more water it can hold and the faster it will carry moisture away from the clothes. At 40 degrees F, the air in an average-sized room (12 by 20 by 9 feet) can hold about a pint of water (see reference 1); at 90 F, the same amount of air can hold over half a gallon!
The air around us usually has some water already dissolved in it, but it’s usually not “full” (i.e., saturated). How “full” of water the air is is measured by the relative humidity. When the weather folks say that the (outdoor) relative humidity is 60% on a given day, this means that the air outside has absorbed 60% of the water that it’s capable of holding at that temperature. Thus there’s still room for it to dissolve more water, for drying your clothes, e.g., and the air is constantly looking for water to dissolve to “sate its appetite”, which is why it does dry (take water away from) your clothes.
During mild weather, when the windows of your house are left open, the inside and outside air exchange freely and so the indoor relative humidity is pretty much the same as the outdoor relative humidity. However, in the wintertime, when your dwelling is closed up and heated, the situation is very different. Suppose it’s 20 degrees Fahrenheit outside, and the relative humidity is 50%; at this temperature, our roomful of air can hold about 8 ounces of water when it’s saturated, so at 50% humidity each roomful contains about 4 ounces. When this air is heated in your home to 70 degrees Fahrenheit, it still contains 4 ounces of water per roomful; but at this temperature, this amount of air can hold up to 40 ounces of water, so the amount of dissolved water is only one-tenth the maximum amount, meaning the indoor relative humidity is now just 10%! The air in your house is thus much more “water-hungry” at its temperature of 70 degrees than is the outside air at its temperature of 20 degrees.
As such, this dry indoor air will have a strong drying effect on everything it comes into contact with, including your skin, your pet’s water dish – and your musical instruments. All of these things will give up water to the air until they are at the same relative humidity, i.e., until they are just as “water-hungry” as the air is, and can hold their own in the battle for moisture. Things would maybe not be so bad if wood’s appetite for water increased with temperature as much as the air’s appetite does, so that it would fight strongly to retain its moisture; but, alas, wood tends to hold about the same amount of water at any temperature (within normal temperature ranges). So as the air becomes “hungrier” due to increased temperature, the wood doesn’t have any additional “appetite” to retain its moisture, and loses it to the air. As the wood gives up moisture to the air, it shrinks across the grain. This moisture transfer isn’t instantaneous, so you don’t see wooden objects “shrink before your very eyes” when they’re exposed to lowered humidity, but water loss starts immediately and continues until the wood has reached “moisture equilibrium” with the surrounding air. (In fact, as you might expect, the outer layers of the wood dry out first, and as they dry moisture is transferred from the inner regions to replenish the lost water. This can set up unusual stresses within the wood as these dryer outer layers try to shrink relative to the wetter inner layers until equilibrium is reached.) The opposite happens when wood is exposed to air with a higher relative humidity: it absorbs water from the air, and consequently expands in size, until its moisture “appetite” is satisfied.
Guitar Design and Humidity
The most serious and noticeable effects of humidity on an acoustic guitar result from the expansion and contraction of the parts of the body or soundbox, so we’ll focus principally on this component. While the neck and fingerboard are affected, the results are less noticeable and less frequently cause significant problems.
Acoustic Guitar Soundbox Design
The soundbox of a guitar is constructed of very thin plates of wood, less than 1/8 inch thick. Inspection of a guitar will show that the grain is oriented along the axis of the neck on both the top plate (face) and back plate of the guitar, and along the “long” direction in the curved sides. The thinness of the plates is necessary so that they can vibrate freely and produce the tone and volume desired of a fine guitar. However, such thin plates are fragile and relatively weak, especially across the grain, and so have braces glued to their interior faces to give them strength, sort of like the framing in a house. These braces must be of just the right dimension to give the needed additional strength without impeding too much the vibration of the plates they support.
The braces across the back plate of the guitar are visible through the soundhole in the face. The braces on the underside of the top can be seen by inserting a mirror through the soundhole. The back braces almost always run from side to side in the guitar, perpendicular to the grain of the back plate. The top braces have a much wider variety of arrangements, depending on the philosophy and taste of the builder. The vibration of the top is one of the most important elements in creating the tone of the guitar, and so some of the braces on the underside are intended to induce the top to vibrate in a particular manner; these are called, appropriately enough, “tone braces”. Others are intended mostly to help support the top, especially against the substantial pull exerted by the strings on the bridge. The most widely used support bracing for steel-string acoustic guitars consists of a pair of braces running diagonally across the grain and forming an “X” whose center lies between the bridge and soundhole, with several smaller braces running from the X-brace to the edge of the top for additional support.
 Guitar top showing bracing
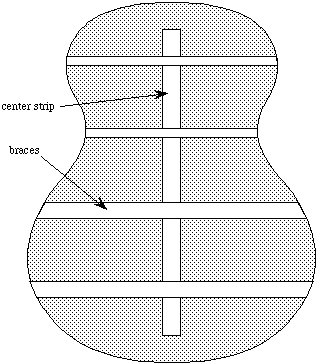
Guitar back showing bracing
The Soundbox vs Humidity: Cross-Grain Construction
While bracing is an essential feature in a guitar, it also presents problems with regard to changing humidity. The chief problem arises because the braces are glued such that their long axis, which for reasons of strength is the direction along the grain, runs across the grain of the top and back plates; this is called “cross grain construction”. A general (fundamental) rule of woodworking is that such cross-grain construction is to be avoided, because of the different expansion of wood across and along the grain. An example is provided by commonly available wooden cutting boards. These often have small “battens” glued to the two ends of the board, across the grain, to cover the “endgrain” that would otherwise be exposed. Covering the endgrain is not in itself a bad idea, for by our fiber analogy, in which wood can be viewed as a bunch of straws bound side by side, we’d expect the wood to absorb water readily through the endgrain, in which the open ends of the straws are exposed, which would cause problems when the cutting board is washed. However, by gluing the battens on the end, an untenable situation is created. As the moisture content increases (either due to increased humidity in the outside air or from washing), the fairly wide board will need to expand in width, across the grain. But the battens are glued on the ends with their grain perpendicular to the grain of the board, and they won’t expand in length as their moisture content increases. We thus have a situation in which the pieces of wood are fighting each other: the board is trying to expand in width, the battens are trying to stay the same length. What happens? Usually, the glue joint between the battens and the board fails, and the battens fall off. Sometimes, the glue will hold, but the joint will “creep”, allowing the width to expand somewhat, and you’ll notice that there’s a little lip where the two pieces originally were flush. In any case, this illustrates why it’s not a good idea to glue together two pieces of wood with their grains running in different directions.
Alas, in the guitar we don’t have much choice. The braces must have their grain running in the long direction (otherwise they’d have no strength), and they must run across the grain of the plates to give them the needed support in this direction. But the top and back plates will want to expand in width with rising humidity, and the braces will tend to resist this expansion. The situation is a little different from that of the cutting board discussed above, because the braces are glued just to one face of the plates rather than on the ends. In this case, as the plates try to expand, the underside of the plates is constrained by the braces while the top surface is unconstrained. The outer surface will tend to become slightly wider than the inner surface, and this forces the plate into an arch. Thus as humidity increases, the top and back of a guitar will bow or “bulge” outward slightly. Similarly, as humidity decreases, the plates will bow inward. It should be noted that this bowing doesn’t completely relieve the stress in the plates; the inner surfaces are constrained by the braces, which creates a compressive stress that tends to keep the plate from expanding with higher humidity and a tensile stress that tends to keep the plate from shrinking with lower humidity. (It should be noted that the sides of the guitar have a significant effect, too, in constraining the expansion and contraction of the top and bottom plates, especially at the ends, but it is the braces that cause the plates to bow as they do.)
One mitigating change that has been introduced over the past few decades is the practice of building the guitar top with a slight arch built-in, using arched braces and workboards. This will help keep the top from actually becoming concave when the humidity drops, and is said to improve tone. Most acoustic “flat-top” guitars built today (including mine) use this approach. Additional discussion of this technique can be found in the article Arched Workboards for Steel String Guitar Construction.
Humidity-Caused Changes in Playability
The above stresses and reactions give rise to a number of changes observed in guitars. When the humidity rises, the top of a guitar will bow outward; this raises the bridge, which raises the strings, and causes them to be higher above the fingerboard, especially at the higher frets. This explains why the action of an acoustic guitar (the height of the strings above the fretboard) tends to become higher in the summer: the relative humidity is higher. Similarly, many guitars will begin to “buzz” in the late fall and winter: this is because the indoor relative humidity is much lower, making the top bow inward, lowering the bridge, and thus making the strings too close to the frets, on which they buzz when plucked. In effect, guitar bodies “breathe” with the seasons, inhaling during humid times and exhaling when it’s dry. This is why some guitars seem to be comfortable to play only during part of the year.
Even if you take reasonable measures to maintain the humidity at acceptable levels in the environment in which the guitar is stored (above 40%), the humidity will still be lower in the winter than in the summer, and you may notice a change in action with changing seasons. Fortunately, these effects can be compensated for relatively easily, as long as they’re not too severe. All that’s needed is a new saddle for the bridge, to set the strings to the appropriate height; this can be dropped in easily when the strings are changed. Any good guitar repairperson can make up a new saddle. You should ask to keep the old saddle so that 6 months later, when the humidity returns to its previous level and the action is now too low (or high), you can drop in the old saddle to restore the guitar to its previous playability. You can think of this as being analogous to putting snow tires on a car in winter. Alternatively, you can have a saddle that gives correct action in the summer, and in the winter when the action drops just add a shim of appropriate thickness under the saddle.
Humidity-Caused Crises: Cracks
An even more serious consequence can arise in winter, or if the guitar is taken to a part of the world that has significantly lower humidity than its usual storage environment. As mentioned above, the inward bowing in low humidity doesn’t completely relieve the stresses in the plate. The plate is trying to shrink in width while the braces are trying to keep this from happening; the lower the humidity, the more the plate tries to shrink and the stronger the pull of the braces to keep it from doing so. If the humidity is low enough, this pull can become stronger than the strength of the plate across the grain, and the plate will crack. Cracking is also sometimes noticed around pickguards, which don’t change size with changing humidity and thus also constrain the contraction of the wood. This explains why most cracking of guitars is noticed in the winter. While cracks can be repaired, there’s no easy solution to this problem once it occurs: prevention is the key.
References
- Understanding Wood, R. Bruce Hoadley, The Taunton Press, Newtown, CT, 1980.