Overview
Guitar Design is a Java application to aide in the design of guitar body shapes. Body designs are specified with control points which indicate the general shape of the design; as the points are dragged to new positions, the body shape changes in the same direction. By moving (and adding and deleting) control points, a body design can be refined until it has the desired shape. The design can be printed full size for use in making templates for guitar construction.
Starting
To start Guitar Design, either double-click on the GuitarDesign.jar file, or type
java -jar GuitarDesign.jar
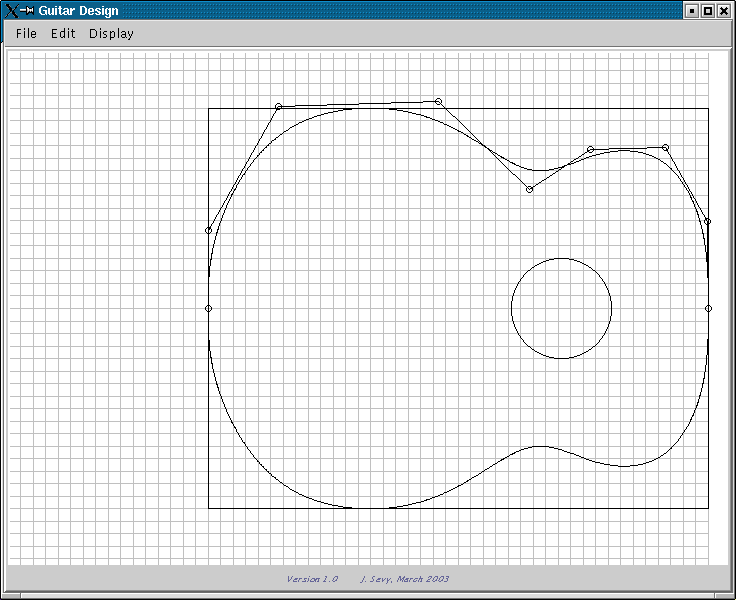
in a terminal window. When the Guitar Design application is opened, a blank design screen is displayed. To begin a new design, select “New Design” from the “File” menu. The application will then be waiting for you to place the control points for the design; the points will be displayed sequentially wherever you click the mouse. When finished, select “Sketch curve” from the “Edit” menu. The curve corresponding to the control points will be drawn, along with the control polygon consisting of line segments connecting the control points and the matching half of the design if symmetry is selected in the Graphics dialog (discussed below). The design can now be refined by dragging the control points; as a point is dragged, the region of the curve in the vicinity of the point will change to follow the movement of the control point.
Notice that when a control point is clicked on with the mouse, it becomes highlighted; this is important when adding, deleting and altering the weight of points (see below), as the operation will apply relative to the currently selected point.
Some general design principles
- It takes relatively few control points to create a pleasing design. I generally use only 9 for symmetric acoustic designs.
- The curve will always pass through the first and last control points.
- At the endpoints, the curve will be tangent to the control polygon; thus, to get a symmetric design to meet at the ends without a cusp, the end two control points should be on a vertical line, as in the design above.
File Menu
The file menu contains items for opening, saving and printing designs.
New design
Select this to start a new design. After this item is chosen, the application will be waiting for you to click at the position of each successive control point, which will be drawn as a circle on the design. When finished placing control points, select “Sketch curve” from the “Edit” menu; the control-point addition process will be ended, and the curve and control polygon drawn on the design.
Open design
Open a previously saved design. Note that designs are saved in a proprietary XML format – only designs previously saved by the Guitar Design app can be opened.
Save design, Save design as
Note that the design parameters are saved as an XML file. This file is plain text, and can be inspected with a text editor if desired.
Export as PDF
Exports the design in PDF format so that it can be viewed and printed with any standard PDF application. Note that this format cannot be re-opened with the Guitar Design app, which uses its own proprietary format (see above under Save and Save As).
Export as DXF
Exports the design in DXF format so that it can be viewed and printed with any standard computer-aided design (CAD) application such as AutoCAD and LibreCAD. Note that this format cannot be re-opened with the Guitar Design app, which uses its own proprietary format (see above under Save and Save As).
Print design
Select this item to print out a design. This brings up a dialog asking whether the design should be printed either on a single page, full size, or just the left or right half (useful for symmetric designs). This is followed by a dialog asking for the page orientation (landscape or portrait). For the full size and left/right half printouts, multiple pages will be produced which overlap slightly so that they can be pieced into a single sheet for use in constructing a template.
Edit Menu
The “Edit” menu contains items for displaying and altering the design.
Sketch design
The “Sketch design” item simply causes the design to be drawn onscreen; this is usually only used after “New design” has been selected from the “File” menu, to stop the addition of control points and cause the design to be drawn.
Add point
This item is used to add a control point. This is useful for refining a design; adding a control point gives additional flexibility in specifying the shape of the design curve (though too many can make it difficult to create a smooth curve, resulting in unappealing lumps). It’s necessary to select the control point that the newly added point will follow before choosing the “Add point” menu item:
- Select the control point that the new point is to follow by clicking on one of the existing control points
- Choose the “Add point” menu item
- Click at the position for the new control point; the new point will be drawn at this position, and the curve will be altered accordingly
The newly added point can be dragged to refine the curve shape.
Delete point
This item is used to remove a control point. It’s necessary to select the control point to be deleted before choosing the “Delete point” menu item:
- Select the control point to be deleted by clicking on one of the existing control points
- Choose the “Delete point” menu item; the selected point will be deleted, and the curve will be altered accordingly
Alter weight
This item is used to affect the amount of influence a control point has on the curve. The default weight of a control point is 1: if its weight is increased to 2, the curve will be drawn more closely to the point; if the weight is increased to 3, the curve will pass through the point, and may even forma a cusp (sharp corner) at the point. Increasing the weight of a point can be useful when defining a cutaway for access to the higher frets. It’s necessary to select the control point whose weight is to be altered before choosing the “Alter weight” menu item:
- Select the control point whose weight is to be altered by clicking on one of the existing control points
- Choose the “Alter weight” menu item; a dialog will appear in which you can select the point’s weight
- When the dialog is closed, the curve will be redrawn to reflect the control point’s new weight
Undo, Redo
These will undo and redo previously applied operations.
Display Menu
The Display menu contains items that affect the display of the design
Control points
When checked, control points will be displayed. This will usually be desired, except possibly when a completed design is being printed.
Control polygon
When checked, the sequence of control points will be connected with line segments.
Curve
When checked, the curve will be displayed. This will usually be left checked.
Show display dialog
This item brings up the display dialog, with the following items:
- Units: allows quantities to be specified in either inches or centimeters
- Grid: selects whether a rectangular grid should be drawn in the display window
- Grid width: specifies the spacing of the grid, if any
- Symmetry: specifies whether the design should be symmetric about the centerline; this is often desireable for acoustic guitar designs
- Design window scale factor: specifies the fraction of actual size used for the onscreen display
- Souldhole: selects whether a (round) soundhole should be drawn on the design
- Soundhole diameter: diameter of soundhole, if any
- Soundhole center: the location of the center of the soundhole from the edge of the design grid
- Outline: selects whether a rectangular outline is drawn in the design window; this is useful for keeping a design within a specified length and width
Show geometric parameters
This item brings up a dialog with geometric parameters for the current design
- Length: gives the length of the curve; note that if symmetry is selected, this gives the length of only one half of the curve, i.e., the length of one acoustic guitar side.
- Area: gives the area of the design
- Minimum radius: gives the smallest radius found in the curve; this can be useful when considering bending guitar sides.