Acoustic guitar body design is an area in which luthiers get to use their imaginations to develop unique shapes with pleasing aesthetics. While good acoustic tone of the instrument is the main goal, the many designs used by different makers show that there’s no set rule on what the shape of a guitar must be to produce a good-sounding instrument. The body shape and size will however affect the overall voice of the instrument – though a Martin D-28 and 000-18 are both wonderful sounding guitars, they definitely sound different. This article discusses some considerations in body design and how they relate to an instrument’s voice, and presents the designs I’ve personally built over the years and the techniques used to create them.
Design Tools
There are lots of ways to design a guitar outline. You can design with paper and pencil, either freehand or using various drawing tools like compasses and French curves and the like. You can also use widely available drawing software such as LibreOffice Draw, Inkscape and the like, which gives you lines, circles, freehand curves and additional tools like Bezier curves to create shapes. These curves can be smoothly joined together to create the complete guitar outline.
A couple of points are worth noting. First, to get a symmetric outline, you can design one half and then copy, paste and flip this in a drawing program to get the mirror image. Second, it’s helpful to have a small flat at the neck end of the body where the neck will attach (maybe 2 1/2″ wide for a typical 6-string neck width).
I have primarily used a tool called Guitar Designer that I developed many years ago that supports designing using cubic B-splines, which are extensions of the cubic Bezier curves used in computer drawing programs. The advantage (as I see it) to using B-splines over Bezier curves is the ability to use as many “control points” as desired to create a continuous smooth curve for the whole body that avoids the “lumps” that can occur when different Bezier curves are joined together. But this is just a personal aesthetic choice. The program also allows designs to be created that are automatically symmetric (without requiring the copy-past-reflect needed in regular drawing programs), and can export the drawing in PDF and SVG formats.
The Guitar Designer app is available as a Java app that runs on a PC; the app can be found and downloaded here:
The designs I’ve created with this app, in both the native format for use with the app and SVG and PDF formats, are available below.
Body Size
Many factors affect the voice of the completed instrument, especially body size. As a general rule of thumb, guitars with larger bodies will have a more pronounced bass response, while guitars with smaller bodies will have a more pronounced treble. The size of a guitar body is determined by both the area of the face and the depth of the body. It’s this body volume that is a main factor in determining the voice of the guitar. The exact shape of the guitar, its outline, will have an effect on the tone, but secondary to the effect of the overall volume – a big guitar will tend to be “boomy”, whatever the shape. Consider for example the Martin dreadnought and the Gibson jumbo. While their shapes are quite different, they’re both quite large guitars, and while their voices are different, they both have a pronounced bass-iness, especially compared to something like a Martin 000. Thus in acoustic guitar design, size matters.
Note that size in this context refers to the overall three-dimensional volume of the guitar body. Thus another way to enhance the bass-iness of a guitar is to make the body deeper to increase the volume. Of course, there are many, many factors that determine the overall voice of a particular instrument, including the top material and thickness, top bracing, and soundhole size. But body volume is the main starting point.
Typical dimensions for steel-string acoustic bodies are given in the table below.
| Body length | 19″ – 21″ |
| Body width (lower bout) | 14″ – 17″ |
| Body width (upper bout) | 10″ – 13″ |
| Body width (waist) | 9″ – 10.5″ |
| Body depth (neck) | 3.5″ – 4″ |
| Body depth (end) | 4″ – 5″ |
These are just general guidelines – there are certainly no fixed rules on this. However, one factor that’s worth considering at the outset is whether you can find a case that will fit your design. If you’re building a clone of a popular existing design (such as a dreadnought or Martin 000), cases specific to that guitar style should be easy to find. But if your design is a custom one (as mine are), you’ll need to search to find a case that’s a good fit. While too small (either length or width) is obviously a no-go, you also don’t want the fit to be too loose or the guitar can bang around inside the case. I’ve put together a spreadsheet with the dimensions of the designs I build (body length, upper and lower bout and waist widths, body depth, and overall guitar length), and obtained dimensions for commercially available case to find the ones that fit best.
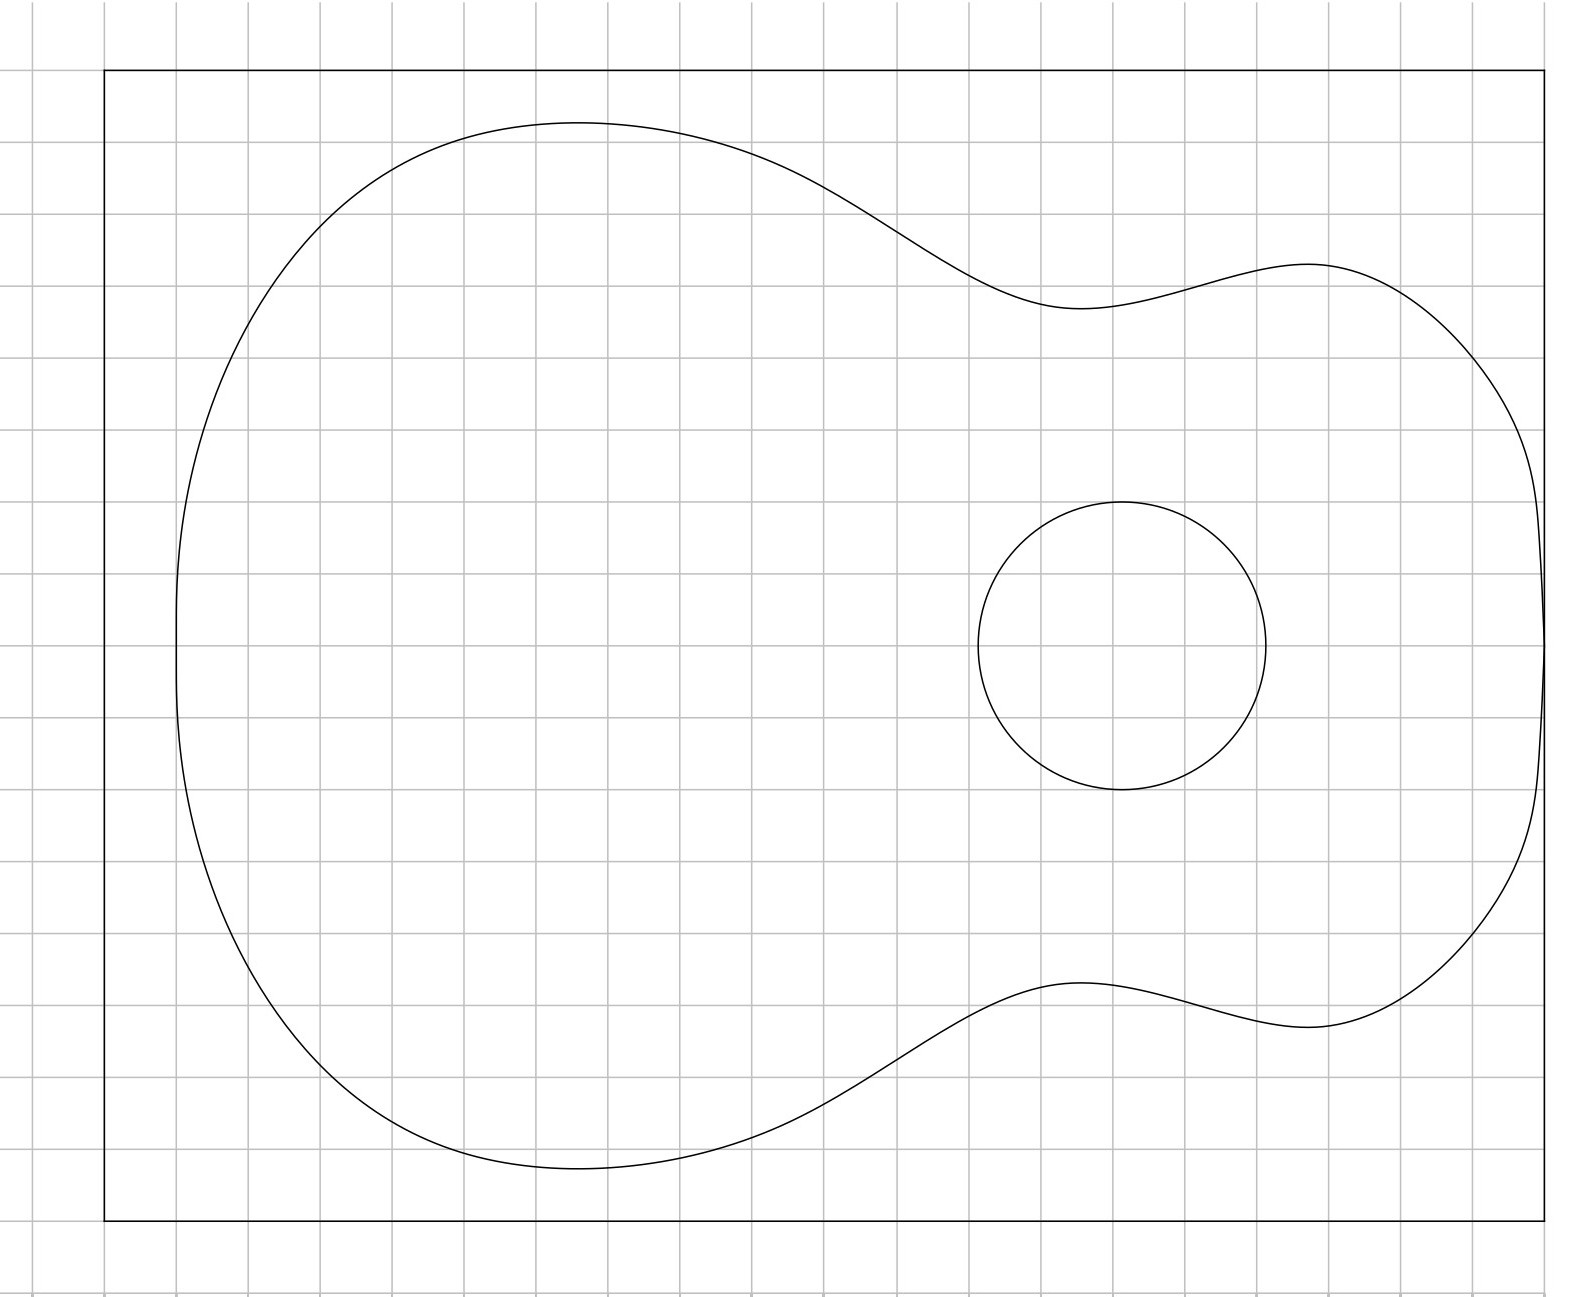
I’ve focused on four distinct body shapes and sizes in my building, named (unimaginatively) style #1 through style #5, and ordered not by size but by the order in which I introduced them over the course of 40 years of building.
- Style #1: large-bodied (rounded jumbo shape)
- Style #2: small-bodied
- Style #3: small-medium (made only one in this style, decided it was a bit too wasp-waisted for my taste)
- Style #4: small-medium (modification of Style #3 with a fuller waist)
- Style #5: medium-large
The guitar case spreadsheet above gives the principal dimensions for each of these designs, and the illustrations below show the actual designs.
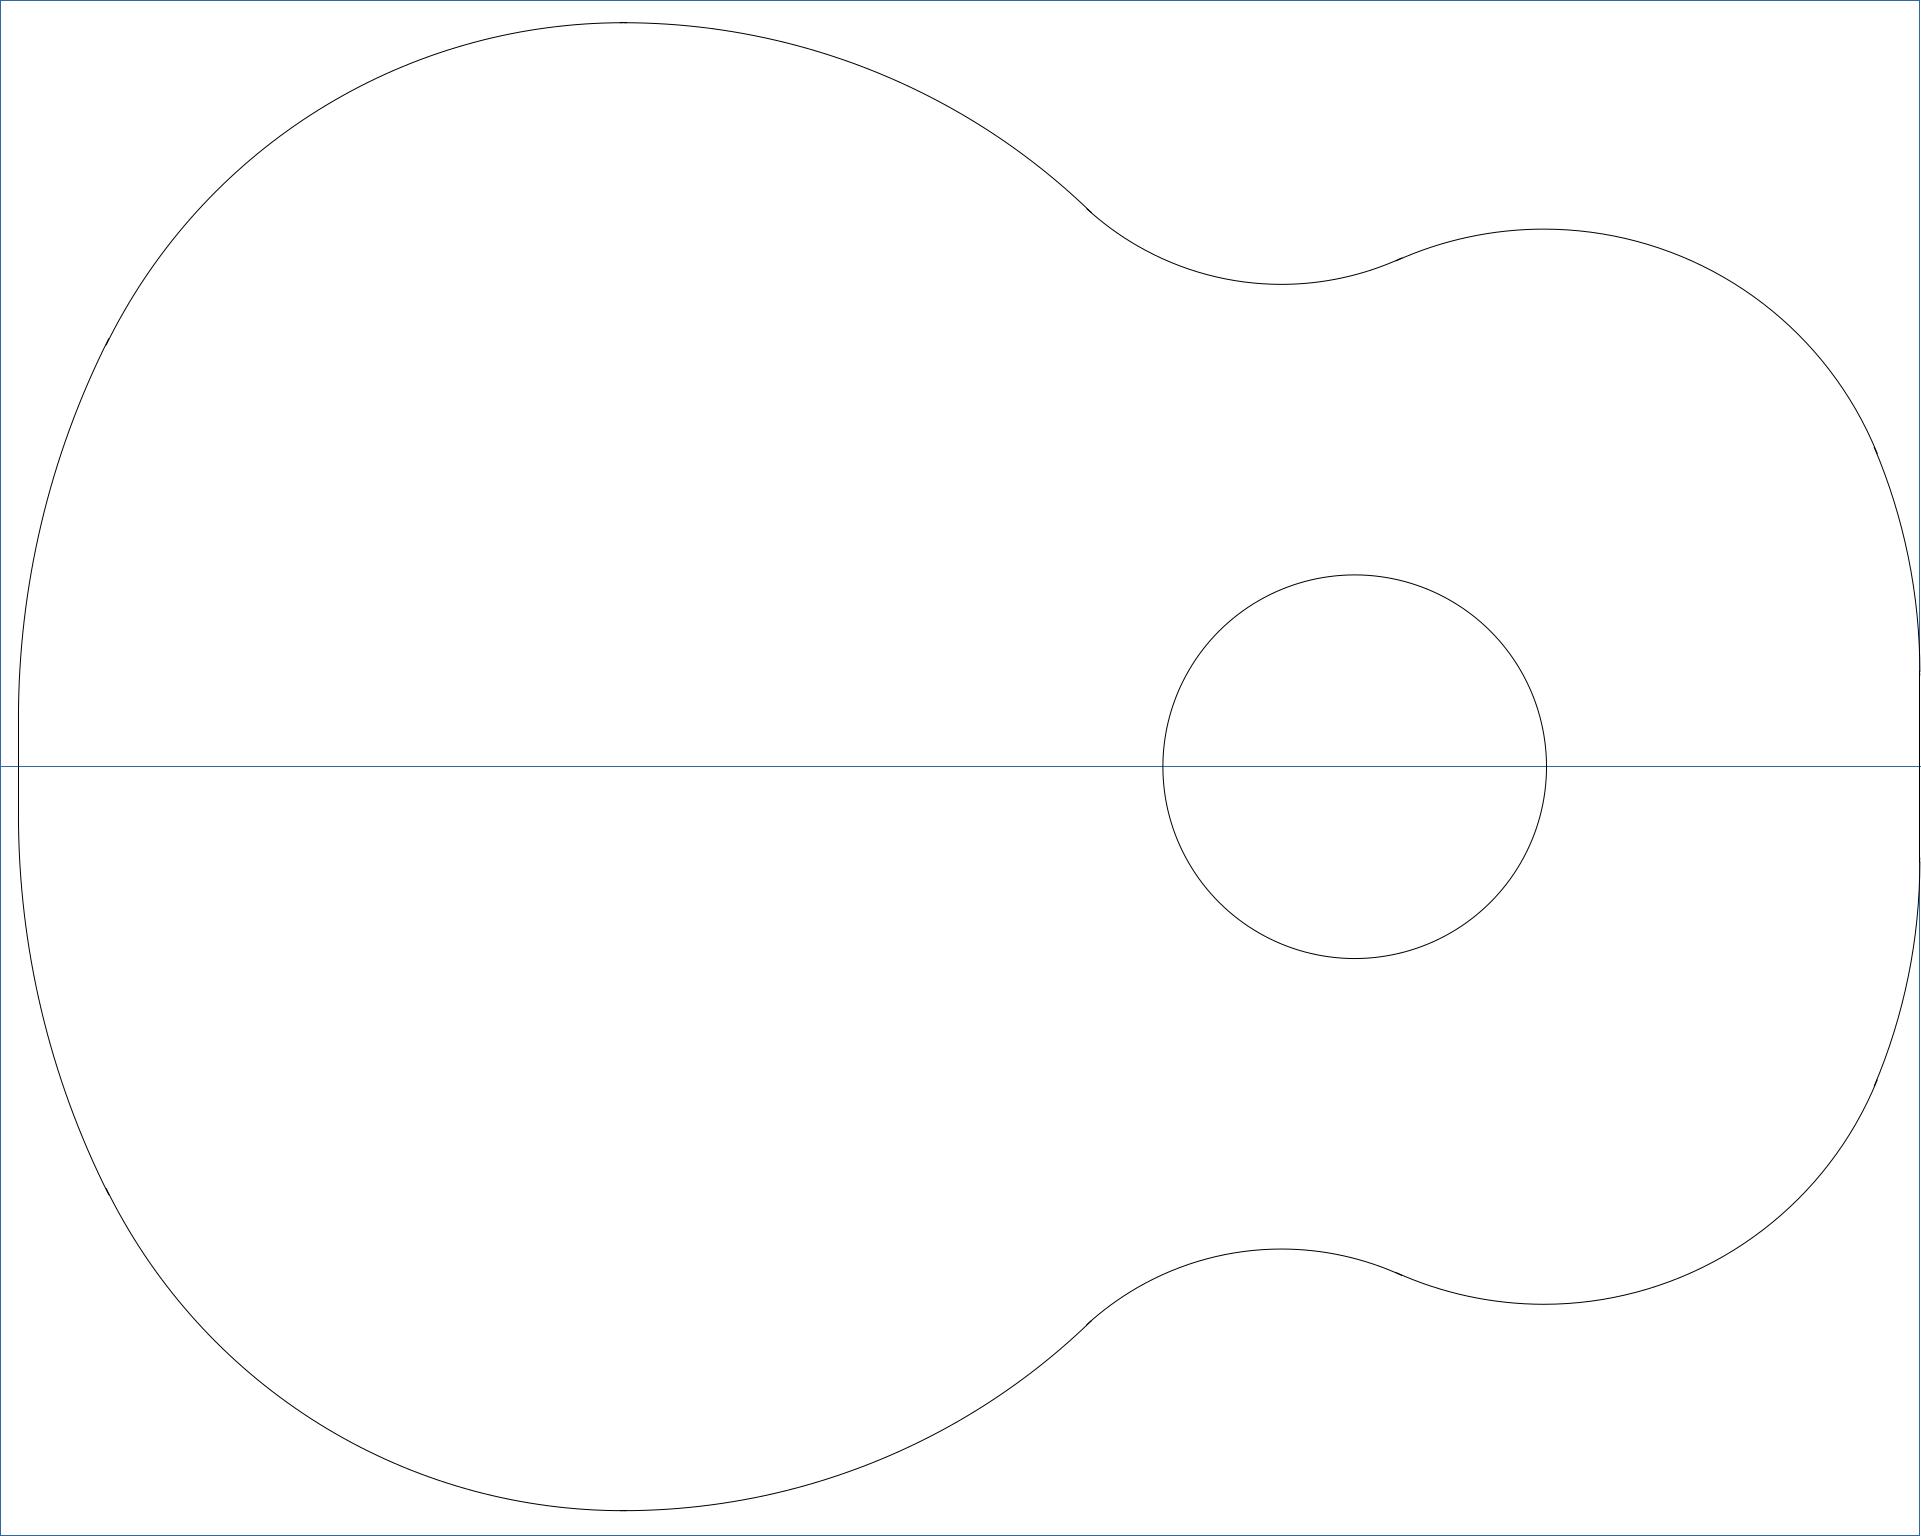
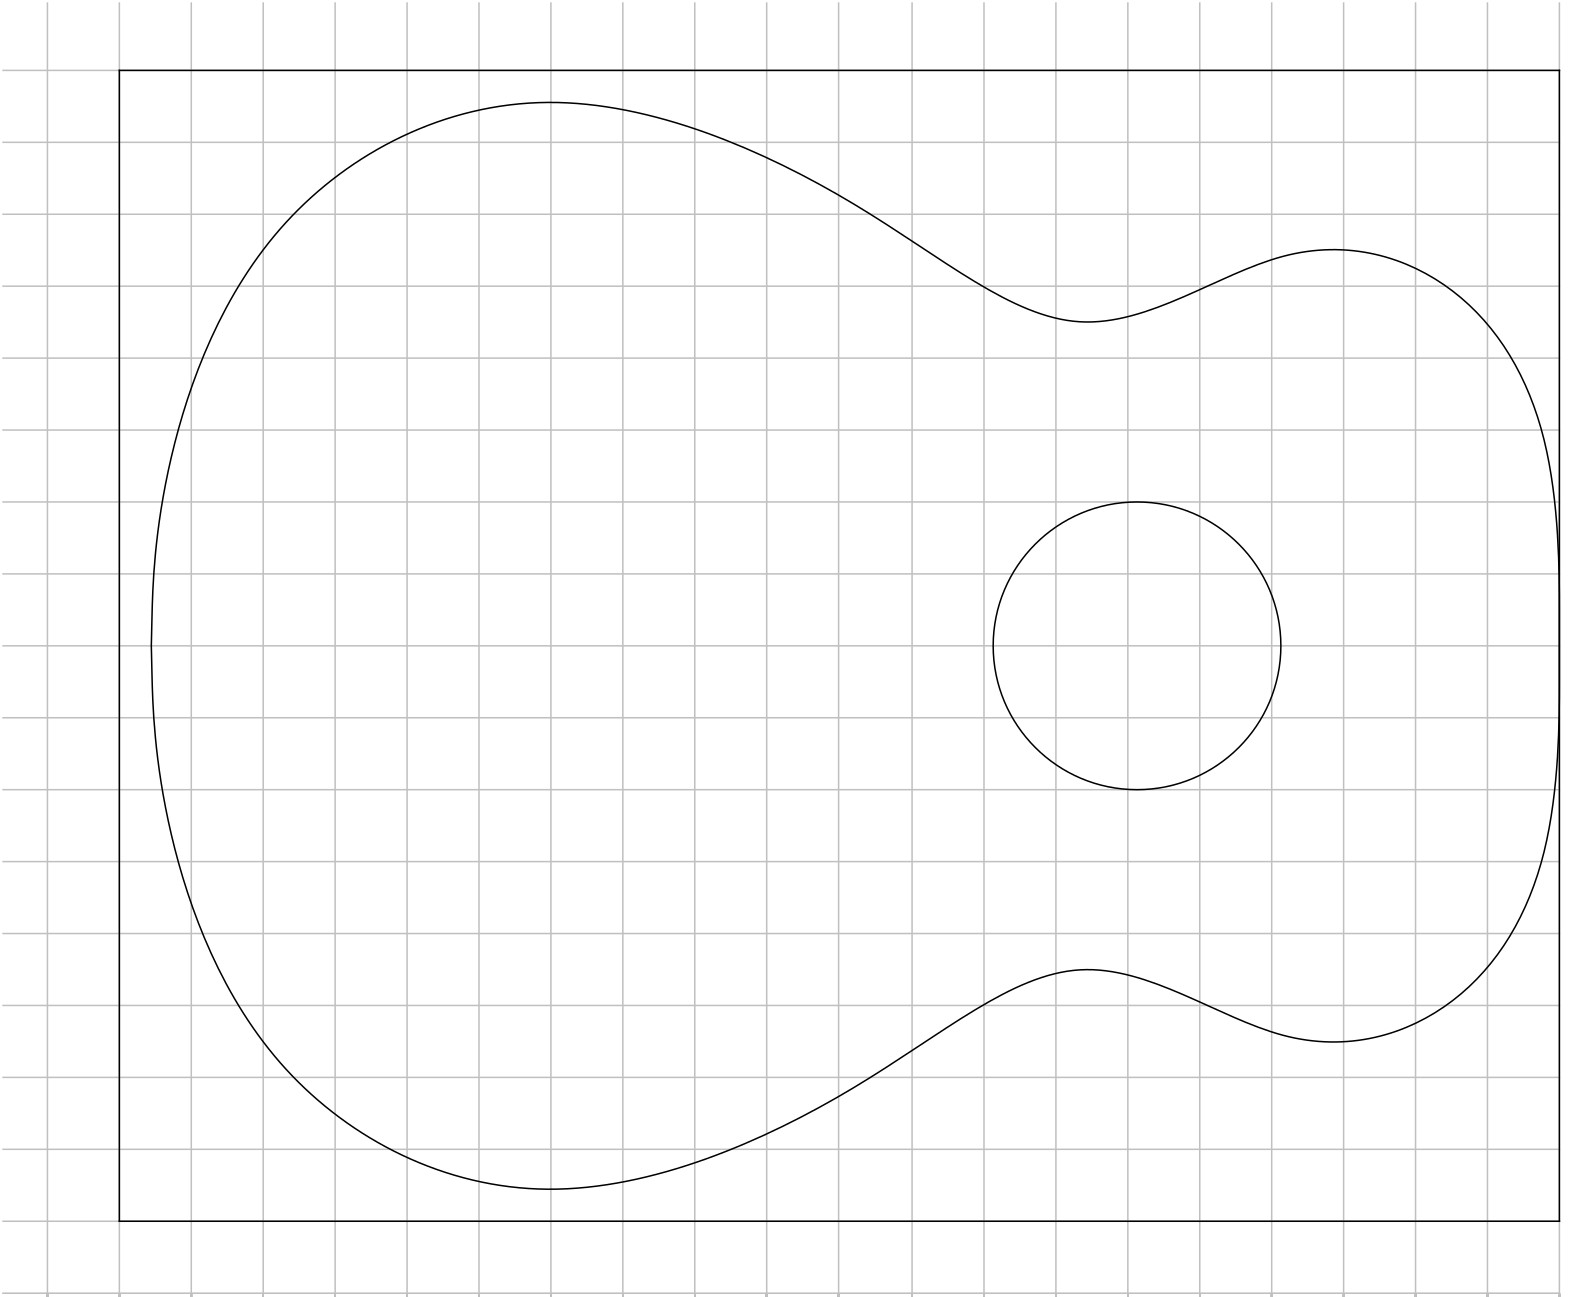
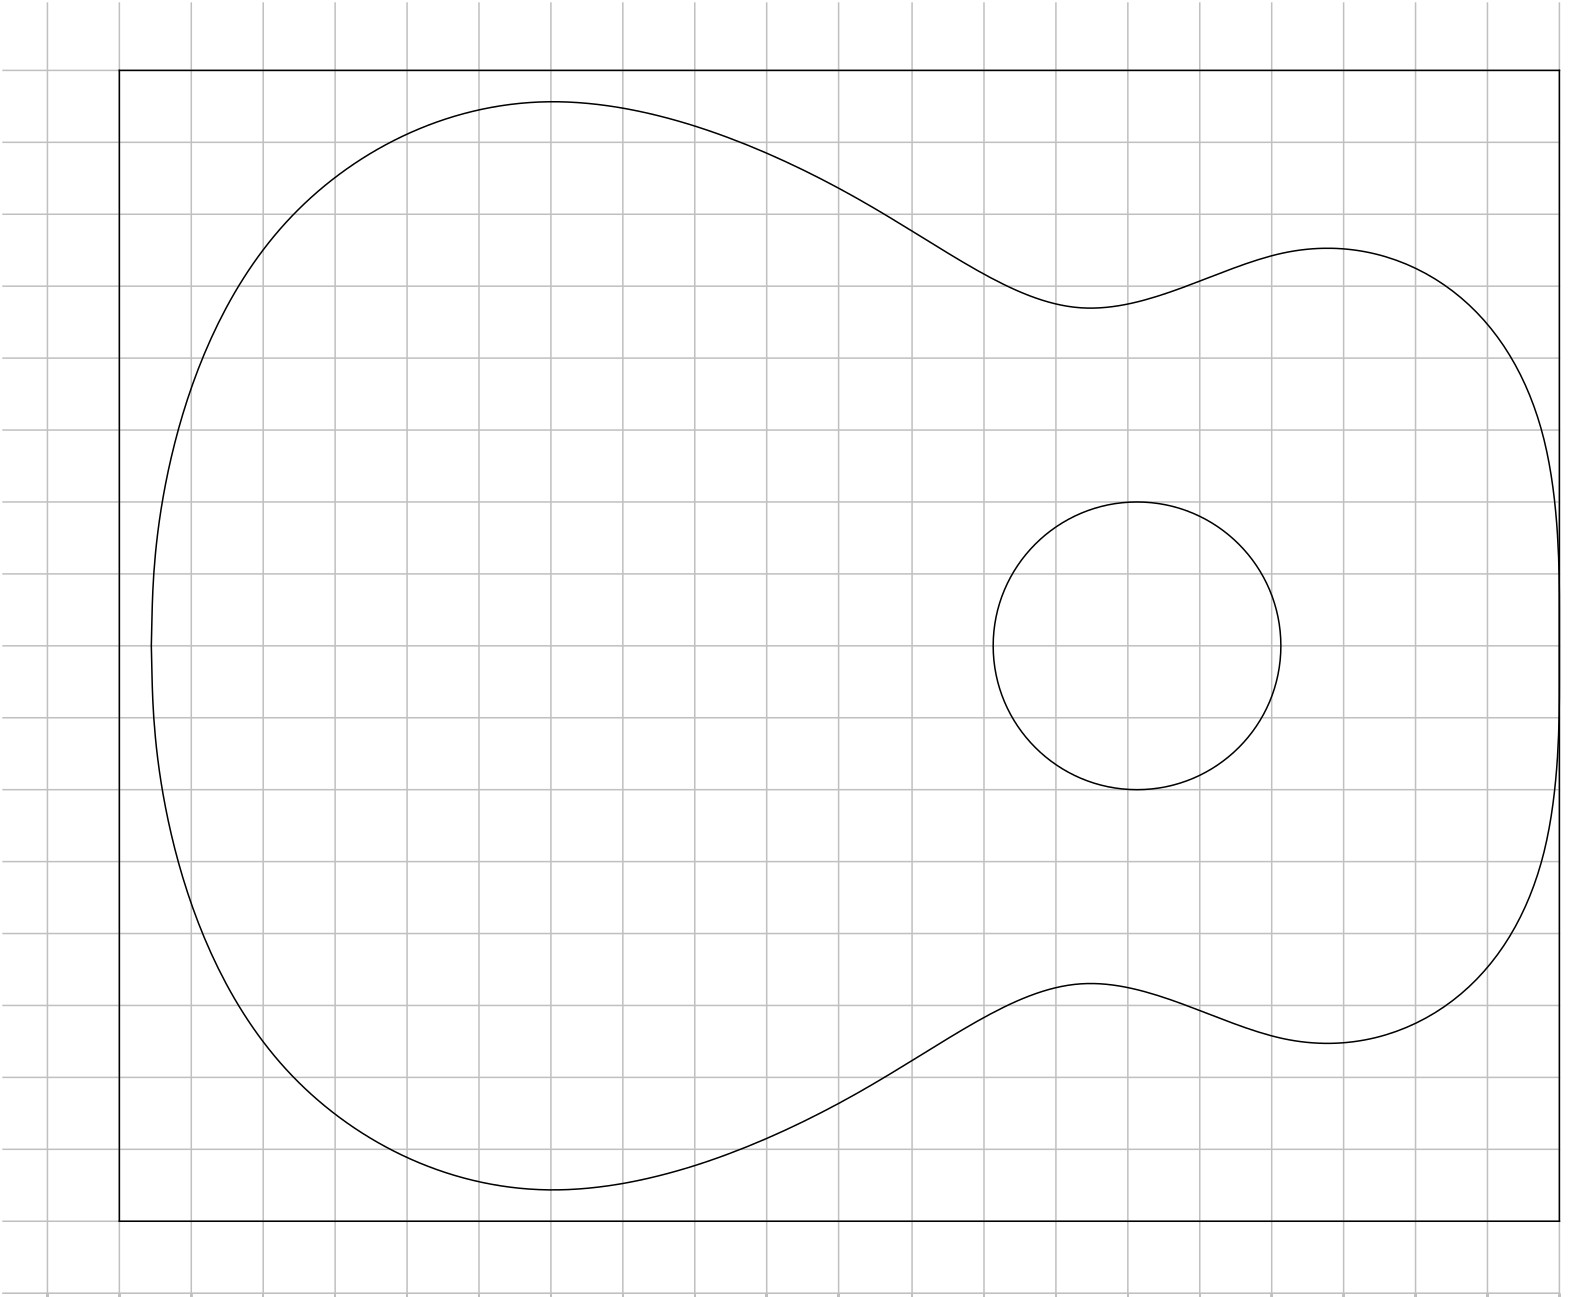
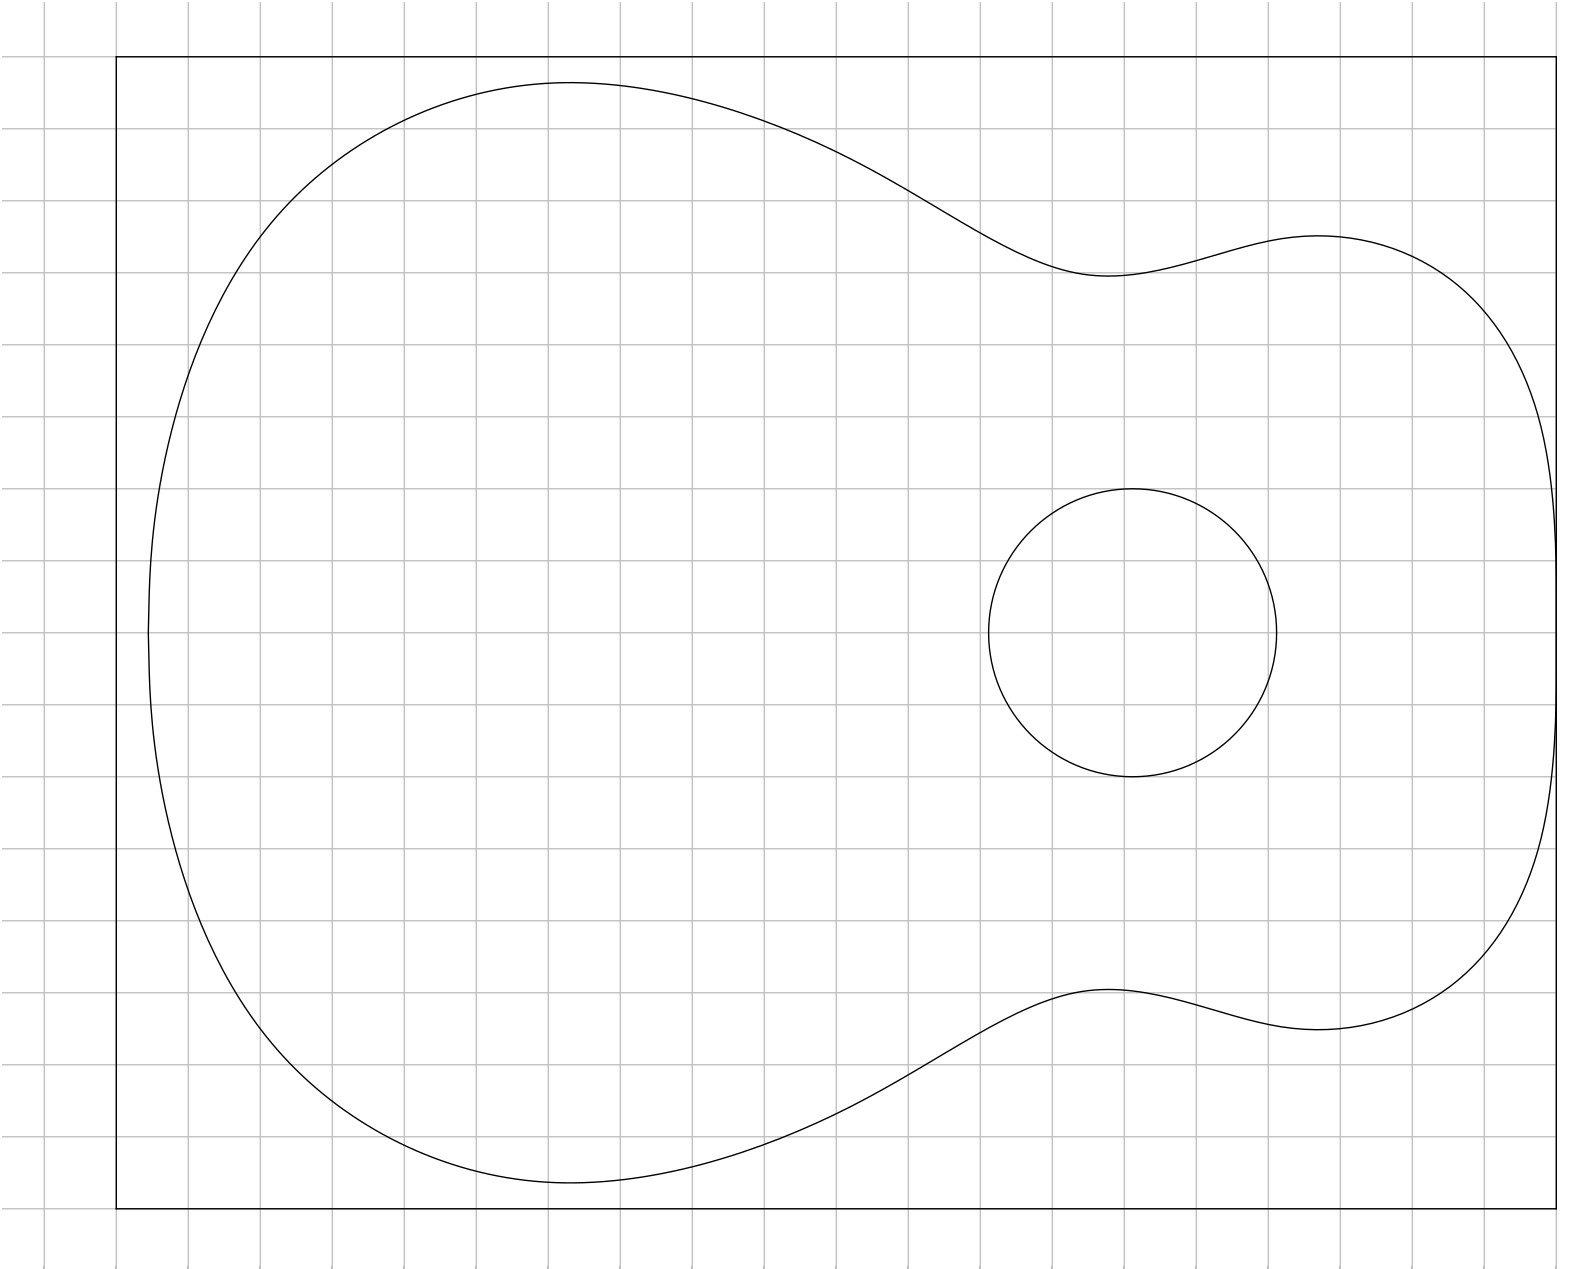
The designs I use for styles 1, 2, 3, 4 and 5 are available at the links below, in various formats. The XML format is for use with the Guitar Design app linked above. Note that style 1 was designed on paper using circular arcs and eventually transferred to a computer drawing program (LibreOffice Draw), so instead of an XML format file for the Guitar Design app there’s an ODG format file for LibreOffice Draw.
| XML/ODG | SVG | ||
| Style 1 |
acoustic_1.odg | acoustic_1.pdf | acoustic_1.svg |
| Style 2 | acoustic_2.xml | acoustic_2.pdf | acoustic_2.svg |
| Style 3 | acoustic_3.xml | acoustic_3.pdf | acoustic_3.svg |
| Style 4 | acoustic_4.xml | acoustic_4.pdf | acoustic_4.svg |
| Style 5 | acoustic_5.xml | acoustic_5.pdf | acoustic_5.svg |
You’re free to print these out and use these designs to build instruments, or as starting points for your own designs. The XML files can be opened and edited with the Guitar Design app linked above.
Soundhole Size
Interestingly, soundhole size is a somewhat significant factor in the tone of the instrument. While it would seem that the main role of the soundhole is “to let the sound out”, it plays an important role in what’s known as the Helmholtz resonance of the body. This is the same principle that operates when you blow across the neck of a bottle to get a tone out. The Helmholtz resonance results from the volume of air in the vicinity of the soundhole acting as a piston with some mass and the air inside the body cavity acting as a spring. When the ball of air in the soundhole moves out, the air inside the body becomes slightly lower in pressure, which tends to pull the air ball back in, at which point the ball compresses the air in the cavity slightly, which pushes the ball back out. This in-and-out motion has a particular frequency at which the ball moves in and out; this is called the Helmholtz resonance of the cavity-ball system. This is just like having a ball suspended at the end of a spring – when started, the ball will bounce up and down at a particular frequency. For a given spring, the heavier the ball, the slower the rate that the ball bobs up and down. In the same way, the size of the air ball, determined by the size of the soundhole, affects how light or heavy the air ball is, and thus how easy it is for the air spring inside the body to pull it in or push it out. The smaller the soundhole, the lighter the air ball, and thus the easier it is for the air spring to move it, and so the higher the Helmholtz resonance; the larger the soundhole, the lower the Helmholtz resonance. Thus to first order, the “bass-iness” of a guitar can be adjusted by changing the soundhole size – a larger soundhole will lower the Helmholtz frequency and thus make the guitar somewhat bass-ier. However, this effect is secondary to the effect of body size – body size matters more than soundhole size, for the most part. (The body volume also affects the Helmholtz resonance since it forms the “spring” in the system. The bigger the body, the less resistance the air inside gives to the soundhole air-ball as it moves in and out, so the softer the spring, which lowers the Helmholtz frequency.)
The discussion above is however only an approximation to what happens in a completed guitar, due to the fact that the top (and also back and sides to a lesser extent) are pliable and vibrate themselves along with the air mass in the body cavity. When the soundhole air ball moves in, it compresses the air in the body cavity, which then pushes against the top, which itself deflects slightly as a result. This deflection of the top plate by the air mass works to lower the Helmholtz resonance below what it would be if the guitar top (and back and sides) were perfectly rigid. The effect of soundhole size is the same, however – the resulting overall resonance is lowered with a larger soundhole.
That said, I’ve generally just stuck to using 4″ diameter soundholes for most of my instruments. The few times that I’ve used something less (like 3 3/4″), I can’t honestly say that I’ve noticed that much difference in the overall voice of the instrument. But that’s just my experience.
Soundhole Location
I locate my soundholes with center 5 7/8″ from the neck-end of the guitar body, for the simple reason that, with a neck joined at the 14th fret and the 25.5″ scale length that I typically use, it allows me to use a 20-fret fingerboard that ends right at the soundhole. That’s probably the main consideration – the exact placement of the soundhole on the top has little effect on the overall voice of the instrument. Indeed, some builders locate the soundhole(s) asymmetrically on the upper bout.
Printing and Building
Once you have a body design that you like, you’ll want to print it out to use in developing jigs for building. If you’ve done the design full-size with pencil and paper, you’re pretty much good to go, though you might want to have full-size copies made at Staples or a print shop. If you’re used a design program, you can save the full-size design as a pdf file and have this printed at Staples using one of the available large-format printing sizes. One tip is to choose the “Blueprint” option for printing, as this is much cheaper than the usual full-color large-format print.
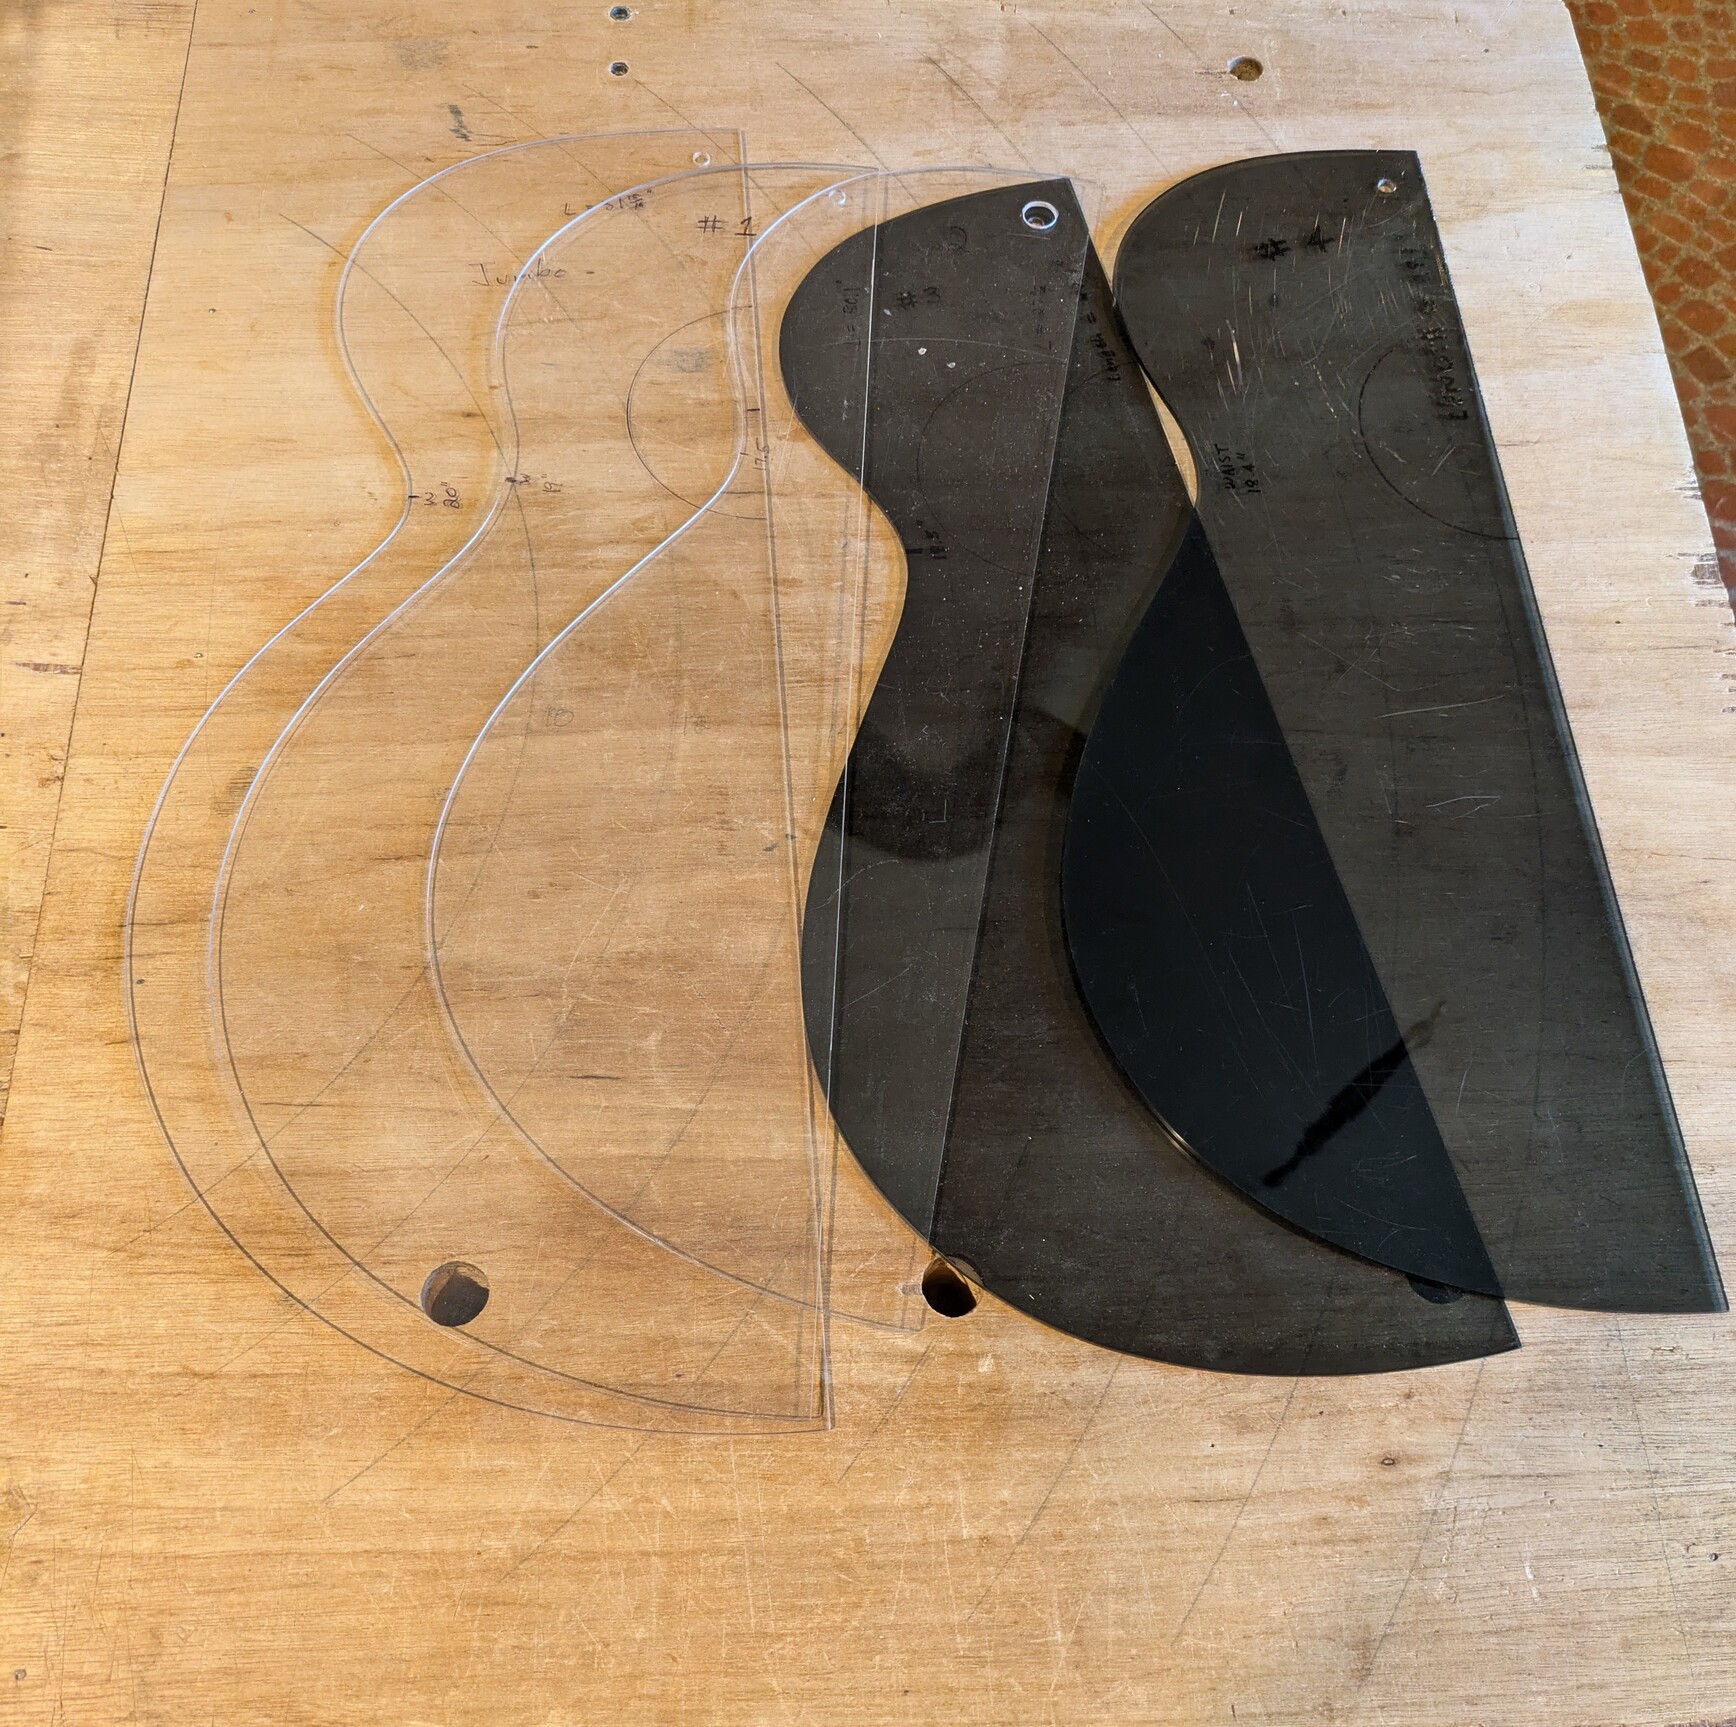
I use the printed output to make a plexiglas half-width template that I use as the basis for all further jigs and drawing operations. If you make the template clear, it makes it particularly useful for drawing outlines on tops and backs since it allows you to readily see defects and avoid them or locate them within the soundhole area.
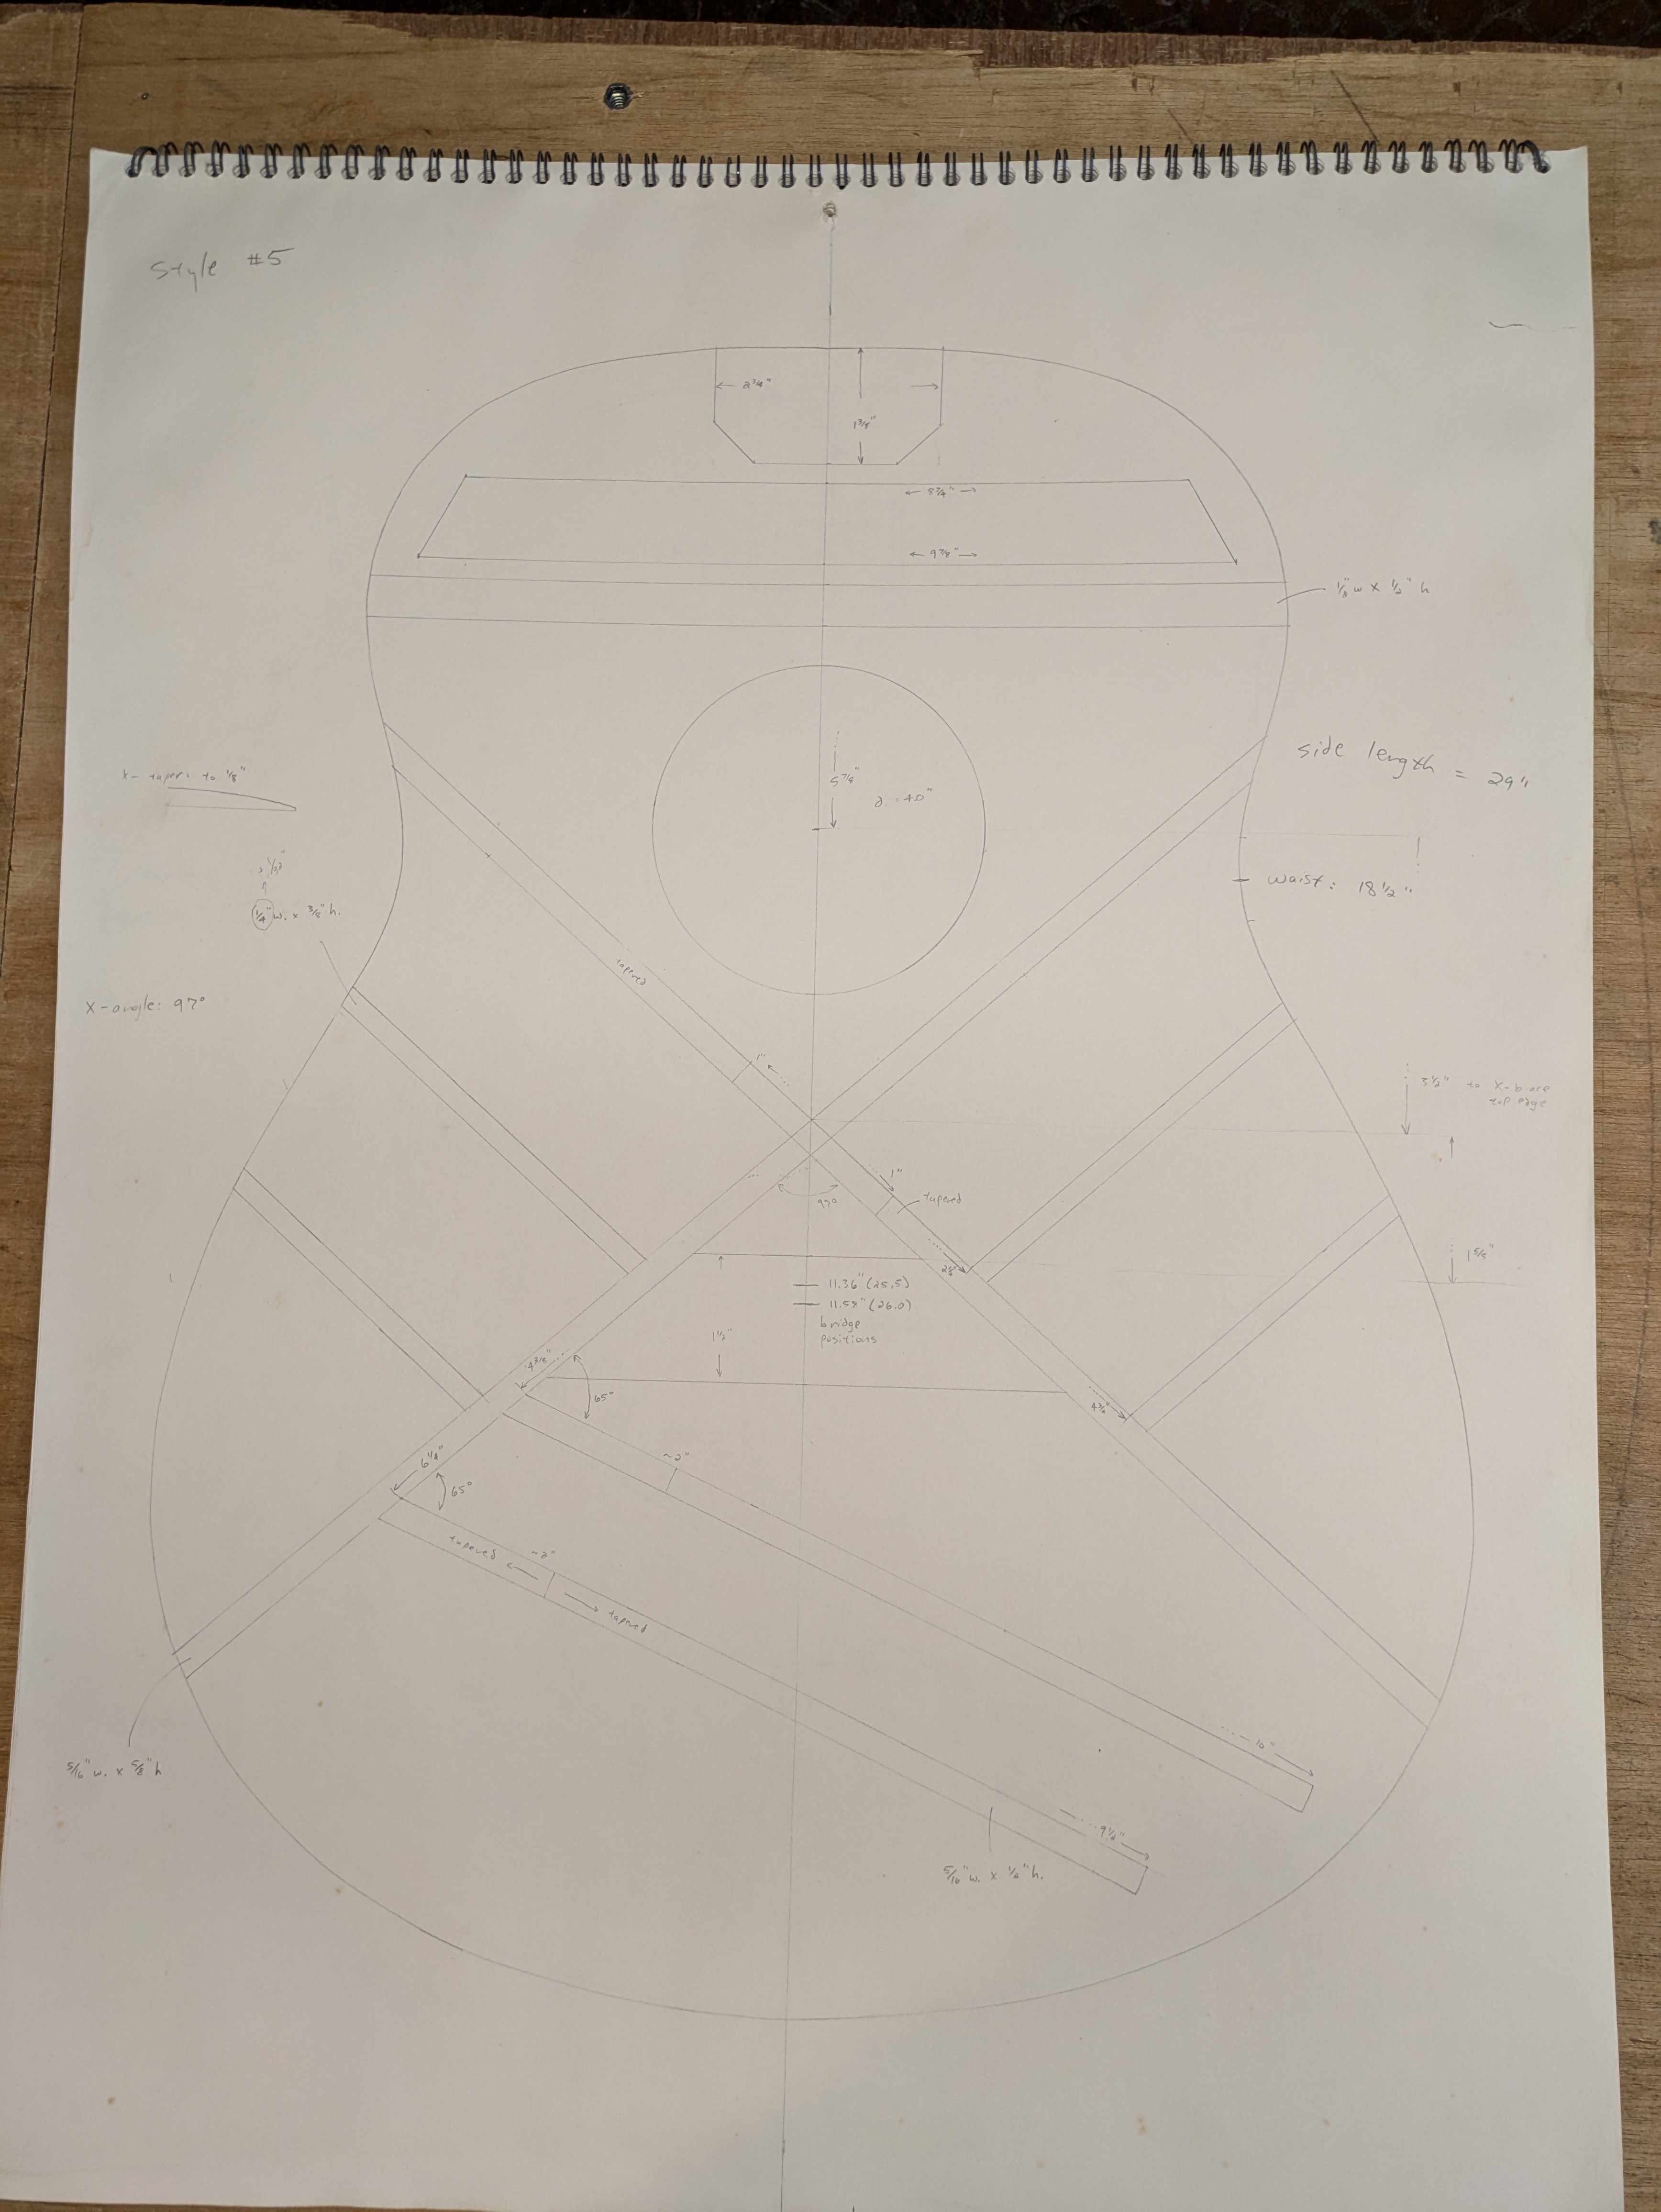
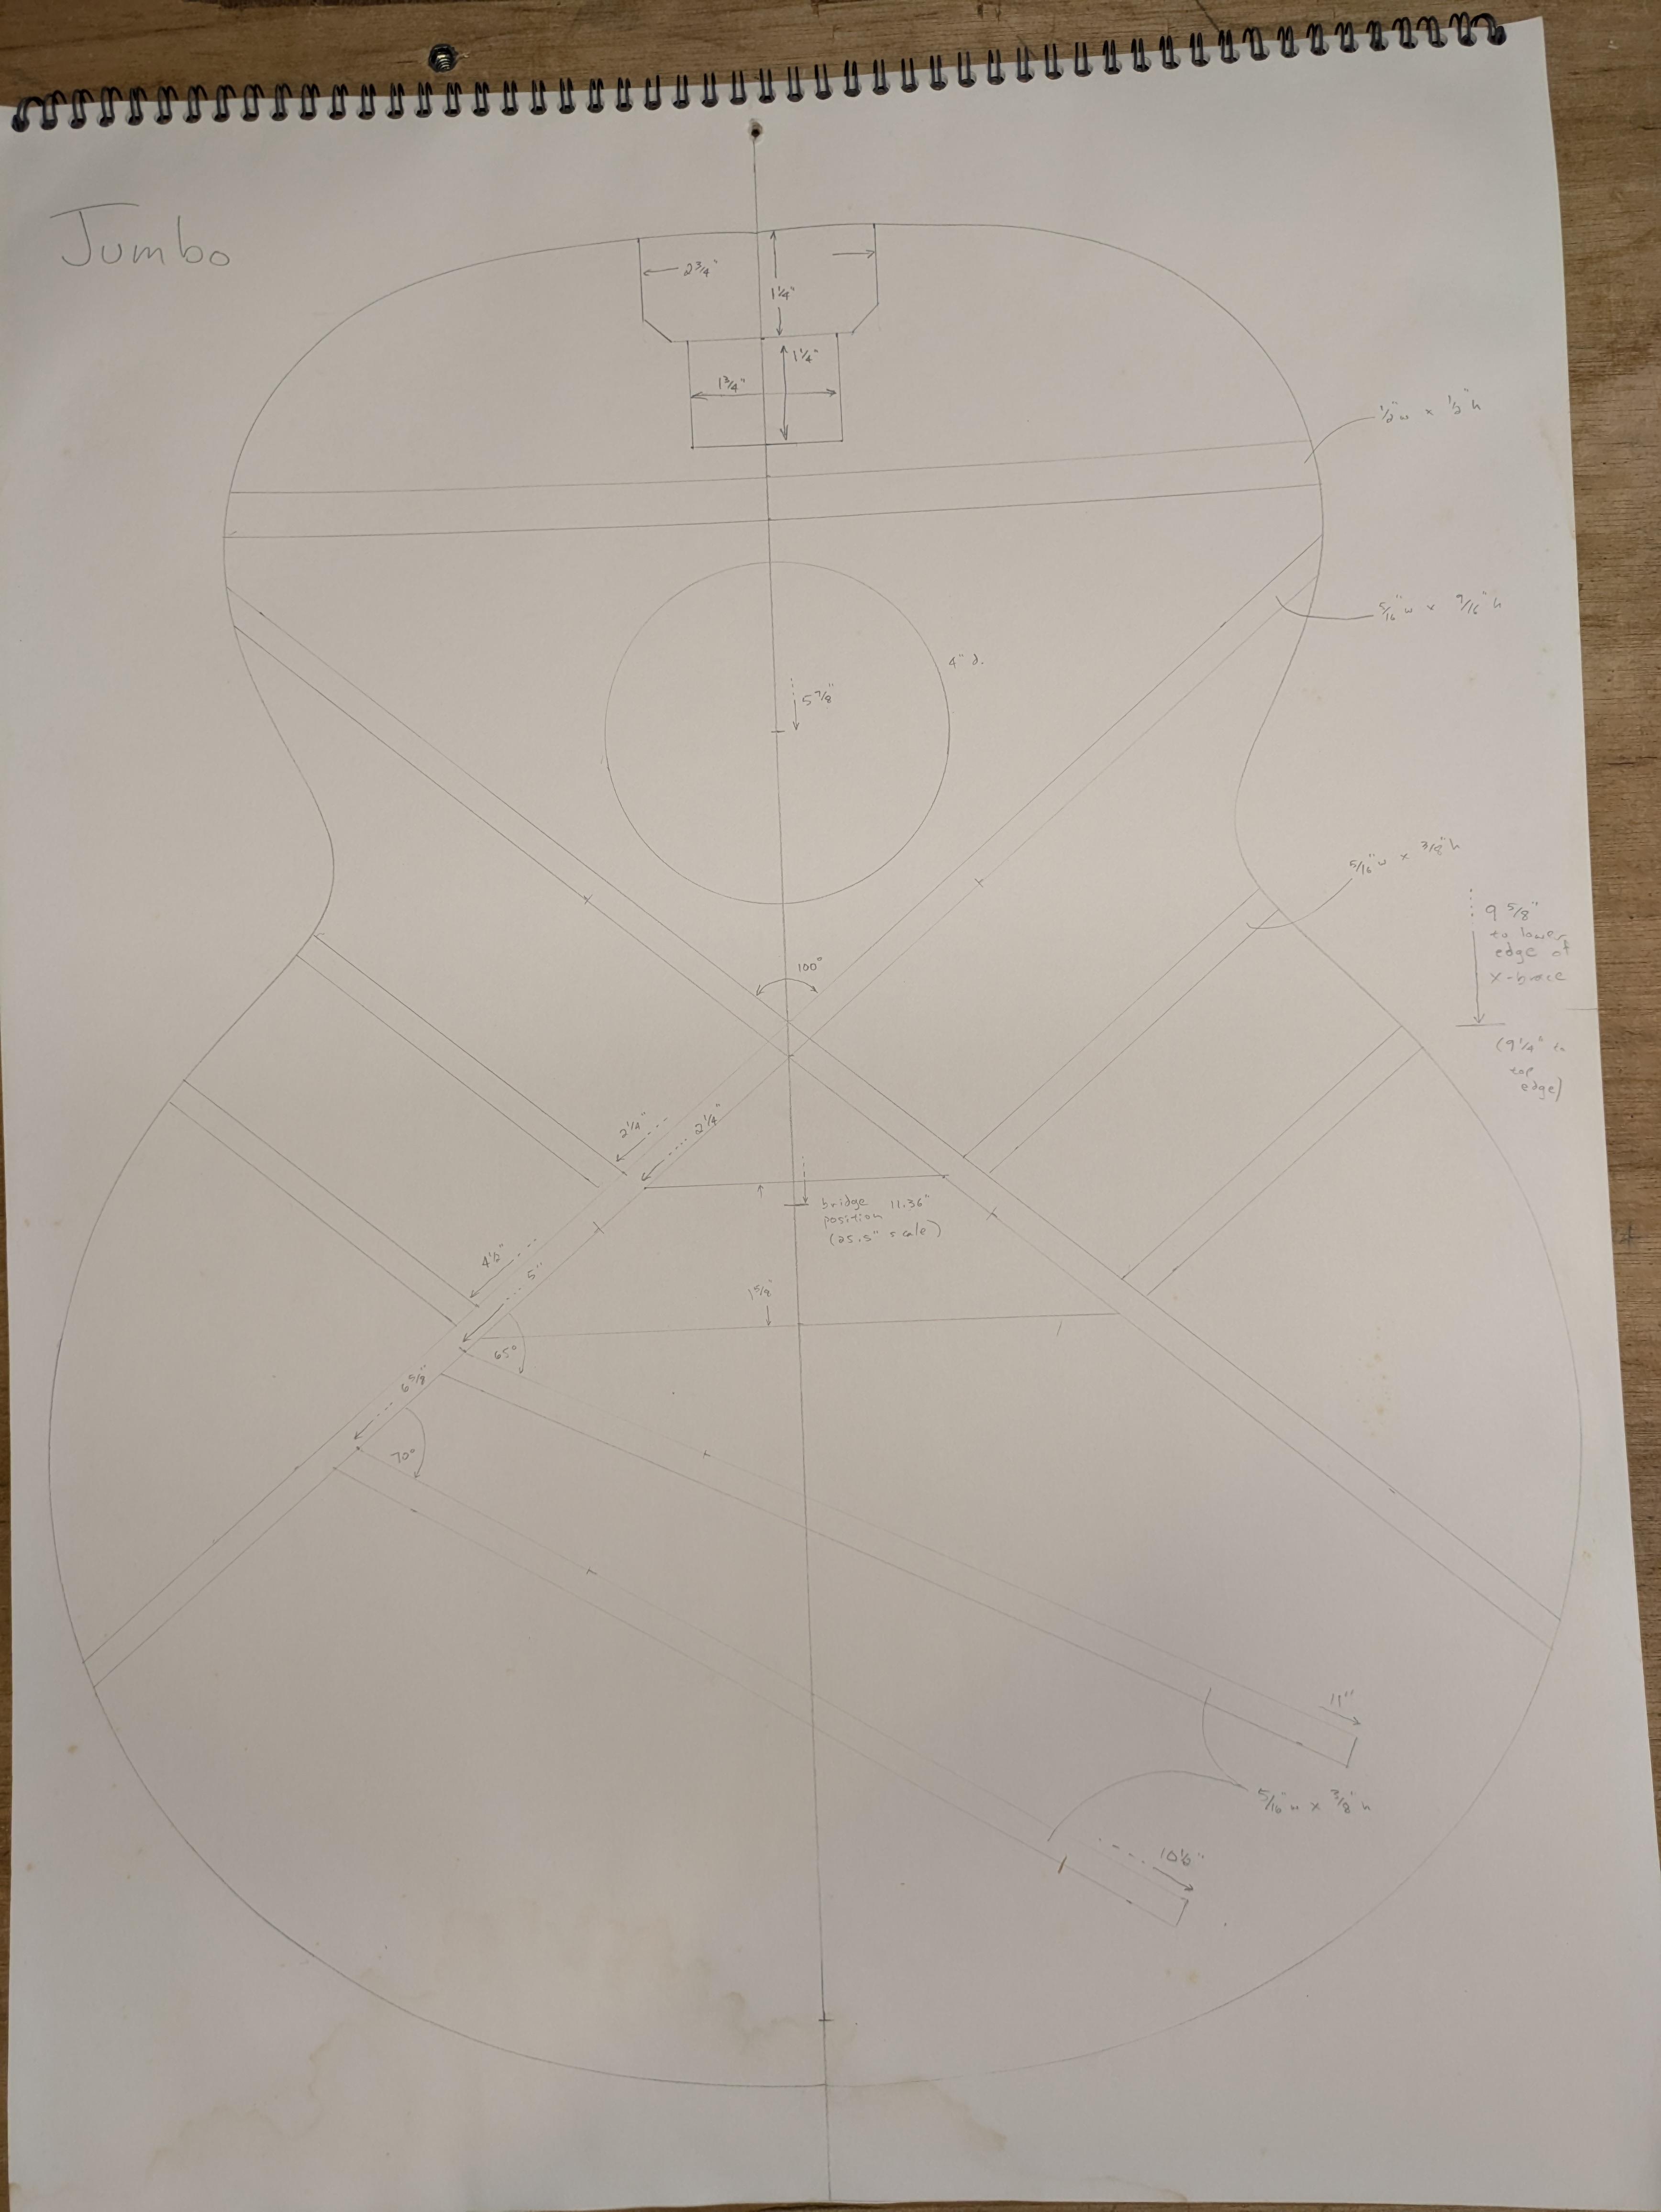
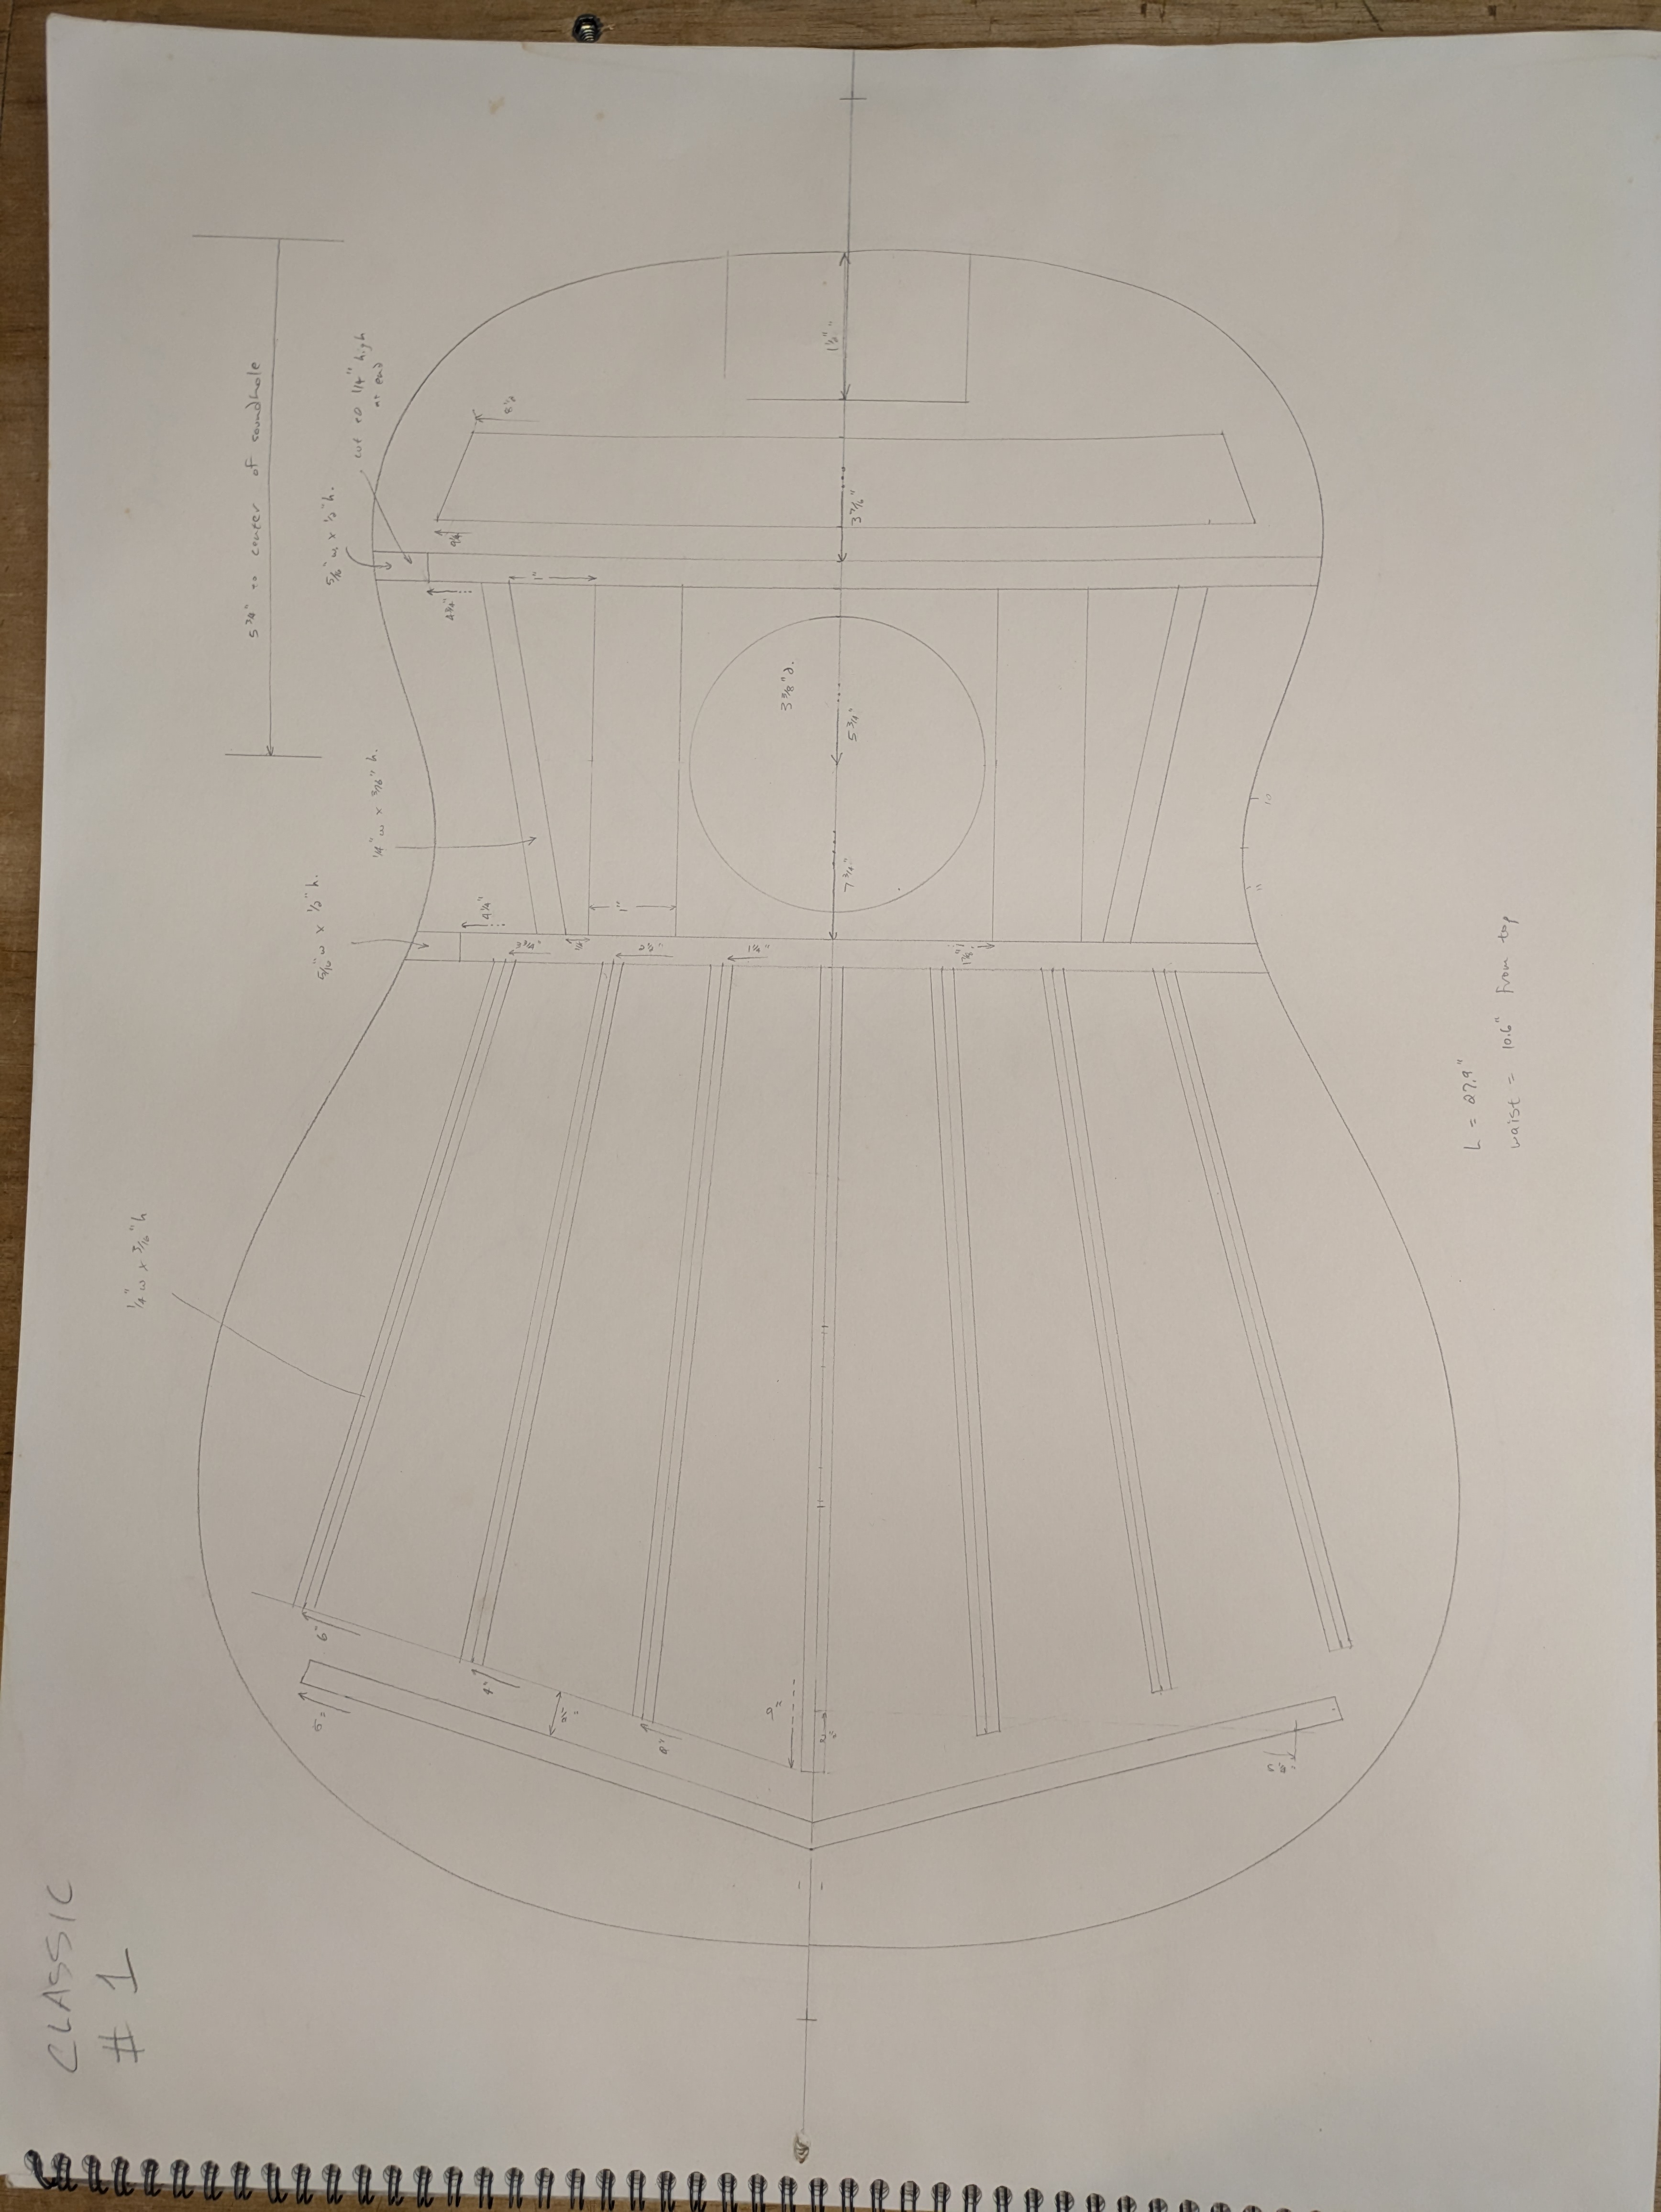
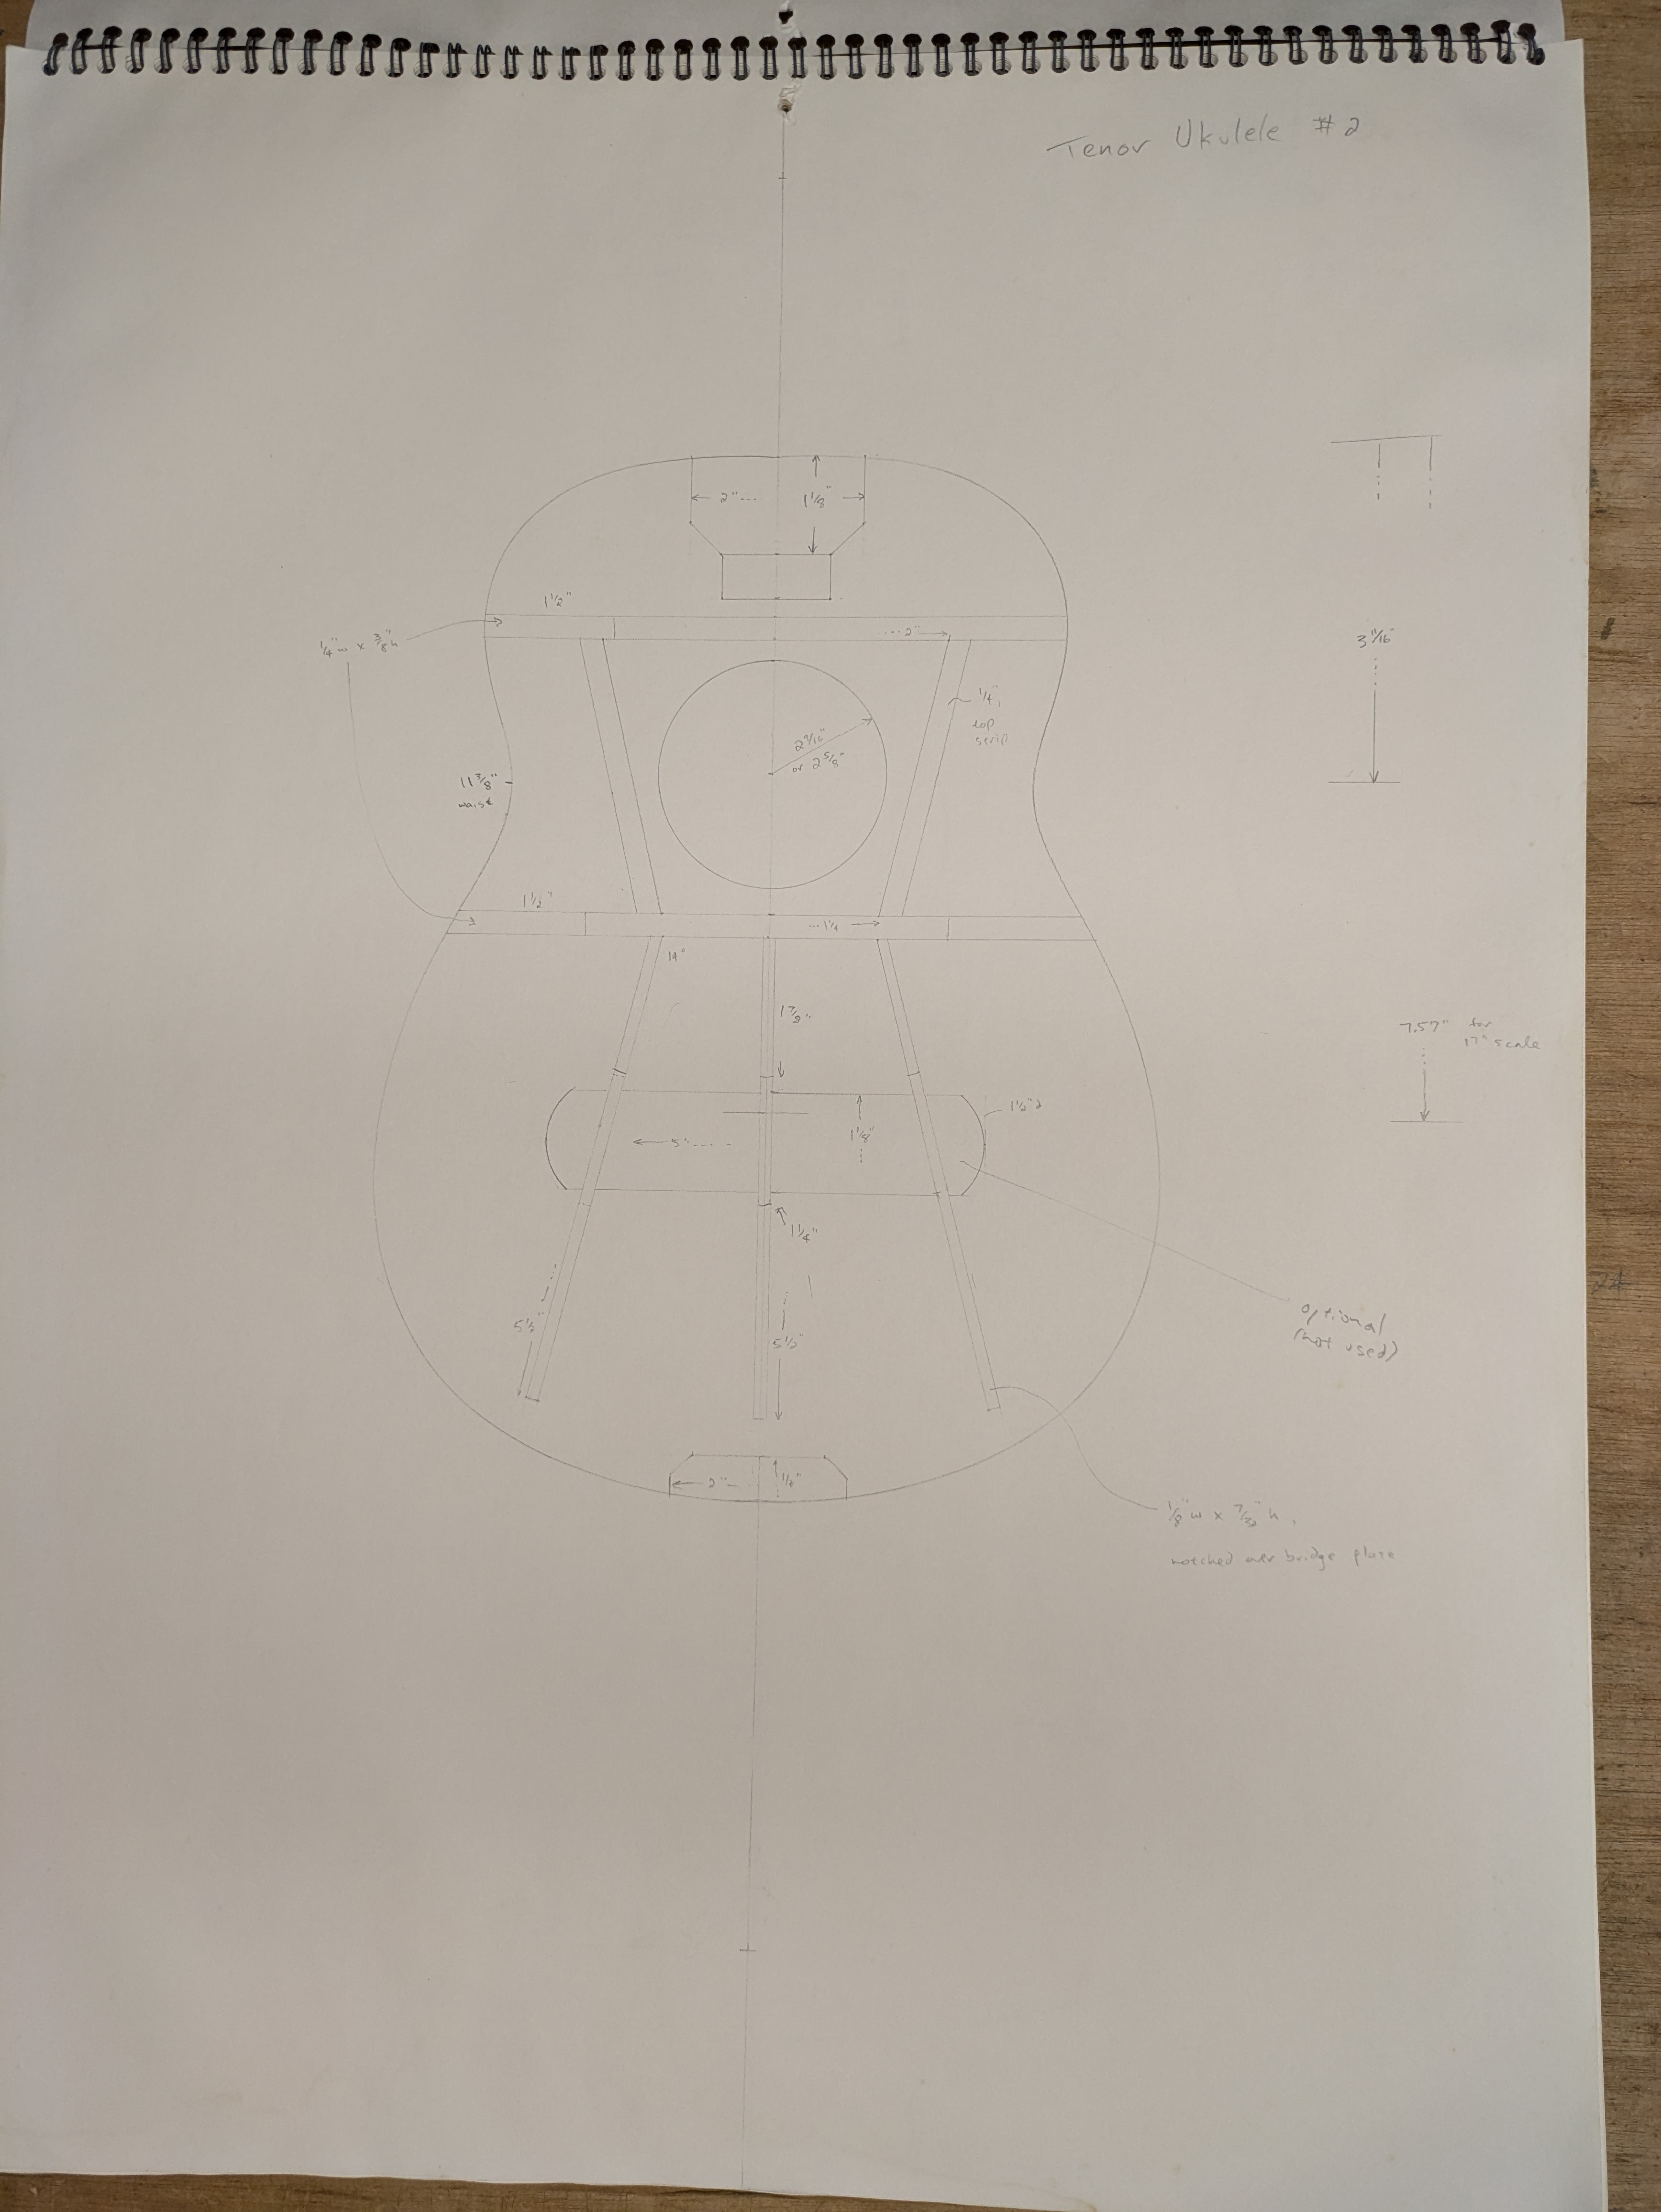
Bracing
Bracing of the top is another area in which there is lots of variation among builders, although generally on a common theme. Most flat-top acoustic guitars use some form of X-bracing, in which the primary structural support on the underside of the top is a pair of braces forming an X whose center is just below the lower edge of the soundhole. This gives the top strength against the substantial pull of the strings while allowing the thin top to vibrate relatively freely. The X brace is generally supplemented with a number of other structural braces, including a cross brace across the upper bout and small struts running from the legs of the X brace to the sides.

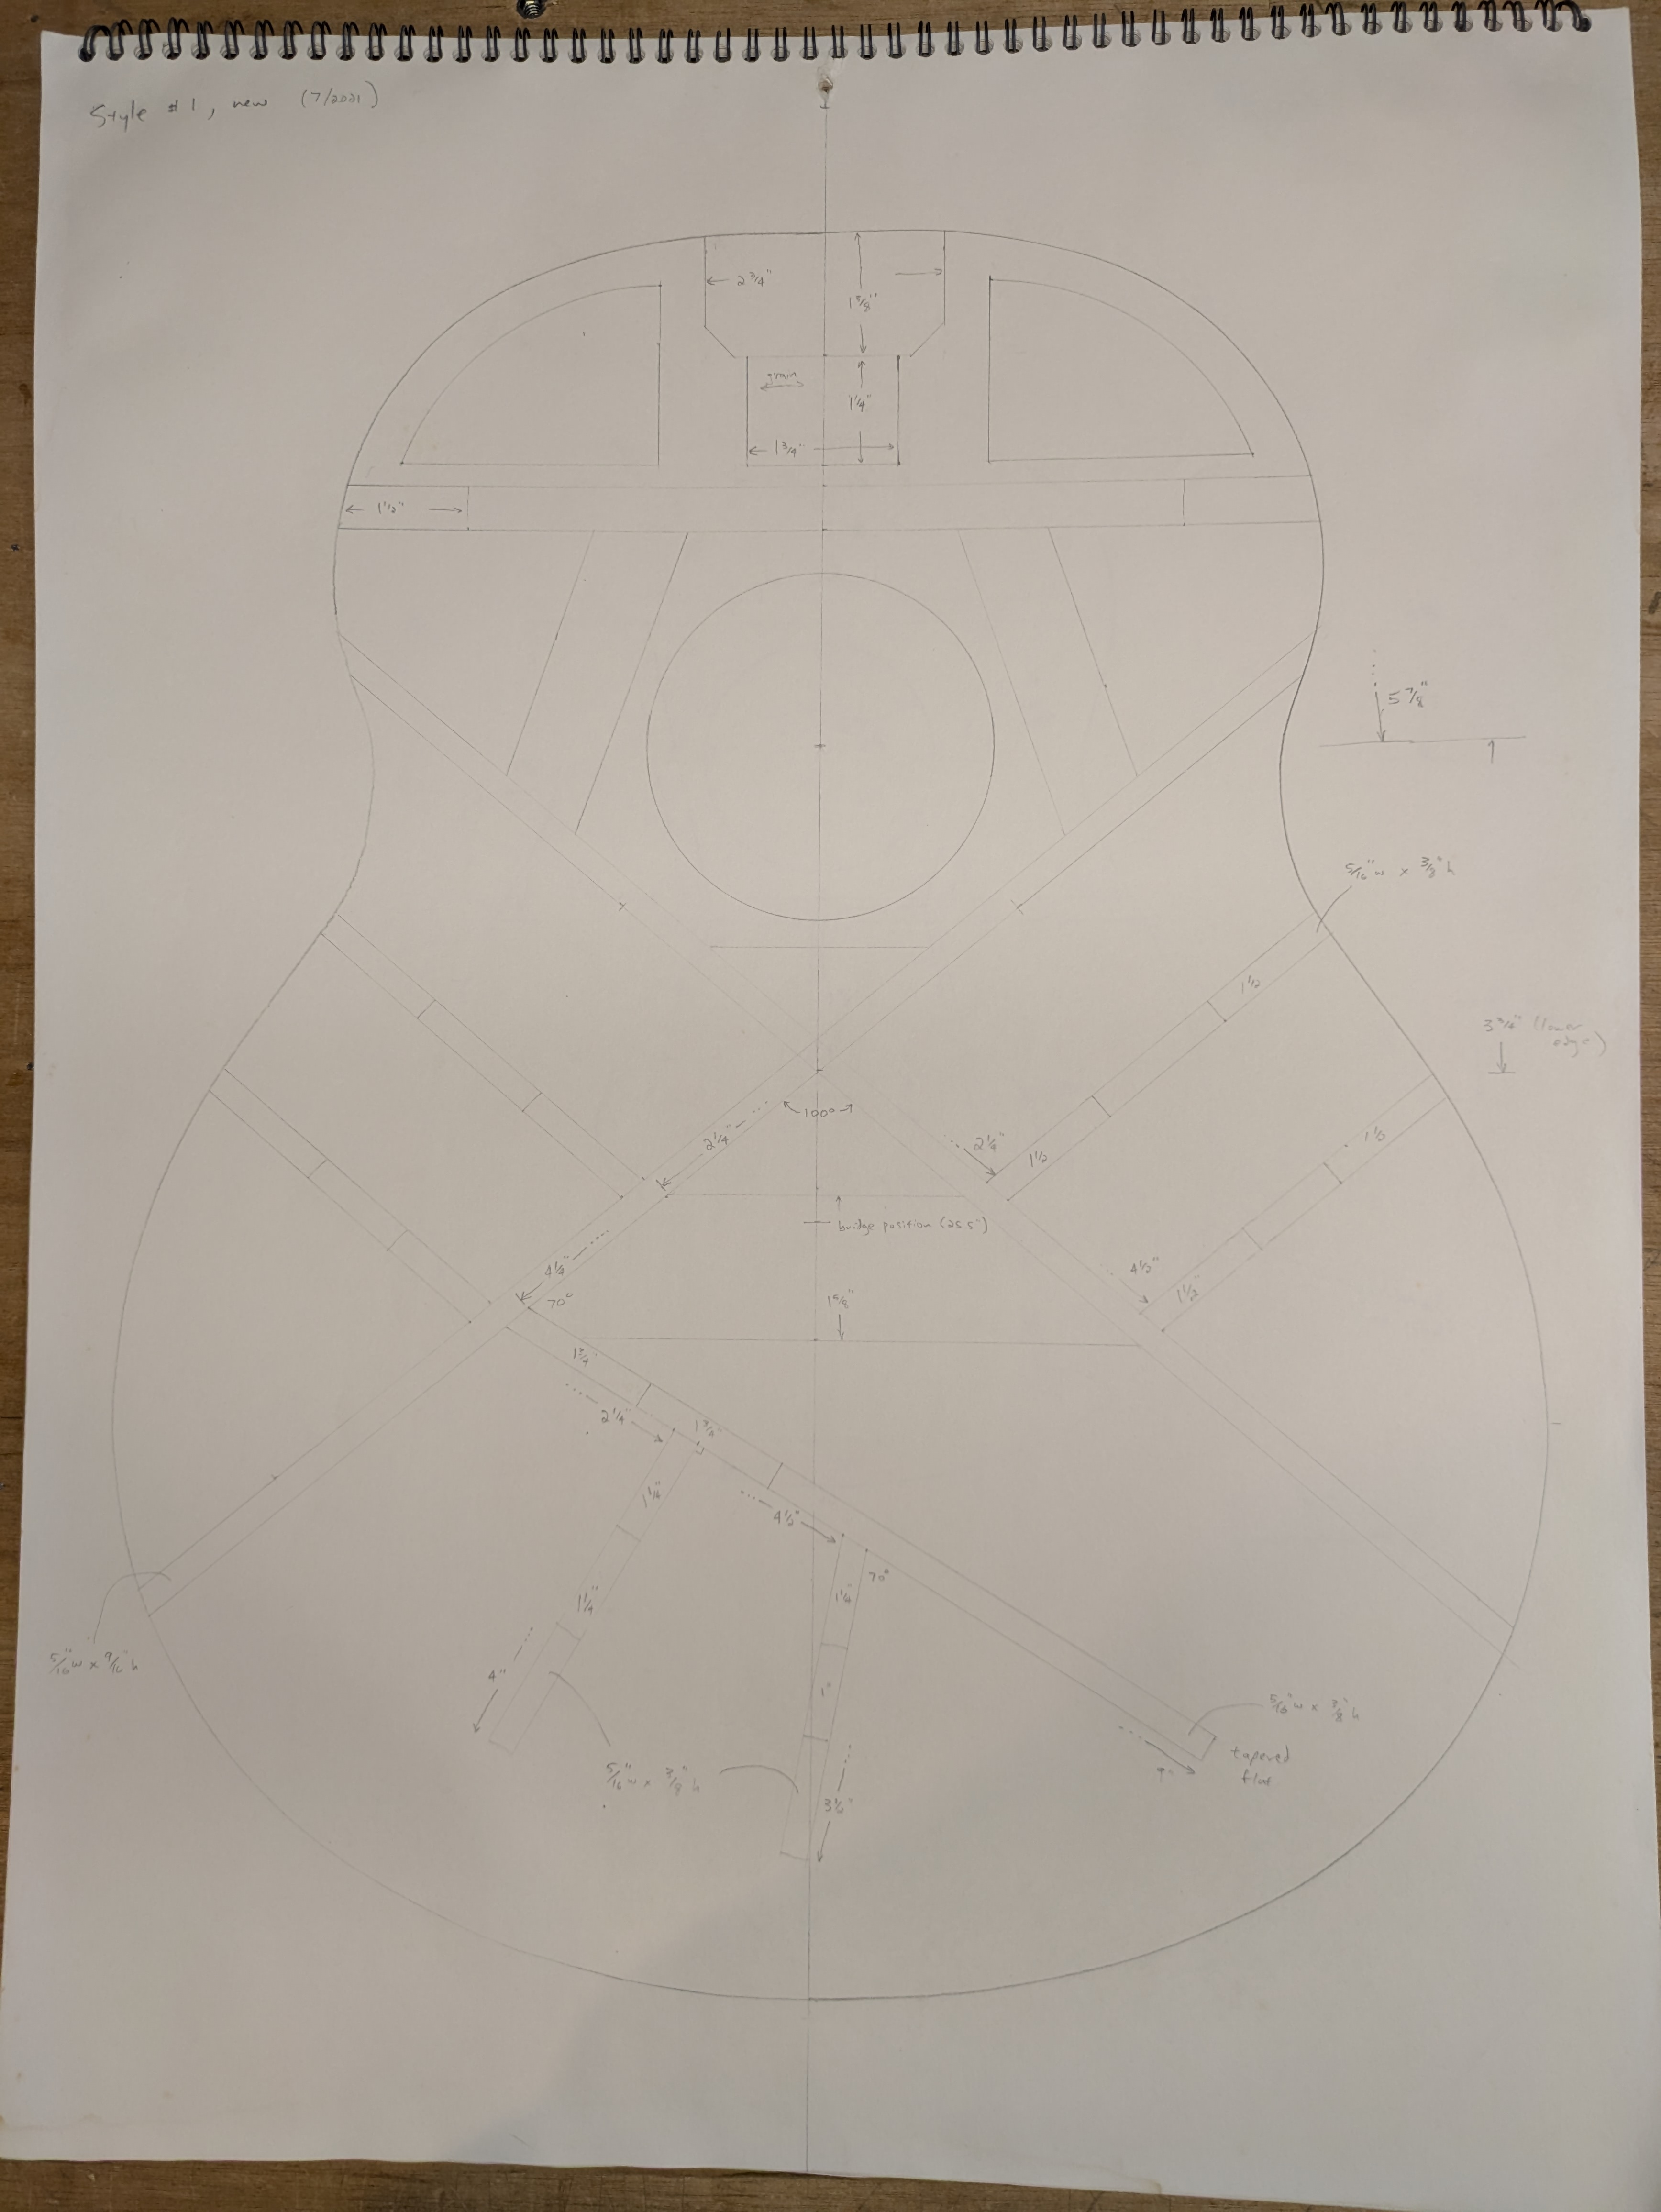
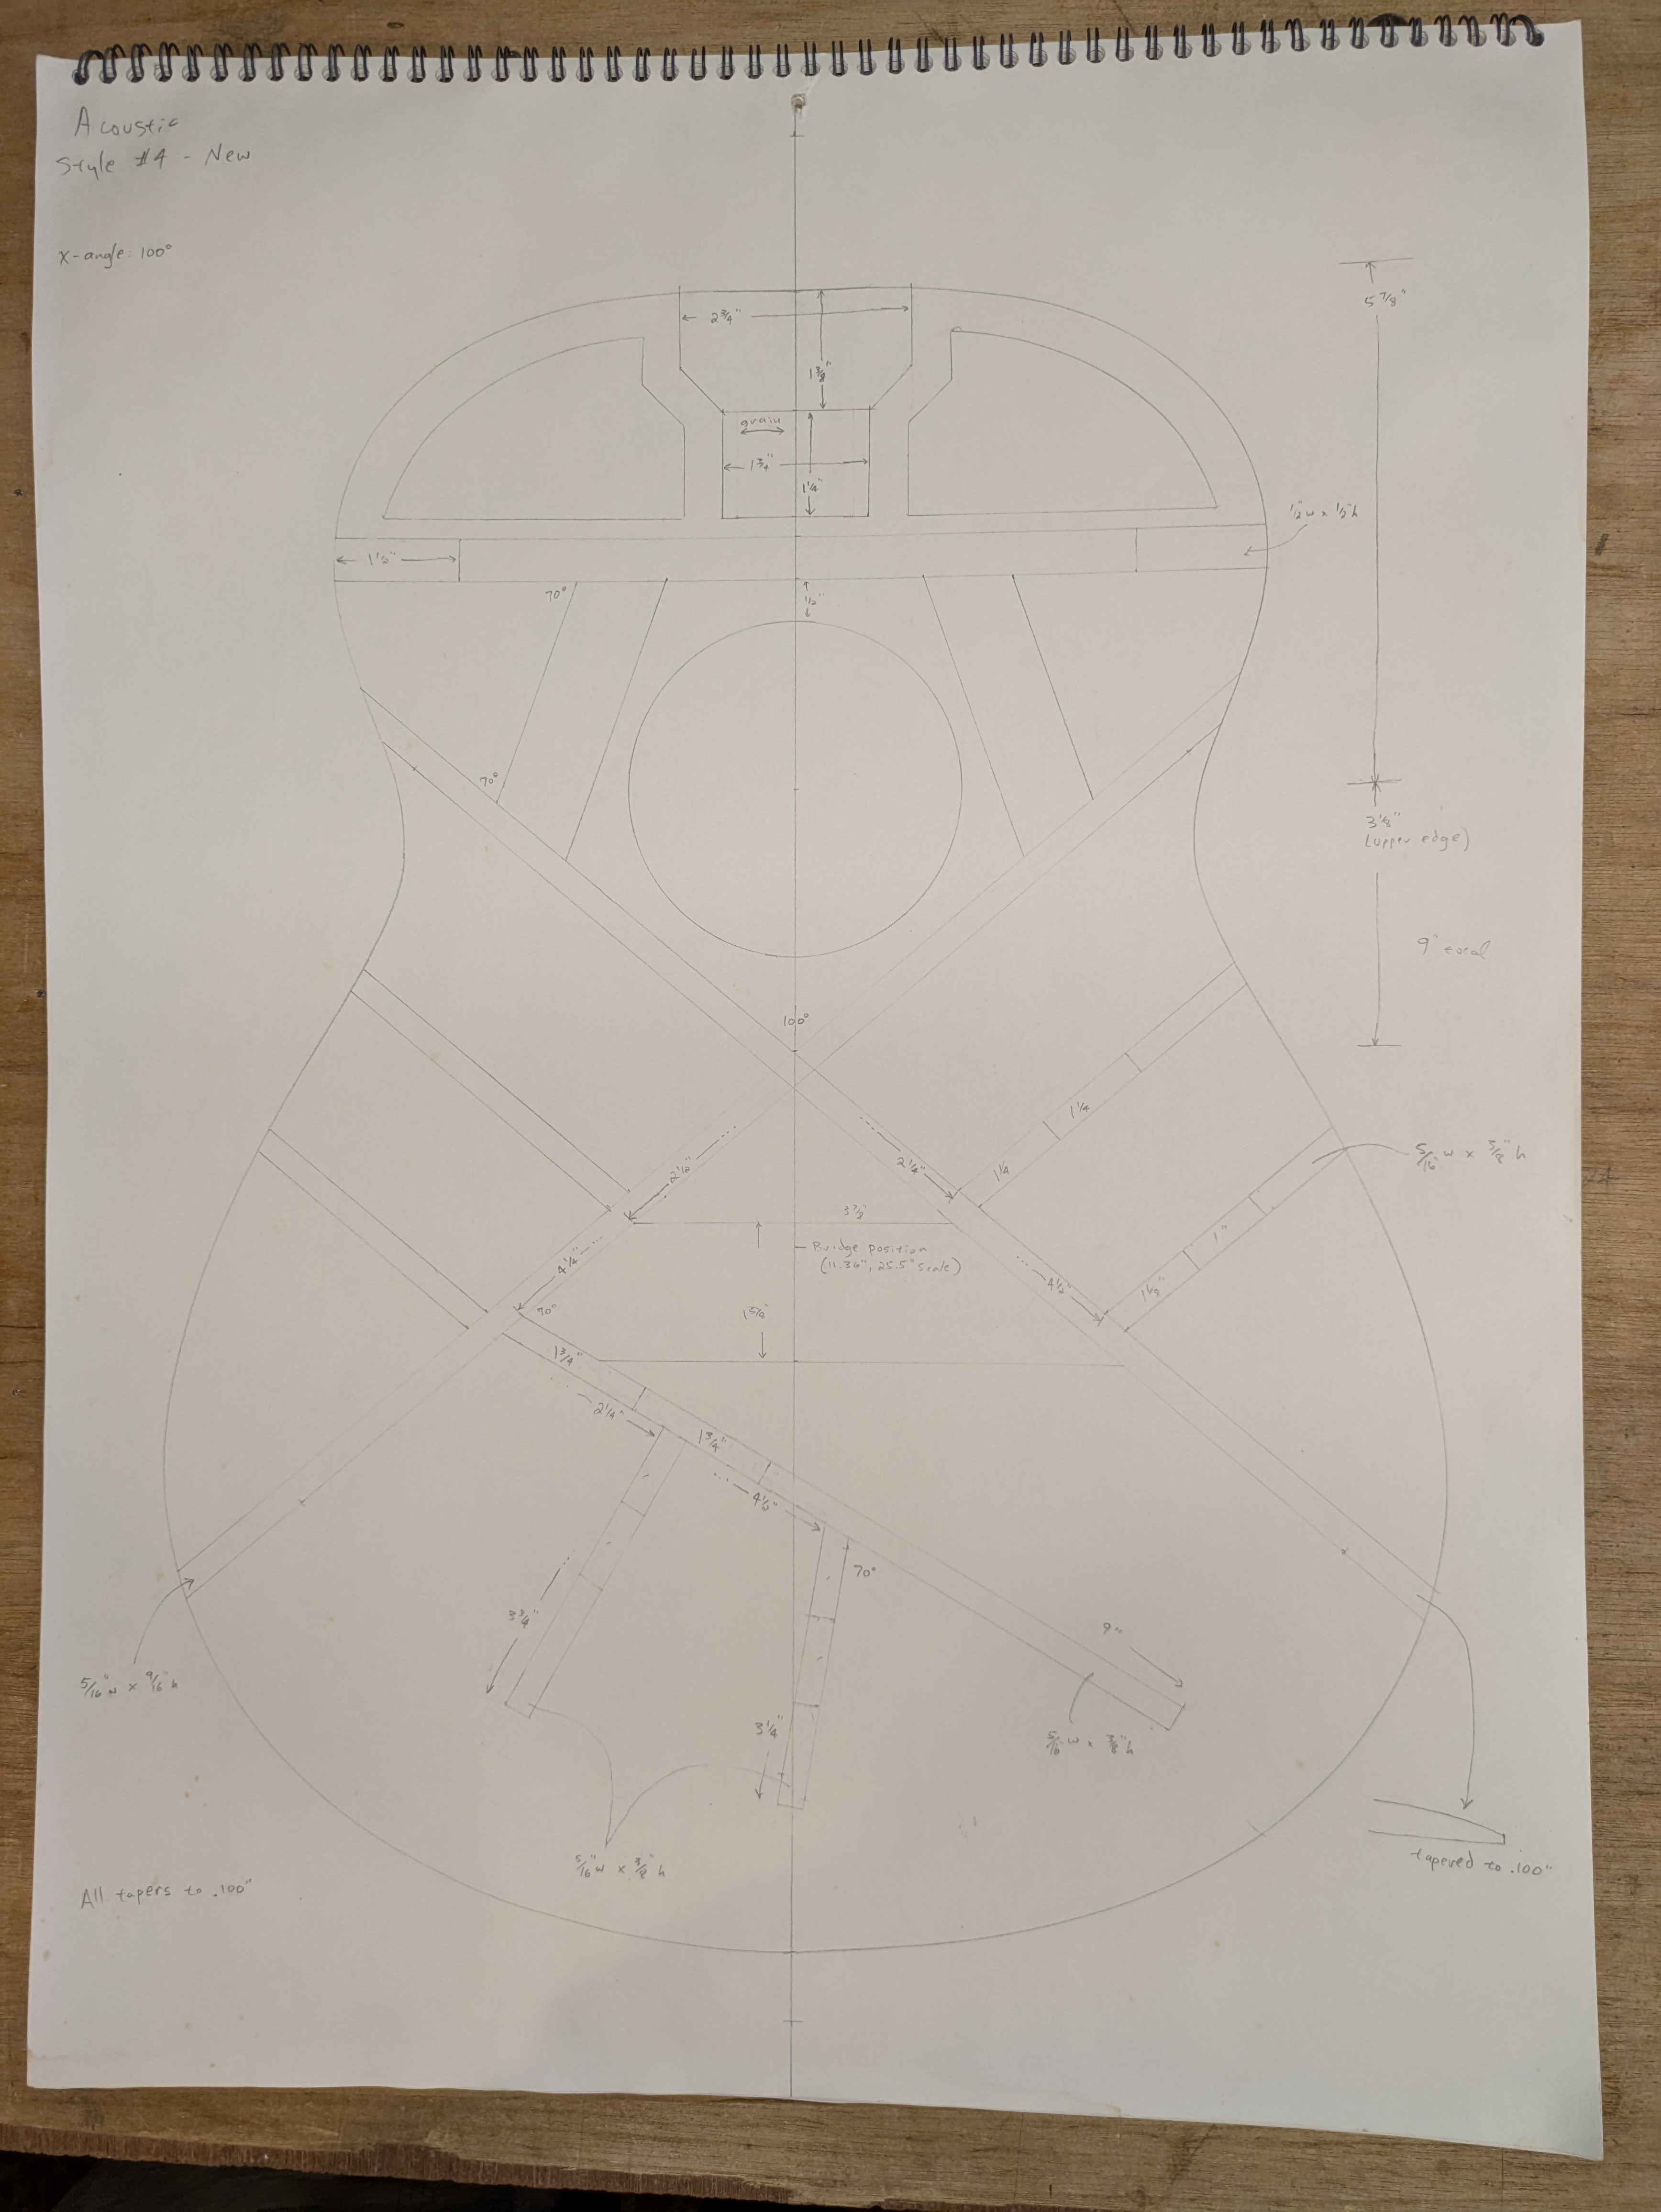
Some of the parameters for the X brace are the brace dimensions (width and height), the position of the crossing point, and the angle formed where the braces cross. These have both structural and tonal importance. Braces that are too large (width and/or height) will restrict the top from vibrating freely, while those that are too small will allow the top to deform excessively from the pull of the strings. The angle between the braces has a similar effect: too narrow an angle will restrict the lower bout from vibrating, while too wide an angle won’t adequately resist the string tension. For my guitars, I’ve settled on X-brace dimensions of 5/16″ wide by 9/16″ high, and an angle of 100 degrees.
Additionally, there are usually some “tone braces” in the area of the lower bout whose role is tonal rather than structural. Their job is to control the vibration of the top and thus affect the voice of the instrument. However, there’s very little consensus on where these tone braces should be located and what their exact effects are. (In fact, I heard the founder of a very well know manufacturer of guitars say during a talk at a lutherie conference some years back that you might as well just apply glue to the tone braces and throw them onto the top at random!) You can find lots of information about top bracing online, discussed on various musical instrument making forums. The images at the links below detail the bracing patterns that I’ve used on my guitars, including a jumbo style, a ukulele and a classical guitar.
- Style 1 bracing
- Style 2 bracing
- Style 4 bracing
- Style 5 bracing
- Jumbo bracing
- Classic bracing
- Ukulele bracing
Addendum: Top Arching
Despite the fact that these are called flat-top guitars, most builders today actually build the top so that it is slightly arched, with the top surface being part of the surface of a sphere of very large radius (typically in the range of 25 feet). This arching actually mirrors somewhat the bulge found in the top of older guitars that were built with truly flat tops; this developed bulge is often considered to be one factor in why the tone of guitars often improves over time. From a structural standpoint, top arching helps to resist both further bulging due to the pull of the strings and the tendency of the top to rise and fall with humidity changes. But this topic is a little beyond the focus of this article, which is more on aesthetics. There are lots of online sources discussing top arching and how to achieve it. I have a short article here on the topic.